Samsung Galaxy A5 2017 Display Replacement Guide
Duration: 45 minutes
Steps: 13 Steps
be careful not to compromise the waterproof sealing
it should function normally after this step
or it might lose its water-protection features
you’ll need some replacement adhesive to get the job done
Hey there, tech-savvy friend! This guide will walk you through swapping out the display on your Samsung Galaxy A5 (2017). Heads up, opening up your phone will break the waterproof seal. No worries though, your phone will still work like a champ even without the water protection. This guide focuses on replacing just the display, leaving the original frame, brains (logic board), and battery in place. But, some replacement screens come pre-installed in a new frame, which means a whole different game! So, make sure you’ve got the right part before you start. Just a heads up, separating the display from the frame usually sends the display to the great beyond. So, only follow along if you’re committed to replacing the display. You’ll need some replacement adhesive to stick that new display and back cover back together when you’re done. Need a helping hand? You can always schedule a repair with Salvation Repair. Let’s do this!
Step 1
That Samsung Galaxy A5 (2017) adhesive is strong stuff! Don’t worry, we’ve got this. If you’re having trouble getting it open, a hair dryer, heat gun, or hot plate might be your new best friend. Just be careful not to overheat the phone—those fancy AMOLED displays and the battery are sensitive to heat. If you need help, you can always schedule a repair.
– First things first, let’s keep it safe—power down your phone before we dive into the disassembly. Safety first, right?
– Grab your trusty iOpener and let’s get that stubborn adhesive under the back cover to loosen up. Stick it on for a solid two minutes and don’t hesitate to repeat this a few times if the cover is feeling a bit clingy. We’re not in a rush!
Tools Used
Step 2
If you’re having a tough time sliding that opening pick between the back cover and the frame, don’t fret! A suction handle can help you create just the right little gap to get started.
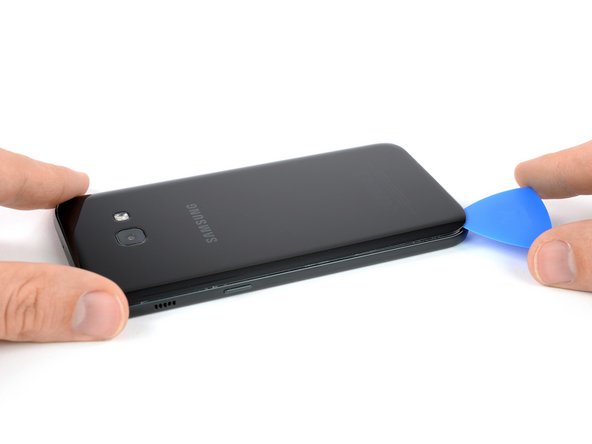
– Let’s get this party started! Insert an opening pick at the bottom of your phone.
– Slide the tip of the opening pick to the bottom left corner. You’re cutting the adhesive like butter!
– Leave your trusty opening pick in the corner to keep the adhesive from sealing itself back up. Grab another opening pick and start cutting the adhesive on the left side of the phone.
Tools Used
Step 3
If the adhesive is putting up a fight, feel free to bring in an iOpener for backup! Remember, the back cover is always under a bit of pressure during removal, so keep that adhesive nice and loose to avoid any breakage.
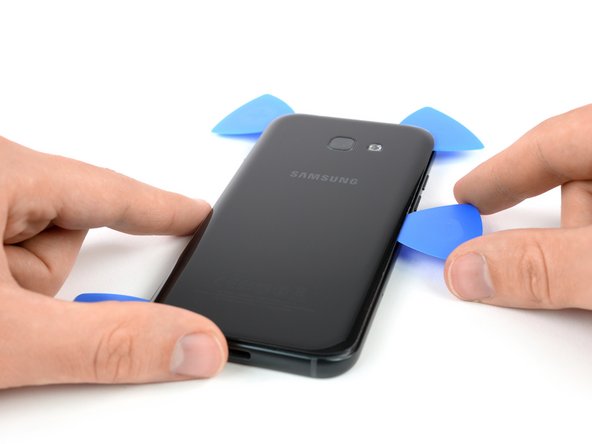
– Let’s get this phone open! Use an opening pick to carefully cut the adhesive on all sides. Think of it like giving the phone a little trim. Leave one opening pick in each corner to keep things from sticking back together.
– Time to pry things apart! Slide an opening pick onto the right side of the phone. Then give it a little wiggle. Once you have a good grip, gently lift the back cover off. You’re almost there!
Tools Used
Step 4
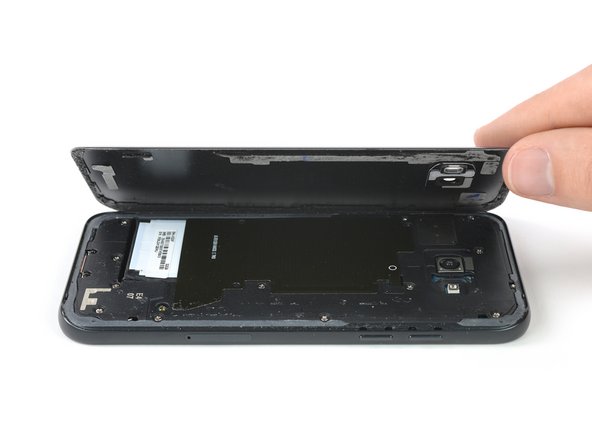
– Let’s get started by gently popping off the back cover of your phone. It’s like peeling a banana, but way cooler!
– Before you slather on that fresh adhesive, make sure to clear away any leftover sticky stuff from both the back cover and the frame. Grab some isopropyl alcohol and a lint-free cloth to give those surfaces a nice, clean shine. You’re almost there!
Step 5
– Let’s take out those eight Phillips #00 screws keeping the motherboard cover snug as a bug!
Step 6
– Time to get started – use a pair of tweezers to carefully lift the motherboard cover on both upper corners of the phone out of its clamps. Take your time, it’s easier than it sounds!
– Now, remove the motherboard cover, which includes the NFC antenna and the loudspeaker. If you need help, you can always schedule a repair
Tools Used
Step 7
– Grab your trusty spudger and gently use the flat end to disconnect that battery flex cable. You’ve got this!
Tools Used
Step 8
– Now it’s time to disconnect the display flex cable – simply use the flat end of a spudger to get the job done. If you need help, you can always schedule a repair
Tools Used
Step 9
Safety first, my friend! Put on those safety glasses to keep any rogue glass shards from messing with your awesome peepers during this repair. 😉
Got a cracked display glass? No worries! Just slap some tape over it to keep the shards in check and protect yourself while you work your magic on the repair.
To get your phone feeling toasty, you might find yourself reheating the iOpener a few times. Just follow the instructions and keep an eye on the heat to avoid any mishaps.
– Get your iOpener ready, and warm up that display for at least two minutes. We gotta loosen things up a bit, right?
– Now, let’s cover the display with clear packing tape, making sure the strips overlap. Think of it like giving your screen a little safety hug.
– This keeps any glass pieces from going rogue, and makes it super easy to pry and lift the display without any drama.
Tools Used
Step 10
Hey, that flex cable is hiding back there near those volume buttons, so be careful with your tools!
– Alright, let’s get this display nice and toasty! Once it’s warm to the touch, stick a suction cup to the top of your phone.
– Now, give that suction cup a little lift and slide an opening pick under the display. We’re going to be best friends with this tool.
– Time to loosen things up! Slide that opening pick along the top edge of the phone. Leave it in place to keep the adhesive from sticking back together.
– Keep on sliding that pick along the side of the phone, towards the bottom. We’re almost there!
Step 11
Be careful when working with the display assembly – the home button and soft key cables are tucked away beneath the bottom part. Just insert the tip of your opening pick to avoid any damage.
– Start by leaving an opening pick on the bottom left edge of the phone – this will come in handy later to prevent the adhesive from resealing.
– Next, carefully slide the tip along the bottom edge of the phone to cut through the adhesive. Take your time and be gentle.
– Keep cutting the adhesive on the remaining sides of the phone, and don’t forget to leave an opening pick in each corner. If you need help, you can always schedule a repair
Step 12
Hold up, partner! Don’t go opening that phone all the way just yet. The display cable is still hangin’ out, and you don’t want to yank it loose. Those home and menu buttons are precious.
Take a peek and make sure those home button and soft key button cables aren’t stuck to the display assembly before you pull it off completely. We don’t want any accidental disconnections, right?
– Gently pry up the top edge of the display assembly, and carefully guide the display flex cable through the mid frame – it’s like threading a needle, but way cooler.
– If one of the cables gets stuck to the display, don’t worry, just use a pair of tweezers or an opening pick to carefully peel it off. And remember, if you need help, you can always schedule a repair
Tools Used
Step 13
– Gently detach the display assembly from the phone, like peeling a banana—smooth and steady!
– Before putting everything back together, take a moment to clean off any leftover adhesive from the frame. Just grab some isopropyl alcohol (97% or higher) and a lint-free cloth or Q-tip, and wipe it down. Trust us, your phone will thank you!


