Samsung Galaxy J6 Teardown
Duration: 45 minutes
Steps: 9 Steps
Today, we’re diving into a rather unassuming device—the latest addition to Samsung’s mid-tier Galaxy J series, the J6. Launched alongside the J4 and J8, you might wonder what makes it stand out? Well, it’s about to get the teardown treatment! Its predecessors, the J3 and J5, have won the hearts of our Latin American and Spanish-speaking repair enthusiasts. Since they asked for this with a polite ‘por favor,’ we’re thrilled to oblige. Let’s uncover the secrets inside the J6! And to stay updated on all our teardown adventures, don’t forget to check us out on Instagram, Twitter, and Facebook.
Step 1


– Heads up: the J6 joins the squad this year alongside the J3, J5, and J7 models.
– Here’s a quick rundown on the specs:
– 5.6-inch Super AMOLED screen, popping with a 720 × 1480 resolution
– Octa-core Exynos 7870 processor (1.6 GHz, Cortex-A53) and a solid 3 GB RAM for smooth moves
– 32 GB built-in storage (plus room for a 256 GB microSD for all your stuff)
– Snapping pics? 13 MP main camera on the back, 8 MP selfie cam up front
– Size matters: 149.3 × 70.2 × 8.2 mm, weighing in at just 154 g
– Running on Android 8.0
Step 2


– As you check around the outside, you’ll spot a classic Micro-USB port—and look, there’s a headphone jack hanging out right next to it.
– Our J6 teardown unit is the Duos model, so you’ll find an extra SIM slot and an SD card slot conveniently located on the side.
Step 3

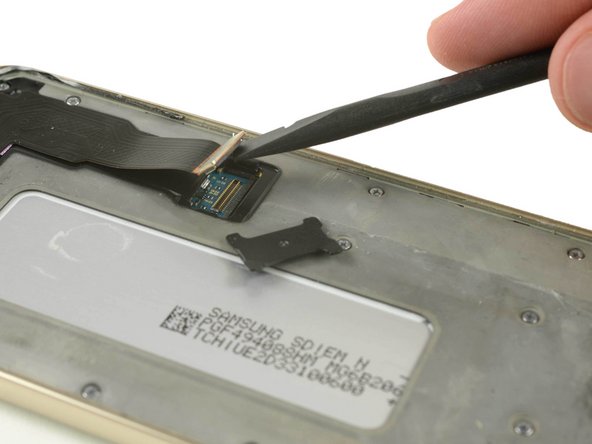
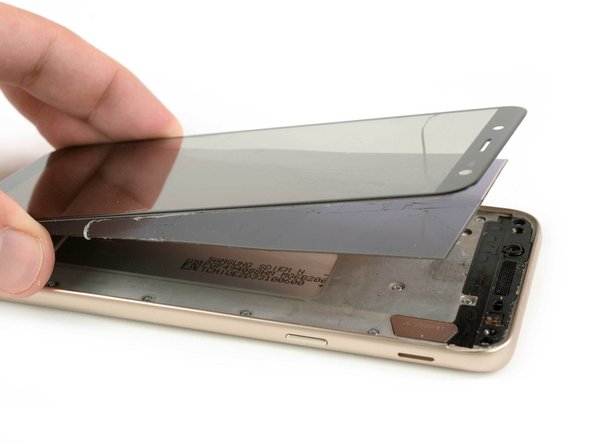
– Since there are no exterior screws to guide us, we start by trying to pry open the back cover as a potential entry point—though after some heating and gentle prying that doesn’t go as planned, we switch gears and focus on the display instead. Using an iOpener and iSclack, the touch panel appears to come away pretty smoothly. Is this a non-bonded, old-school style display? Not quite—turns out, a super-strong adhesive under the sAMOLED panel kept it glued tight, even as the touch layer gave way. The final step involves unplugging the protected connector and carefully removing the now-free display assembly to keep moving forward. If you need help, you can always schedule a repair.
Tools Used

Step 4


– Looks like those outer screws are already hard at work holding the midframe together.
– Time to grab your trusty Mako Driver Kit and unscrew a handful of Phillips screws.
– With those out of the way, you can gently pop off the midframe.
Step 5


– On the opposite side of the midframe, the battery is tucked away—secured with some strong adhesive. Using a bit of gentle heat and patience, carefully loosen it up so you can pry out the power pack for inspection. It measures in at 11.55 Wh (3,000 mAh at 3.85 V), which is about the same as last year’s J5, but a tad less than the 2017 J7 Pro’s 3,600 mAh. If you need help, you can always schedule a repair.
Step 6


Yeah, this step takes away a bit of the ‘J’ in J6, but hang in there—there’s more to come!
– First up, we carefully take out the 8 MP front-facing camera hanging out at the top, then move down to remove the 3.5 mm headphone jack at the bottom.
– Unfortunately, the USB charging port is soldered directly onto the motherboard—so it’s not coming out easily or getting a quick fix here.
Step 7


– Alright, let’s get started by carefully taking out the motherboard…
– Now, gently remove the 13 MP rear camera, complete with its ƒ/1.9 aperture.
Step 8


– Let’s take a look at the front of the motherboard, where you’ll find some interesting components:
– Now, flip it over and check out the back, which has its own set of surprises:
– Oh, and notice those two empty spots? It seems like this board might be versatile, possibly used for different versions of the J6 that need a unique mix of chips!
– Samsung KLMBG2JETD-B041 32 GB NAND Flash Memory
– Samsung K4EHE304EC-AGCF – that’s 3 GB of memory layered over the Exynos 7870 chip, pretty cool, right?
– Samsung Shannon 515 power management IC, keeping the power in check!
– Samsung Shannon 925 RF Transceiver, ready to handle your signals!
– Skyworks Multiband Power Amplifier SKY77656-11, boosting your connection like a pro!
Step 9

– And that’s a wrap on our quick teardown! All the parts are laid out and ready for a closer look. We were crossing our fingers for a bit more modularity in this mid-range phone, but let’s take a moment to review and see how the J6 really stacks up.
Success!