Samsung Galaxy Note 4 Headphone Jack Replacement Guide
Duration: 45 minutes
Steps: 9 Steps
Ready to give your Samsung Galaxy Note 4 a little makeover? Let’s tackle that headphone jack replacement together! It’s easier than you think, and we’re here to help you every step of the way. If you need assistance, remember you can always schedule a repair.
Step 1


– Slide a fingernail or a trusty plastic opening tool into the divot next to the rear-facing camera – it’s time to get this repair started!
– Now, gently pry and twist the flexible rear cover off the back of the phone. Remember to take your time and be patient, and if you need help, you can always schedule a repair
Step 2

– Gently slide a fingernail or a trusty plastic opening tool into the little groove at the bottom right corner of the battery and give it a gentle lift.
– Now, go ahead and take out that battery!
Step 3


– Time to free that SIM card! Give it a gentle push to get it started, then pull it out the rest of the way. Easy peasy, right?
Step 4

– Alright, let’s start by taking out those sixteen 4.0 mm Phillips #00 screws holding the midframe to the display assembly. It’s like giving your device a little ‘unscrew’ massage.
– Now, grab the cap of the S Pen and give it a little tug to remove it from its slot. We’re almost there! If you need help with any of these steps, you can always schedule a repair.
Step 5


Watch out! Don’t go pulling the front glass panel away from the display assembly just yet—it’s still holding on tight with adhesive. Let’s keep it all together, shall we?
The adhesive used here is pretty gentle, so you won’t need to break out the heat gun. Just proceed with caution and you’ll be golden. If you need help, you can always schedule a repair
– Slide a plastic opening tool into the gap between the midframe and the display assembly.
– Gently run the plastic opening tool around the edges of the device to loosen that stubborn adhesive.
Step 6

– Let’s loosen up those clasps! Grab your trusty plastic opening tool and gently work it around the battery housing. You got this!
Step 7


Alright, let’s get this party started! You’ll need to give it a little oomph to get those parts separated. Think of it as a gentle hug from a strong friend.
Now, if your new midframe didn’t come with a headphone jack, don’t sweat it! You’ll need to move the old one over. Those plastic opening tools are your best friends for this. Just pop it out – it’s held in place with a few plastic pins.
Step 8

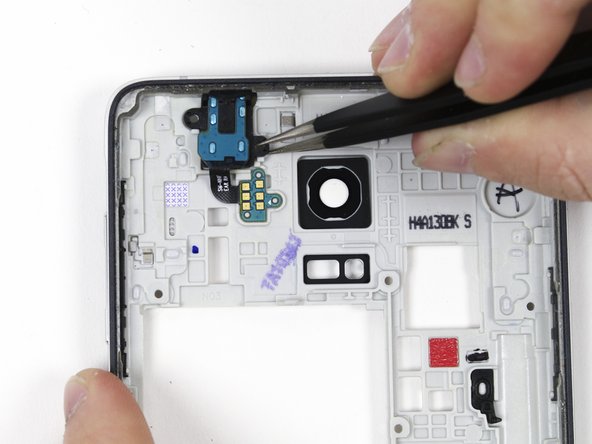
– Grab your trusty plastic spudger and tweezers, and gently work your magic to pop that headphone jack out of the middle housing. You’re doing great!
Tools Used

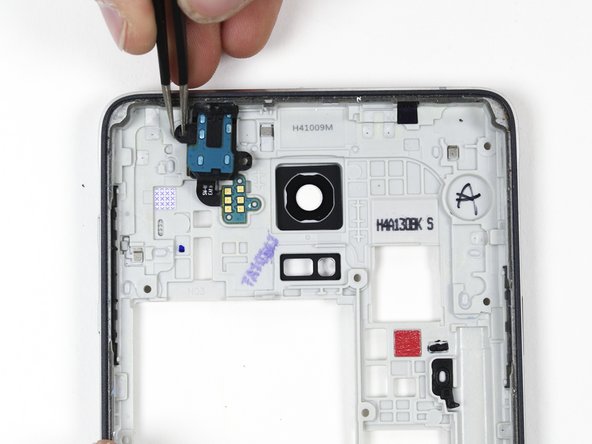
Step 9
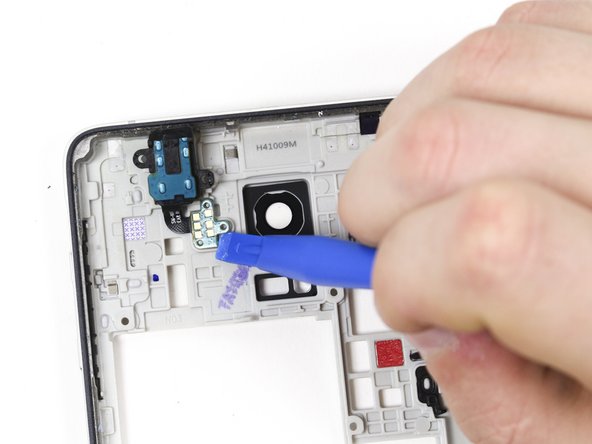

– Let’s get this headphone jack out of there! Gently pry it up from the midframe. Take your time and don’t worry, it’ll come loose. If you need help, you can always schedule a repair


