Samsung Galaxy Note20 Ultra Laser AF Sensor Replacement Guide
Duration: 45 minutes
Steps: 18 Steps
Alright, safety first! Let’s give your phone a little battery chill-out time before we start. Aim for less than 25% juice, just to be on the safe side. You know, for a smooth repair journey. 😉
Ready to tackle the laser AF sensor replacement on your Samsung Galaxy Note20 Ultra? Before you dive in, let’s keep safety first: make sure your battery is below 25% to avoid any unexpected thermal surprises during the repair process. And if your battery looks a bit puffy, just remember to take the proper precautions. You’ve got this!
Step 1

Before you start taking things apart, make sure your phone is completely powered off. You don’t want any surprises, right? 😉
If you’re using a hairdryer, heat gun, or hot plate, be careful not to overdo it. The screen and battery can be a little sensitive to heat. You want to keep them happy, not toasty! 😋 If you need help, you can always schedule a repair.
– Warm up that iOpener and give the left side of the rear cover a nice, cozy hug for a minute. Let’s get this party started!
Tools Used

Step 2


Be careful not to insert the opening pick more than 5 mm into the phone, or you might accidentally damage the internal components. If you need help, you can always schedule a repair
Hey, sometimes that back glass can be stubborn, but don’t worry! If it’s super cracked, try covering it with some clear packing tape – that’ll help the suction cup stick. Or, you can use some super strong tape instead of the suction cup altogether. If you’re still having trouble, don’t sweat it! You can always schedule a repair. We’ve got your back!
Phones get old, you know? You might have a bit of a challenge on your hands depending on how old your phone is. If you’re having trouble getting it off, just add a little more heat to the edge and give it another go. And remember, if you need help, you can always schedule a repair.
– Grab yourself a suction cup and stick it onto the warmed edge of the rear cover, aiming for that sweet spot right near the edge.
– With a firm and steady pull, lift up on the suction cup to create a nifty little gap between the rear cover and the frame.
– Slide an opening pick into that gap you’ve just made, and let’s keep moving forward!
Step 3


– Gently glide the opening pick down the left edge, making your way to the bottom left corner to slice through that pesky adhesive.
– Keep the pick snugly in the bottom left corner to stop the adhesive from playing tricks and sealing back up.
Step 4


Alright, pal, just keep that opening pick chill – don’t jam it in more than 5 mm. You don’t wanna get all up in the phone’s innards and cause some trouble. If you need help, you can always schedule a repair.
Now it’s time to get those new opening picks into place – just slide them into the gaps created by the picks you’ve already got in each corner. If you need help, you can always schedule a repair
– Keep on heating and slicing through that adhesive along the three other sides of the rear cover. You got this!
– As you go, pop in an opening pick at each corner to stop the adhesive from sealing back up. Teamwork makes the dream work!
– Slide an opening pick around the whole edge of the phone to free any sneaky adhesive you might’ve missed. If something’s being stubborn, just give it a little reheat.
Step 5


– Gently lift the rear cover straight up to free it from your device.
Step 6


Alright, cool cat, let’s be careful here. Just get under the edge of that connector, okay? Don’t go wild on the socket or any of its pals – those guys are delicate! You got this.
– Grab your trusty spudger and use its pointed end to gently pry up and disconnect the wireless charging coil press connector. You got this!
– When it’s time to re-attach press connectors like this one, take your time to carefully align it and press down on one side until you hear that satisfying click. Then, do the same on the other side—just avoid pressing down in the middle. If it gets misaligned, those little pins can bend, and that’s a no-go! Remember, if you need help, you can always schedule a repair.
Tools Used

Step 7


– Time to give that white press connector a little nudge! Use the pointed end of your spudger to gently pry it up and disconnect it from the motherboard shield. It’s chilling out down in the bottom right corner. You’ve got this! If you need help, you can always schedule a repair.
Tools Used
Step 8

These screws might be a bit sticky, like a stubborn friend who doesn’t want to let go. They’ve got threadlocker on their threads, so they’re not going anywhere without a fight. But don’t worry, we’ve got this!
Just like you need to remember where you left your keys, these screws have their own special spots. Keep track of each one and make sure it goes back in its original spot. Think of it like a puzzle, but with screws! And we’re pretty sure you’re a puzzle pro.
– Let’s get this show on the road! Grab your trusty Phillips screwdriver and give those six 4.0 mm screws securing the motherboard shield a good ol’ twist to the left. You got this! If you need help, you can always schedule a repair
Step 9


Watch out for those motherboard shield edges—they’re thin and sharp, just like your wit! Handle with care and keep those fingers safe!
– Grab a trusty pair of tweezers and gently lift that motherboard shield like a pro!
– Now, use your fingers to get a solid grip on the motherboard shield. You’ve got this!
Tools Used

Step 10


Alright, this wireless charging coil is just hanging on by a little bit of adhesive. Don’t worry, it’s not a big deal. Just be gentle and it’ll come right off. If you need help, you can always schedule a repair.
– Gently lift the wireless charging coil up and away from the device to take it out with ease.


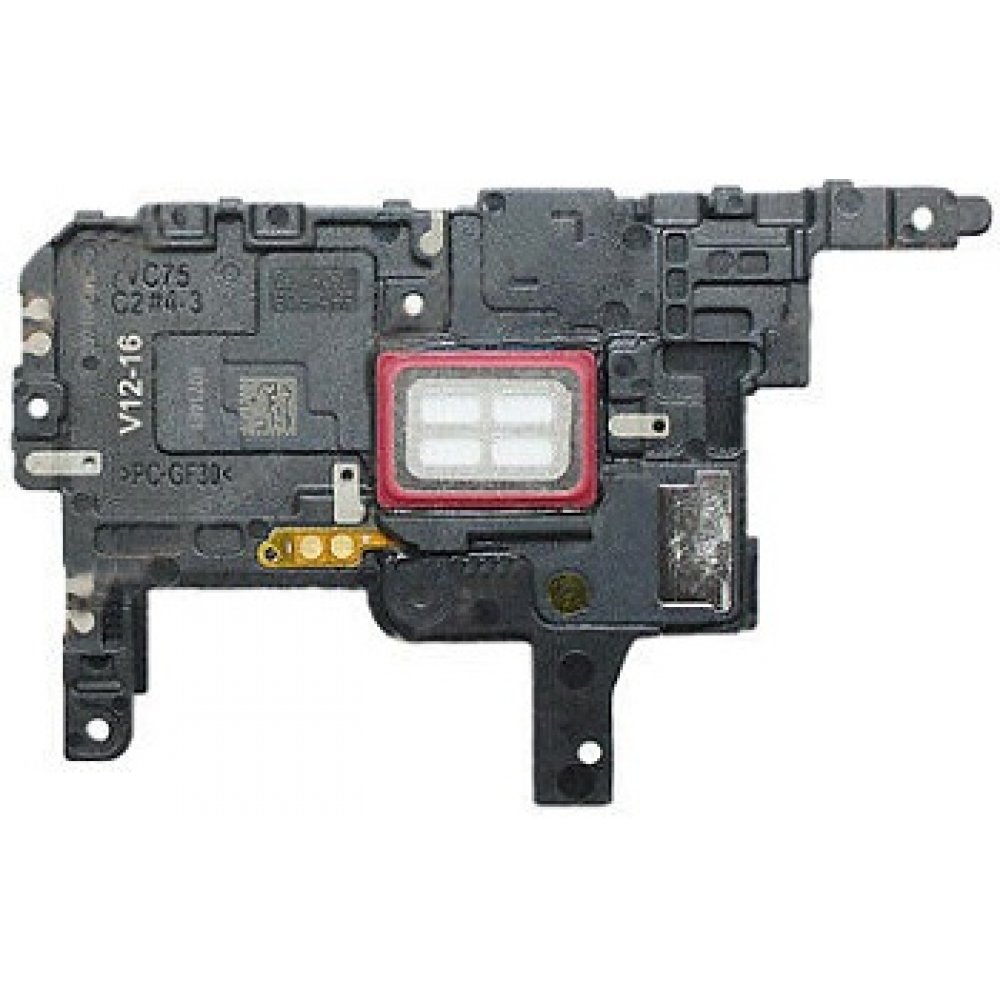
Step 13

– Alright, let’s get this show on the road! Grab your trusty Phillips screwdriver and give those four 4.0 mm screws holding down the earpiece speaker a little love tap to loosen ’em up.
Step 14


Okay, so that earpiece speaker is just hangin’ out there, chillin’ on the frame. Make sure you clip it back on along the top edge. You got this!
– Let’s get that earpiece speaker out! You’ll find a little triangle marking on the right side of the speaker. Carefully slide the pointed end of your spudger into that hole.
– Now, give that speaker a gentle nudge! Use your spudger to pry it up and separate it from the frame. No need to go crazy, just a little wiggle and it’ll come loose.
Tools Used


Step 16


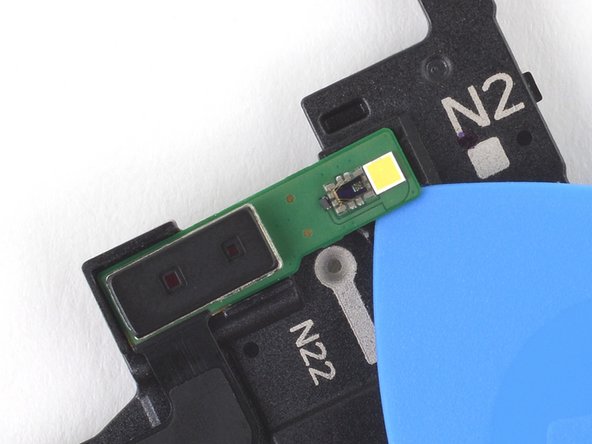
Alright, let’s get this laser AF sensor unstuck from the earpiece speaker. It’s just holding on with some light adhesive, so don’t worry, it’s a breeze to separate!
– Let’s get this party started! Carefully slide an opening pick into the gap under the right side of the laser AF sensor.
– Now, gently slide the opening pick towards the top of the sensor, cutting through the adhesive. We’re almost there!
Step 17


– Slide the opening pick beneath the top of the laser AF sensor to gently slice through the adhesive.
Step 18

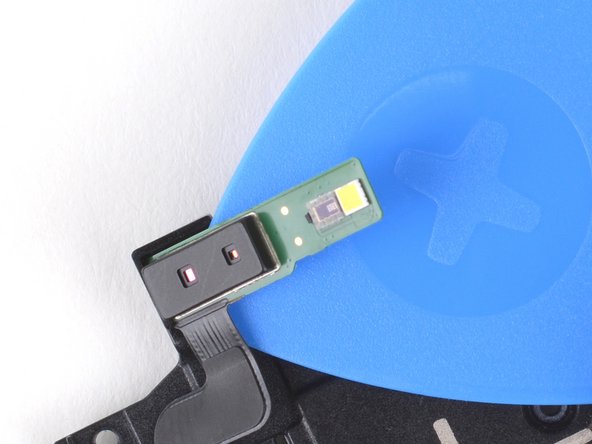
– Take out the laser AF sensor – it’s time to say goodbye to the old part.
– When you’re putting everything back together, follow our guide for using a pre-cut adhesive card to secure the new laser AF sensor to the earpiece speaker. And don’t worry if you need a little extra help, you can always schedule a repair