Samsung Galaxy S10 Motherboard Replacement
Duration: 45 minutes
Steps: 21 Steps
Ready to swap out that motherboard on your Galaxy S10? This step-by-step guide will steer you through removing the old board, including the now-soldered USB-C port, and installing a fresh one. Keep calm, follow along, and if you hit a snag, you can always schedule a repair for extra help.
Step 1


If you've accidentally popped that tool into the other hole, don't sweat it! The microphone and the ingress seal are safe and sound, hanging out where they can't get hurt.
- Grab your trusty SIM card eject tool, a SIM eject bit, or even a straightened paperclip, and gently insert it into the tiny hole on the SIM tray at the top edge of your phone, right next to that sleek plastic antenna band.
- Give it a firm press to pop that tray out like a champ.
- Carefully remove the SIM card tray from its cozy little home.
- When you're ready to put the SIM card back in, just make sure it's facing the right way in relation to the tray. You've got this!
Tools Used

Step 2


You can use a hair dryer, heat gun, or hot plate here—just keep it cool and don't go overboard, since the screen and battery aren't big fans of too much heat.
- First things first—disconnect your phone and shut it down before you dive in.
- Warm up your iOpener and park it on the right edge of the back cover for about two minutes. Let that heat do its magic.
- While the iOpener works, check out the image of the removed back cover and scope out where the adhesive is hiding.
Tools Used

Step 3


- Prop up the warmed right side of your phone on something about half an inch (13 mm) thick—this gives you a handy angle for using the opening tool.
- Hold the left edge steady with your fingers so your phone doesn't take a little trip across the table. Give the suction cup a confident tug.
- Press the tip of your opening tool into the tiny gap between the back cover and the frame—think of it like sneaking a chip into salsa.
- With your tool in the gap, slide it back and forth along the seam to loosen up the back cover. Slow and steady wins the race!
Step 4


- Warm up that iOpener and press it against the same edge of your phone for a solid two minutes. Let's get that adhesive nice and cozy!
- Grab a suction cup and stick it on the back of your phone, aiming for the center of the right edge (that's where the adhesive is the thinnest, so it's the sweet spot!).
- Give that suction cup a strong, steady pull to wiggle open a little gap between the back cover and the frame. You got this!
- Slide the point of an opening pick into the gap you've created. Let's get this party started!
- If you're struggling to make that gap, it might be that the adhesive isn't feeling warm and fuzzy enough. Heat that edge until it's just shy of too hot to touch, and give it another go.
- Feeling stuck? You can always drop a few splashes of high concentration (over 90%) isopropyl alcohol into the seam to help loosen up the adhesive. It'll be like a spa day for your phone!
Go easy with the pick—too much muscle could turn your back cover into a mosaic.
Because of tight fits and strong glue, you might need to try a few times to get that opening pick in just right. Stay patient, and gentle persuasion often does the trick. If you hit a stubborn spot, take a breather and try again — persistence pays off. Need a hand? You can always schedule a repair with Salvation Repair to get expert help.
Tools Used
Step 5


Hold off on slicing the adhesive in the corners until you've warmed things up—jumping ahead could leave you with a cracked back cover, and nobody wants that.
- Glide your pick along the edge of the phone to slice through that sneaky adhesive.
- Pop a pick in the gap to keep the adhesive from making a comeback.
Step 6


If you're finding the cut a bit stubborn, just warm up the edge again before moving forward. A little heat can loosen things up and make it easier to get that perfect cut. Keep at it, and if you hit a real snag, remember you can always schedule a repair.
- Warm up the bottom edge of your phone with a heated iOpener for a couple of minutes—think of it as giving your device a mini spa treatment.
- Grab an opening pick and sneak it into the right edge, close to the bottom right corner. No need to rush—precision is key here.
- Glide the pick smoothly around the corner, then keep slicing along the bottom edge and cruise past the bottom left corner. You're on a roll!
- Pop an opening pick into the seam to stop that stubborn adhesive from sticking things back together.
Tools Used
Step 7


When working those corners, make sure they’re nice and warmed up—your tool will glide right through!
- Keep that heat going and slice away at those remaining edges of the phone with style!
Step 8


If you'd rather not bother with replacing the adhesive, that's cool! Just make sure to clean off any big chunks that could mess with the back cover sitting properly. Once it's in place, give it a little heat and a gentle press to make sure it sticks.
- After you've made your way around the phone with your trusty tool, gently twist an opening pick into one of the edges to help pop the back cover away from the frame.
- Carefully lift the back cover. If there’s any stubborn adhesive still hanging on, use those opening picks to help slice through the last bits.
- Now, go ahead and remove the back cover completely.
- This is a great moment to power on your phone and check that everything’s working like a charm before sealing up the back cover. Just remember to turn it off completely before diving back into the repair.
- Follow this guide to put the back cover back on, transfer and install the camera bezel, and replace that adhesive like a pro.
Step 9

- Take out the eight 4 mm Phillips screws holding the top midframe in place. Time to show those screws who's boss!
Step 10


- The midframe is still hanging on with a few plastic clips along the edges. Grab a spudger and slip its tip into the notch on the right side of the midframe, near the volume up button. Gently pry upward to loosen the midframe from the phone. If you need a hand, you can always schedule a repair.
Tools Used

Step 11


The top midframe sometimes likes to hang on at the bottom right corner. If it’s being clingy, just give it a gentle peel—no need to rush.
- Start by gently lifting the midframe from the top corners and pull it off the phone.
- To get the top midframe back in place:
- Line up the midframe's top edge with the phone, and carefully lower it onto the device.
- Press gently around the edges of the midframe to make sure the clips snap back in. The frame should sit flush against the phone’s body.
Step 12


Watch out for those tiny surface-mounted parts hanging out near the connector—don't let them get bumped or knocked loose when you disconnect things.
- Slide the flat end of your trusty spudger under the battery connector that’s cozying up to the motherboard beneath the rear-facing camera.
- Gently pry upwards to free that connector from its socket—it’s just a little shy!
- Carefully nudge the battery's flex cable away from the motherboard socket, just to keep things from bumping into each other accidentally.
Tools Used
Step 13

- Loosen and remove the seven 4 mm Phillips screws holding down the lower midframe. Keep them safe—you’ll need them to put everything back together later. If you need a hand with anything, remember you can always schedule a repair.
Step 14


The midframe is still hanging on with a few stubborn plastic clips around the edge. Give them a gentle nudge and they’ll pop free—no sweat!
- Slide the tip of your trusty spudger under the top right corner of the lower midframe.
- Gently pry it up to pop that midframe free from the phone!
Tools Used
Step 15


- Grab that loose end of the midframe with your fingers and gently lift it up, nice and easy.
- Give the midframe a little wiggle to help pop those stubborn edge clips free.
- Now, go ahead and take out the lower midframe. Just a heads up, the loudspeaker is snugly tucked into the lower midframe.
Step 16


- Grab the flat end of a spudger and gently pry up the display connector from its socket on the motherboard, which is near the bottom right corner of the phone. Easy does it—just a little wiggle and lift.
Tools Used
Step 17


- Take your spudger and gently pop the headphone jack connector out of its spot on the motherboard. Easy does it!
Tools Used
Step 18

- Unscrew the three 3.7 mm Phillips screws that are holding the motherboard in place. You've got this!
Step 19


- Slide the tip of your spudger under the right side of the motherboard—yep, right by the volume down button.
- Give it a gentle lift to help nudge the motherboard out of its cozy spot.
Tools Used
Step 20


- Take your spudger and slide its tip under the bottom left corner of the motherboard—like you’re flipping a pancake, but gentler.
- Give it a careful lift to loosen the motherboard from its spot. No need to flex those muscles—let the tool do the work.
Tools Used
Step 21


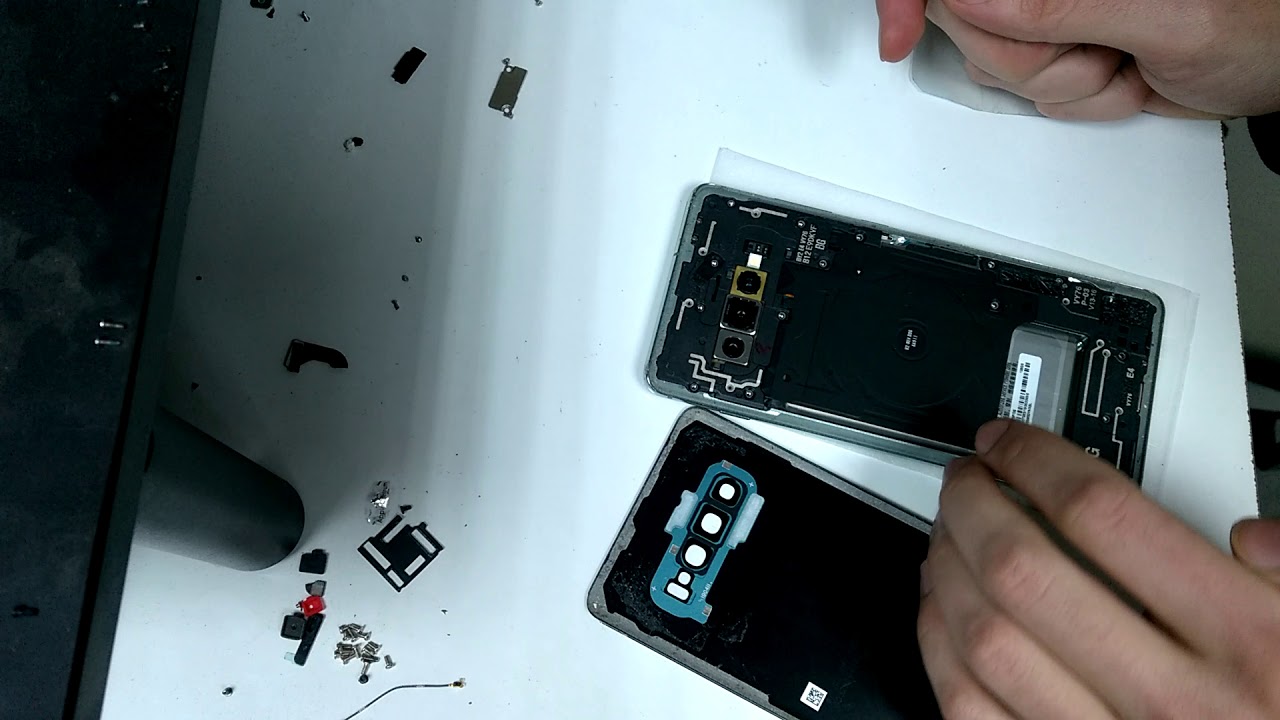
- With a gentle grip, take hold of the motherboard by its top corners.
- Carefully swing the motherboard out of its snug little home. Watch out for any cables that might want to tag along!
- Now, give the motherboard a little nudge towards the top edge of the phone while giving it a slight wiggle. This will help free the charging port from its cozy socket.
- Once the charging port is free, go ahead and remove the motherboard.
- Ready to put the motherboard back in? Here’s how:
- Line up the charging port of the motherboard with the bottom edge of the phone.
- Gently press the motherboard against the bottom edge until the charging port is snugly seated.
- Lower the motherboard and press it into place. Just be careful not to squish any cables underneath! The board should sit nice and flush against the frame.