
Samsung Galaxy S10 Plus Motherboard Replacement
Duration: 45 minutes
Steps: 22 Steps
Get ready to tackle the motherboard swap for your Galaxy S10+! The trickiest part? That sneaky back cover. But don’t worry, you’ve got this! Just take it step by step, and if you find yourself in a pickle, you can always schedule a repair.
Step 1


No sweat if you aimed for the other hole—the microphone and gasket are safely tucked away, so no worries about damage.
- Grab a SIM card ejector, the right screwdriver bit, or just a trusty paperclip that’s seen better days—poke it into the little hole on the SIM tray at the top edge of the phone, next to the plastic antenna strip.
- Give it a good push—the tray will pop out like magic.
- Slide the SIM card tray out and set it aside.
- When you’re ready to put everything back, just make sure the SIM card sits in the tray the right way. No upside-down surprises!
Tools Used

Step 2


A hair dryer, heat gun, or hot plate can be handy tools, but watch out—don’t let the phone get too toasty. The display and internal battery are pretty sensitive to heat, so keep the temperature in check to avoid any damage.
- First up, unplug your device and power it down — no surprises here. Next, warm up an iOpener and gently press it against the back cover’s right edge for about two minutes to soften things up. While you're waiting, glance at the image of the back cover you've removed and take note of where the adhesive is sticking—it's like your map for the next steps. If you hit a snag or need hands-on help, remember you can always schedule a repair with Salvation Repair.
Tools Used

Step 3


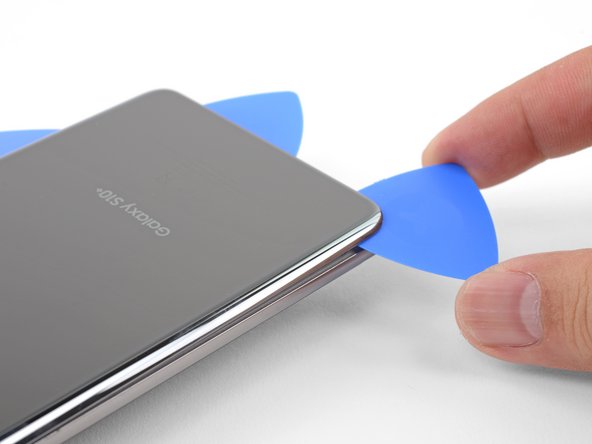
Be gentle with the pick—if you go in too hard, you might crack that back cover glass. Take your time and keep it smooth.
Since we're working with some snug fits, you might need to give it a few tries. Don't sweat it, you've got this!
- Stick a suction cup on the back of your phone, aiming for the center of the right edge—that’s where the glue takes a coffee break.
- Give the suction cup a solid pull, nice and steady, until you spot a gap forming between the back cover and the frame.
- Slide the pointy end of an opening pick into that newly formed gap like you’re sneaking into a secret club.
- If the gap is playing hard to get, hit the edge with a little more heat and repeat your previous moves.
- Feeling stubborn resistance? A few drops of strong isopropyl alcohol (90% or higher) along the seam can help the glue loosen up.
Step 4


- Rest the warm right edge of your phone on something that's about 0.5 inches (13 mm) thick. This helps tilt the phone just right for that opening tool action!
- Hold the left edge of the phone with your fingers to keep it steady while you give that suction cup a good, firm pull.
- Gently press the edge of your opening tool into the gap between the back cover and the frame.
- Slide the opening tool back and forth along that seam a few times to work it open.
Step 5


Hold off on slicing the adhesive at the corners before applying heat—that's a quick way to crack the back cover. Take your time, warm things up gently, and then carefully work your way around. If you need help, you can always schedule a repair.
- Gently slide a opening pick around the edge of the device, slicing through the adhesive like a hot knife through butter. Keep it smooth and steady to avoid any damage.
- Once you've got a good groove going, leave that pick in the seam to hold the adhesive apart—think of it as a little spacer to keep things from sealing back up too soon. If you need a hand, you can always schedule a repair.
Step 6

- Warm up the bottom edge of your phone with a heated iOpener for about two minutes.
Tools Used
Step 7


If the cutting gets tricky, just reheat the edge a bit before moving on. Keeps things smooth and avoids tears.
- Grab your opening pick and slide it into the right edge near the bottom right corner—think of it as giving your device a gentle nudge.
- Ease the pick around the corner, gliding along the bottom edge and looping around the bottom left like you're tracing a secret path.
- Leave your pick chilling in the seam so the adhesive doesn’t get any ideas about sticking back together.
Step 8


When you're slicing through those corners, make sure to give them a good, solid heat-up first. A well-warmed corner makes all the difference!
- Keep that heat flowing and gently slice around the leftover edges of your phone. You've got this!
Step 9


- After you’ve worked your way around the phone with the opening pick, give one edge a gentle twist. This will help pop the back cover loose from the frame.
- Slow and steady wins the race—lift the back cover carefully. If it’s still sticking, go ahead and slice through any stubborn adhesive with your picks.
- Remove the back cover and set it aside. You’re halfway there!
- When putting things back together, it’s a smart move to turn on your phone and check that everything works before sealing the back cover. Don’t forget to power down again before you keep tinkering.
- Follow this guide to slap the back cover back on, move and install the camera bezel, and swap out the adhesive for a fresh stick. If you run into trouble, you can always schedule a repair.
Step 10

- Take out all nine of those 4 mm Phillips screws holding the top midframe in place. Let’s get this phone ready for its next move!
Step 11


The midframe is still snugly held in place by a few plastic clips around the edge. Just give them a gentle pry if needed, and you’ll be ready to move on.
- Pop the pointy end of your spudger into the little notch on the midframe’s right side, hanging out near the Bixby button.
- Give it a gentle pry to loosen up the midframe. It’s like convincing the phone to let go—no arm wrestling required.
Tools Used

Step 12


- Slip the tip of your spudger into the little notch on the left side of the phone, just hanging out near the power button.
- Gently pry upwards to start freeing the midframe from its snug spot in the phone.
Tools Used
Step 13

- Gently lift the midframe from the top corners and set it aside—like you're opening a treasure chest filled with circuits.
- Ready to put the top midframe back on? Here's the smooth way:
- Line up the top edge of the midframe with the phone, then lay it down like you're tucking it in for a nap.
- Give the edges a little press with your fingers all around the perimeter until you hear those satisfying clicks. The midframe should sit flush with the phone edge, looking neat and snug.
Step 14


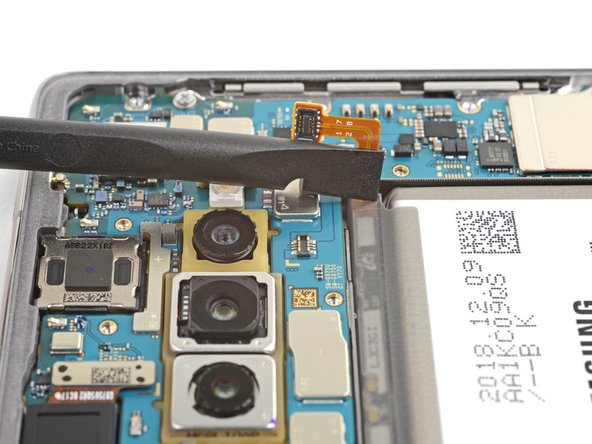
When unplugging connectors like these, keep an eye out for those tiny surface-mounted components around the socket—they're like the little neighbors that don’t want to be knocked over. Handle with care to keep everything happy and in place.
- Slide the flat end of a spudger right under that battery connector, which is hanging out with the motherboard just below the rear-facing camera. It's like a little game of hide-and-seek!
- Gently pry upwards to give that connector the nudge it needs to disconnect from its cozy socket.
- Now, carefully push the battery's flex cable away from the motherboard socket. We don't want any accidental reunions happening here!
Tools Used
Step 15

- Start by removing the seven 4 mm Phillips screws that hold the lower midframe to the phone. Once those are out, you're on your way to opening things up—no sweat. If you need a hand, just schedule a repair and we'll take care of the heavy lifting.
Step 16
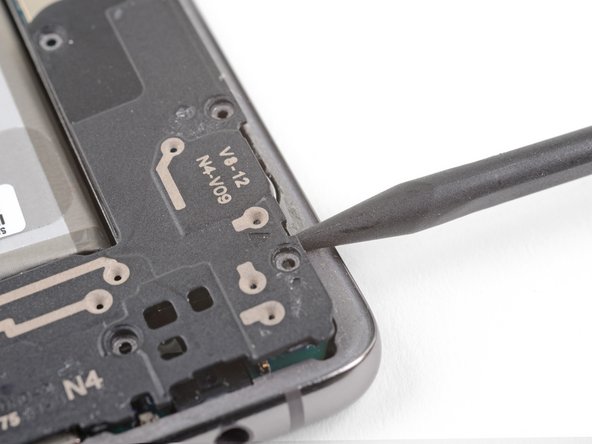

The midframe’s still hanging on thanks to a handful of sneaky plastic clips along the edge.
- Take your spudger and slide the tip into the notch near the bottom right corner of the lower midframe—look for the tiny triangle marking the spot.
- Give it a gentle lift to pop the midframe loose from the phone.
Tools Used
Step 17


- Grip the loose end of the midframe with your fingers and gently lift it upward. Give the midframe a little wiggle to help loosen those remaining clips. Carefully remove the lower midframe — keep in mind, the loudspeaker is built right into it. To put the lower midframe back, line up its bottom edge with the phone’s edge and press it into place. If you need a hand, you can always schedule a repair.
Step 18


- Grab the flat end of your spudger and gently pop up the display connector from its spot on the motherboard (bottom right corner of the phone). Easy does it—no need to rush!
Tools Used
Step 19


- Grab the flat end of your spudger and gently pop the headphone jack connector out of its cozy spot on the motherboard.
Tools Used
Step 20

- Loosen and remove the three Phillips screws holding the motherboard in place: one 3.8 mm screw and two 3.7 mm screws. Keep these screws safe if you plan to reassemble later. Need a hand? You can always schedule a repair.
Step 21

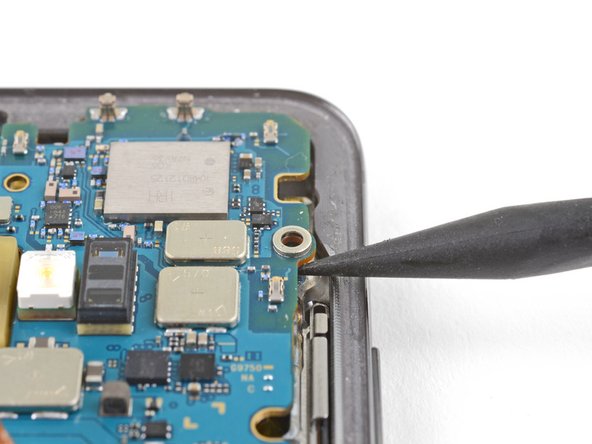
- Slip the tip of your spudger under the right side of the motherboard, hanging out near the volume up button.
- Lift up gently and give the motherboard a nudge to pop it loose from its spot.
Tools Used
Step 22


- Now it's time to put your device back together—just follow these steps in reverse, and you'll be golden!
- Once you've wrapped up the repair, be sure to give your handiwork a test run with this guide.
- Got e-waste? Don't toss it! Take it to an R2 or e-Stewards certified recycler and do your part for the planet.
- If things didn't quite go according to plan, no worries! Swing by our Answers community for some troubleshooting tips and tricks.


