
Samsung Galaxy S20 Plus Battery Replacement
Duration: 45 minutes
Steps: 31 Steps
If your battery is looking a bit puffy, handle it with care and keep the heat away from your phone.
For your own safety, make sure to drain your battery to below 25% before diving into the disassembly.
Ready to give your Samsung Galaxy S20 Plus a fresh start? Let’s tackle the battery replacement together! That battery is sticking around thanks to some serious adhesive, so we’ll need a little magic—specifically, some high concentration (over 90%) isopropyl alcohol to help us out. If your battery looks a bit puffy, no worries, just remember to keep it cool and avoid heating up your phone. Safety first! Make sure to drain your battery below 25% before we dive in; this helps prevent any unexpected excitement if we accidentally poke the battery. And don’t forget, you’ll need some fresh adhesive to wrap things up once we’re done. If things get tricky, don’t hesitate to schedule a repair!
Step 1

Before you start, give your phone a little break—power it down and unplug it.
A hair dryer, heat gun, or hot plate can help warm things up, but be careful not to get too toasty—excessive heat can harm the display and internal battery. Keep it gentle to avoid damage and ensure a smooth repair process.
- Warm up that iOpener and gently press it against the bottom edge of the back cover for a solid two minutes. Patience is key, and soon you'll be on your way to a successful repair!
Tools Used

Step 2


- Stick a suction cup onto the back of the phone, aiming as close to the bottom center as you can. Think of it as giving your phone a friendly kiss to start things off.
- Give the suction cup a firm, steady pull to gently pry open a little space between the back cover and the frame. No wiggling like a fish out of water—just a confident tug.
- Slide a plastic opening pick into the gap you just created. It’s like slipping a butter knife under a crust—careful but confident, to keep things moving smoothly.
Go easy with the pick—pressing too hard might turn that back cover into a glass jigsaw puzzle.
If your screen's really shattered, sticking a piece of clear packing tape over it can help the suction cup stick better. If tape isn't doing the trick, heavy-duty tape might work as a substitute for the suction cup. And if all else fails, supergluing the suction cup directly onto the broken glass is an option. Because tight fits can be tricky, you might need to reheat with the iOpener and try pulling with the suction cup a few times. Having trouble creating that tiny gap? Just apply a bit more heat around the edge and give it another go. Remember, patience and a little heat go a long way—if you need a hand, you can always schedule a repair.
Tools Used
Step 3


When working near the edges of the phone, especially around the curved corners, avoid cutting the adhesive there—your glass might crack if you're not careful. Take it slow and steady to keep everything intact.
- Glide your pick back and forth along the bottom edge to slice through that stubborn adhesive.
- Keep your pick chilling in the seam to stop the adhesive from sticking itself back together.
Step 4

- Warm up the left edge of the back cover for two minutes with your heated iOpener. Let it get nice and toasty!
Tools Used
Step 5


- Stick a suction cup onto the back of your phone, aiming for the center of the left side. It's like giving your phone a little hug.
- Give the suction cup a firm, steady pull—think tug-of-war champion style—until you see a gap appear between the back cover and the frame.
- Slide the tip of an opening pick into the gap. No need to rush, just ease it in.
- Feeling some resistance? A few drops of high-strength (over 90%) isopropyl alcohol along the seam can help loosen things up. Adhesive never stood a chance.
Take it easy with the pick—don’t force it, or you might end up cracking that back cover glass!
Since tight fits are common here, don’t get discouraged if it takes a few tries. The curved glass edge means you can’t slide your pick in too far, but as long as the tip is underneath the glass’s edge, you’re good to go. If it feels like there’s no gap, try gently warming the edge a bit more and then give it another shot. Persistence pays off—keep at it, and if you need a hand, you can always schedule a repair.
Tools Used

Step 6


- Once the pick is slid under the edge of the glass, tilt it downward and work it in further to break free the back cover's adhesive. Keep at it gently—you're on your way to opening it up. If you need help along the way, you can always schedule a repair.
Step 7


Heads up! When sliding along the ridge near the volume and power buttons, the glass cutout in that area can be a bit fragile—go easy to avoid any unwanted cracks.
- Gently slide your pick along the left edge of the phone to loosen the back cover's adhesive. Keep the pick in place under the left edge of the glass to prevent the adhesive from resealing. If you need help, you can always schedule a repair.
Step 8

You can use a hair dryer, heat gun, or hot plate to help with this step, but keep it cool—too much heat can mess up your screen or battery.
- Warm up the right edge of the back cover with a heated iOpener for about two minutes—like giving your device a cozy spa moment.
Tools Used
Step 9


Just like on the other side, angle the opening pick downward to slide it fully under the back cover.
- Stick a suction cup onto the back of the phone, right near the middle of the right edge—nice and close to the corner for leverage.
- Pull gently but firmly on the suction cup to create a small gap between the back cover and the frame—no need to yank, steady wins the race.
- Slide an opening pick into that gap to start prying it open, and get ready to keep the momentum going.
Step 10


- Glide your pick all the way up the right side of the phone—think of it as the red carpet for separating that sticky back cover.
- For extra style points, leave your pick hanging out under the glass near the top—this keeps the adhesive from trying to make an unexpected comeback.
As you gently lift the back cover, watch out — it might pop loose along with one or both of your picks, causing them to drop away. No worries—just set those picks aside since the bottom edge probably won’t reseal from here on out. Keep going at a steady pace, and if you need a hand, schedule a repair to get professional help.
Step 11

- Warm up the top edge of the back cover with a heated iOpener for about two minutes. Keep it cozy enough to loosen things up, but not so hot that you get a surprise burn. If you need a hand, you can always schedule a repair.
Tools Used
Step 12


Watch out for those curved glass corners on the back cover—they crack easier than a joke at a dad convention. Take it slow and gentle so your cover stays in one piece.
If you hit a snag and the slicing gets stubborn, just take a breather, reheat a bit, and then keep going. It’s all about patience and a little extra warmth to make things slide smoothly.
- Take your pick and cruise along the right edge, swinging up and around the top right corner like a pro.
- Keep sliding along the top edge, making your way to the left side, until the back cover is fully freed from its sticky situation.
Step 13


- Gently lift up the back cover. If it’s feeling clingy, grab those opening picks and give any leftover adhesive a little slice.
- Take off the back cover and set it aside.
- When you’re putting things back together:
- Now’s a great time to power up your phone and check that everything’s working. Make sure to shut it down completely before sealing things up again.
- If you spot any sticky adhesive chunks, nab them with tweezers (or your fingers). Heat can help if the adhesive’s being stubborn.
- Using custom-cut adhesive? Follow the guide for that.
- Using double-sided tape? There’s a guide for that too.
Tools Used

Step 14

- Grab your Phillips #00 screwdriver and take out the six screws (each one is 4 mm long) holding the motherboard bracket in place.
As you go along, keep a mental (or physical) map of each screw — make sure it finds its way home exactly where it belongs. Think of it as a treasure hunt, with the screws as your hidden gems. Staying organized keeps things smooth and stress-free. If you need help, you can always schedule a repair.
Tools Used

Step 15


Hang tight—don’t take off the bracket just yet, it’s still hanging out with the wireless charging coil.
- Grab your tweezers and carefully lift up the motherboard bracket, unhooking it from the plastic midframe. Easy does it—no wrestling required!
Tools Used
Step 16


- Carefully lift the motherboard bracket to reveal the orange battery connector. You've got this!
Step 17


When popping off connectors like these, watch out for those tiny surface-mounted bits hanging out around the socket—they're not fans of surprise moves!
- Grab your trusty spudger and gently lift up the battery connector to disconnect it. Take it easy—you got this!
Tools Used

Step 18


- Grab your trusty spudger and gently pop up the wireless charging coil connector—no need for brute force, just a smooth lift!
Tools Used
Step 19


- Grab your trusty tweezers and gently lift the wireless charging coil away from the device—think of it as peeling a sticker, but way cooler.
- Take out the wireless charging coil and set it aside like the tech trophy it is.
- When putting things back together, reconnect the charging coil and battery connectors first, then secure the motherboard bracket screws to get everything lined up nicely. Press the coil pad down firmly so it sticks like it means it.
Tools Used
Step 20

- Grab your Phillips #00 screwdriver and take out the five 4 mm screws holding the loudspeaker and lower midframe. Let’s make those screws history!
Tools Used


Step 22


- Grab your trusty spudger and gently pry up those main and auxiliary flex cables from the daughterboard at the bottom of your device. You've got this!
- When it's time to reconnect those connectors, take a moment to align them just right. Press down on one side until you hear that satisfying click, then do the same on the other side. Remember, no pressing down in the middle! If things get misaligned, those little pins can bend, and we definitely don’t want that. Keep it smooth and steady!
Tools Used
Step 23


- Grab your trusty spudger and gently pop up the main and auxiliary flex cables from the motherboard. Take it slow—these connectors like a gentle touch!
Tools Used
Step 24


- Lift up the main and auxiliary flex cables with care, and set them aside like you're handling secret ninja scrolls.
Step 25


- Gently pry up and unplug the left 5G antenna cable from the motherboard. You've got this!
Step 26


- Pop a spudger under the main display flex cable and gently lift it off the motherboard—like you're unplugging a stubborn headphone jack.
Tools Used
Step 27


- Carefully lift and bend the display along with the left 5G antenna flex cables to clear the path for the motherboard and battery.
Step 28
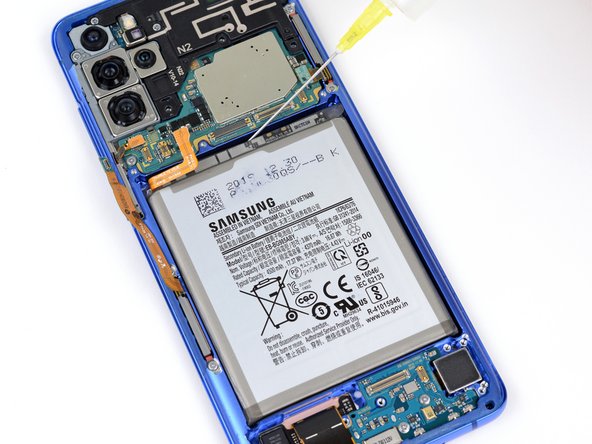


Go easy on the alcohol—too much can mess with your screen.
- Drop 1-2 drops of high-concentration (over 90%) isopropyl alcohol into the little gaps between the frame and the edges of the battery. It's like giving your device a refreshing drink!
- Now, let it chill for a minute to give the isopropyl alcohol some time to work its magic on that sticky adhesive.
Tools Used
Step 29

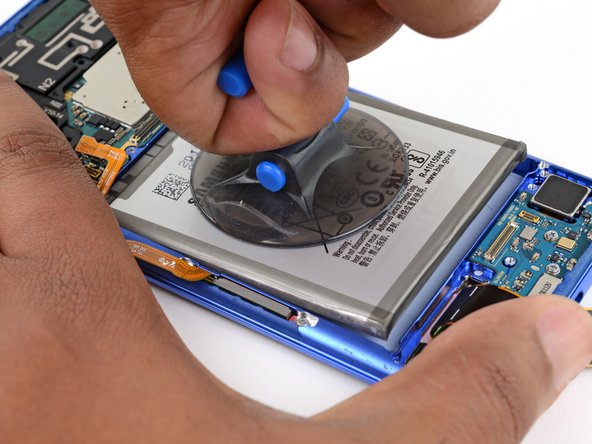
- Stick a suction cup right in the middle of the battery, then brace the top and bottom of your device against your work surface with one hand while pulling gently on the suction handle with the other. When you see the battery start to lift away from the device, you’re good to go to the next step. Keep in mind, patience is key—gentle, steady pulls over time work better than brute force. Pull on the suction cup with consistent pressure for about 15 seconds each time. If the battery refuses to budge, try adding a drop or two of isopropyl alcohol along the top, left, and right edges, wait a minute for it to soak in, then give it another gentle tug. If you need help, you can always schedule a repair.
Tools Used

Step 30
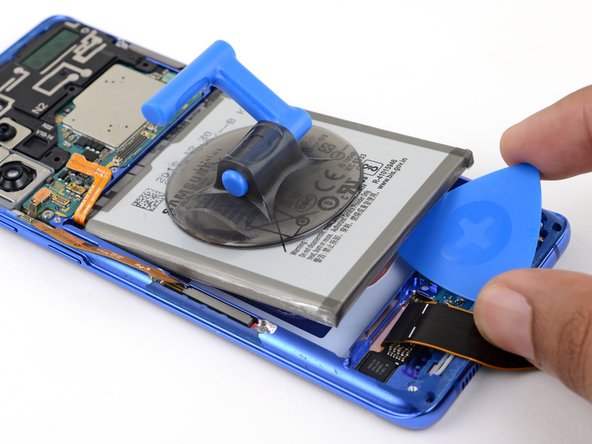

Wait until you’ve got the battery lifted enough to easily slide an opening pick underneath. If it’s still stuck tight, forcing it could poke a hole in the battery—and nobody wants a surprise fireworks show.
Once the battery is up, skip the isopropyl alcohol. It can sneak into the fingerprint sensor and wreck your screen. Not worth the risk!
- Now it's time to get that battery out - start by slipping an opening pick under the bottomsolid edge of the battery and give it a gentle twist to! loosen up the adhesive that's holding it! in place.
Tools Used
Step 31

Once you’ve removed the battery, it's time to let it go! Reusing it is a no-go due to safety concerns. Grab a fresh battery to keep your device shining bright!
- Double-check your shiny new part against the old one—sometimes a little sticker or leftover piece needs a home on the new guy before you install.
- Ready to put everything back together? Just flip through the steps backward and you're golden.
- Give your battery a fresh start with a cycle reset and calibration. Your device will thank you.
- When it’s time to part ways with old electronic bits, recycle them responsibly at an R2 or e-Stewards certified location.
- Hit a snag? Our Answers community is standing by with troubleshooting tips, or you can always schedule a repair if you want some backup.


