
Samsung Galaxy S20 Plus USB-C Port and Daughterboard Replacement
Duration: 45 minutes
Steps: 26 Steps
Ready to give your Galaxy S20 Plus some TLC? Here’s how to swap out the USB-C port and daughterboard—just don’t forget fresh adhesive to seal the deal. Follow along, and your phone will be back in action before you know it!
Step 1

Before you jump in, make sure your phone is powered down and unplugged. Safety first—let’s keep those fingers happy!
A hair dryer, heat gun, or hot plate can be handy, but keep a close eye on the heat — your phone’s display and battery are pretty sensitive to getting too hot. Use gentle, controlled warmth to avoid any unwanted damage.
- Warm up your iOpener and let it chill on the bottom edge of the back cover for about two minutes.
Tools Used

Step 2


- Start by placing a suction cup on the back of your phone, right near the center of the bottom edge. We're aiming for precision here!
- Give that suction cup a strong, steady pull to open up a little gap between the back cover and the frame. You got this!
- Now, slide the point of an opening pick into that gap. You're making great progress!
Handle the pick with care and avoid going overboard with the force, or you might end up with a cracked back cover glass. Keep it cool and gentle!
If your screen is shattered and the adhesive is stubborn, try sticking a piece of clear packing tape over the crack—this can help the suction cup latch on. If tape isn't enough, a strong tape might do the trick as a makeshift grip instead of a suction cup. When all else fails, a tiny dab of superglue can secure the suction cup to the broken glass—just be careful not to get glue where it shouldn't go. Since tight fits can be tricky, reheating with the iOpener and gently prying with the suction cup might take a few tries, so patience is key. If you're struggling to create a gap, add a bit more heat along the edge and give it another shot. For tough cases, remember you can always schedule a repair with Salvation Repair.
Tools Used
Step 3


Be careful around the edges—cutting the adhesive near the curved corners of the phone can lead to cracks in the glass. Take your time and stay safe.
- Wiggle the pick along the bottom edge to cut through the sticky stuff holding things together.
- Keep the pick wedged in the gap so the glue doesn't sneakily stick itself back together.
Step 4

- Place a heated iOpener on the left edge of the back cover and hold it there for about two minutes. This will soften the adhesive and make removal easier. If you need help, you can always schedule a repair.
Tools Used
Step 5


Easy does it with the pick—no need for a Hulk smash! Too much muscle could crack that back cover glass.
The tolerances here are pretty tight, so you might need to try this a couple of times. No big deal, you'll get it!
Since the glass on this edge is curved, don’t expect to slide the pick in too far. Just get the tip underneath the glass's edge, and you're good to go.
If the gap isn't happening for you, no worries! Heat up the edge a bit more and give it another shot.
- Grab a suction cup and stick it to the back of your phone, aiming for the center of the left edge. You've got this!
- Give that suction cup a good, steady pull to create a little gap between the back cover and the frame. Feel the magic happen!
- Slide the tip of an opening pick into that gap you've just made. You're on a roll!
- For an extra boost, consider adding a few drops of high concentration (over 90%) isopropyl alcohol into the seam to help loosen that pesky adhesive. Just a little goes a long way!
Step 6


- Once you've got the pick under the glass edge, gently tilt it downwards and slide it in further. This will help break the back cover's adhesive so you can peel it off smoothly.
Step 7


Be careful when sliding around the ridge in the frame near the volume and power buttons — the glass cutout can be more prone to cracking if you’re not gentle. Take your time, and if you need a hand, you can always schedule a repair.
- Gently slide your pick along the left edge of the phone to loosen the back cover's adhesive. Think of it as giving the phone a little nudge to start the party.
- Keep your pick under the left edge of the glass to stop the adhesive from sticking back together. This way, you're making sure the back stays open for the next steps. If you need help, you can always schedule a repair.
Step 8

A hair dryer, heat gun, or hot plate can be handy, but watch the heat—your phone’s display and battery are sensitive and don’t like getting too hot. Keep it gentle to avoid any melt-downs.
- Warm up the right edge of the back cover with a heated iOpener for a couple of minutes. Give it a nice spa treatment before you dive in!
Tools Used
Step 9


Just like with the last edge, give that opening pick a little tilt downward to slide it right under the back cover. You've got this!
- Stick a suction cup onto the back of your phone, aiming near the center of the right edge—think of it like giving your device a gentle hug.
- Gently but firmly pull on the suction cup to coax a little gap between the back cover and the frame—slow and steady wins the race.
- Slide the tip of an opening pick into that gap and wiggle it carefully to start popping the cover free.
Step 10


While you're working on this, the back cover might let go of one or both picks, causing them to drop out. No worries—just put them aside. The bottom edge won't snap shut again from this point, so you're good to go.
- Gently slide your pick along the right edge of the phone to loosen up that sticky adhesive holding the back cover in place.
- Once you’ve got the right edge separated, keep your pick under the glass near the top to stop that adhesive from resealing itself. We don’t want any sneaky reattachments!
Step 11

- Grab your iOpener, heat it up, and let it chill on the top edge of the back cover for a solid two minutes.
Tools Used
Step 12


Handle the back cover gently near the corners—it's curved and more prone to cracking. A light touch here helps keep your back cover intact and happy.
If you hit a snag where the slicing gets stubborn, just take a breather, reheat a bit, and then get back at it. Sometimes a little heat and patience are all you need to keep going smoothly.
- Gently slide your pick from the right edge, working around the top right corner. Keep it steady and friendly as you go. Then, glide along the top edge all the way to the left, carefully cutting through the adhesive holding the back cover in place. Take your time—patience makes perfect. If you need a hand with any tricky steps, you can always schedule a repair.
Step 13


- Gently lift off the back cover, using opening picks to carefully cut through any stubborn adhesive. Once loosened, remove the back cover completely. During reassembly, it's a smart move to power on your device and test all functions before sealing it back up—just to make sure everything's working smoothly. Be sure to shut down your device fully before continuing. To clean up leftover adhesive, pick out the chunks with tweezers or your fingers—warming it up briefly can help loosen things. If you're using custom-cut adhesives, follow this guide. For double-sided tape, refer to this guide to get the best results.
Tools Used

Step 14

As you tackle this repair, be sure to keep an eye on each screw and return it to its original spot. Trust us, your future self will thank you!
- Grab your trusty Phillips #00 screwdriver and get ready to tackle those six 4 mm-long screws holding the motherboard bracket in place. You've got this!
Tools Used

Step 15


Hold up—don’t yank that bracket off just yet! It’s still hanging onto the wireless charging coil.
- Grab your trusty tweezers and gently lift the motherboard bracket away from the plastic midframe to unclip it. You've got this!
Tools Used
Step 16


- Gently lift the motherboard bracket just enough to get the orange battery connector into view. Keep it steady — no need to force it. If you need help, you can always schedule a repair.
Step 17


When you're unplugging connectors like these, just a friendly reminder to watch out for those tiny surface-mounted components hanging out around the socket. They can be a bit shy and might get knocked loose if you're not careful!
- Grab your trusty spudger and gently ease it under the battery connector to pop it up and disconnect it. You've got this!
Tools Used

Step 18


- Grab your trusty spudger and gently pop up that wireless charging coil connector.
Tools Used
Step 19


- Gently lift the wireless charging coil away from the device using a pair of tweezers—think of it as peeling an orange, but for tech. Once loosened, carefully remove the coil. When putting things back together, reconnect the charging coil and battery connectors first. Then, secure the motherboard bracket screws to keep everything in line. Finally, press down firmly on the coil pad to make sure it sticks well. If you need a hand along the way, you can always schedule a repair.
Tools Used
Step 20

- Grab your trusty Phillips #00 screwdriver and get ready to tackle those five 4 mm-long screws holding the loudspeaker and lower midframe in place. You've got this!
Tools Used
Step 21


- Get your spudger or a trusty pair of tweezers and gently wedge it into the notch at the top left corner of the midframe. Give it a careful pry to pop those clips loose and free the midframe.
- Once that's done, lift out the loudspeaker and lower midframe to continue with the disassembly.
Step 22


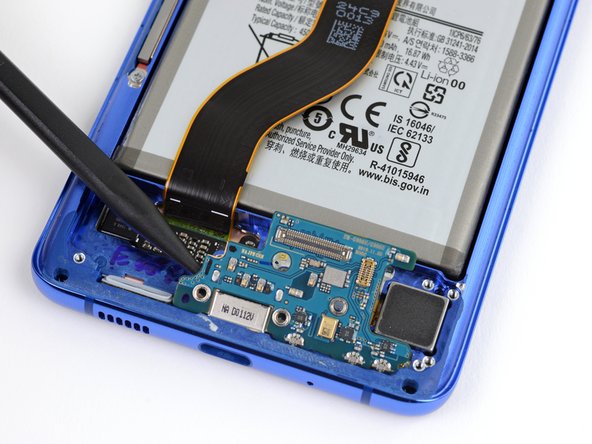
- Grab a spudger and gently work your magic to lift and disconnect the main and auxiliary flex cables from the daughterboard located near the bottom of your device. Easy peasy!
- When it's time to reattach those connectors, simply align them carefully and press down on one side until you hear that satisfying click. Then, do the same on the other side. Just remember, don't apply pressure in the middle—those pins can be a bit delicate. If they get misaligned, it could lead to some serious damage. If you find yourself in a tricky situation, don't hesitate to schedule a repair.
Tools Used
Step 23


- Grab a spudger and gently pry up the main and auxiliary flex cables from the motherboard, disconnecting them smoothly. Take your time—patience makes perfect. If you need a hand, you can always schedule a repair.
Tools Used
Step 24


- Gently lift and detach the main and auxiliary flex cables. Take your time and be careful, they can be a bit tricky, but you've got this!
Step 25

- Grab your Phillips #00 screwdriver and take out the three 3.4 mm screws holding down the USB-C port and daughterboard. Easy does it!
Tools Used
Step 26


- Gently wedge a spudger under the left side of the daughterboard and give it a little leverage to pop it free from its slot. Then, grab your tweezers and lift the daughterboard straight up and away from the bottom of the device. Need a hand? You can always schedule a repair.


