Samsung Galaxy S20 Rear-Facing Camera Module Replacement
Duration: 45 minutes
Steps: 35 Steps
Ready to give your Galaxy S20 some new camera mojo? This guide walks you through swapping out the rear-facing camera module, which includes all three cameras and the frame that keeps them together. Heads up: you'll need to take out the motherboard to get to the camera, and have some fresh adhesive on hand for reassembly. Take your time and you'll have your phone snapping pics again in no time. If things get tricky, you can always schedule a repair.
Step 1


No stress if the tool ended up in the other hole—the microphone and its seal are tucked safely out of the way.
- Grab a SIM eject tool, the smallest screwdriver bit you have, or even a trusty paperclip (straightened out, of course). Find the tiny hole on the SIM tray up at the top edge of your phone, right next to the plastic antenna band.
- Push straight in with confidence—don’t be shy! The tray will pop right out.
Tools Used

Step 2


The SIM card tray tends to be pretty loose and can pop out easily. Keep an eye on it—if you want to keep your SIM in place, handle the tray gently and avoid jostling it around too much. If it keeps falling out or you need a hand, you can always schedule a repair.
- Carefully remove the SIM card tray from your device. When reinserting the SIM card, make sure it's oriented correctly to fit smoothly into the tray. Keep an eye out for that tiny rubber gasket around the tray—it helps keep water and dust out. If it's damaged or missing, replace the gasket or the entire tray to keep your device protected. Need a hand? You can always schedule a repair if things get tricky.
Step 3

Hit pause on your phone’s power—unplug it and switch it off before diving in!
You can use a hair dryer, heat gun, or hot plate to loosen things up, just keep it chill and don’t roast the phone—screens and batteries aren’t fans of high heat.
- Warm up your trusty iOpener and give the bottom edge of the back cover a cozy two-minute hug.
Tools Used

Step 4


Go easy with the pick—too much muscle could turn your back cover into a glass mosaic.
Got a screen that's seen better days? Try sticking some clear packing tape over it to help the suction cup grab hold. If your suction cup is slacking, swap in some extra-strong tape instead. And hey, if nothing's sticking, you can go rogue and superglue the suction cup to the screen (just be careful when you pull it off later).
Patience is your friend here—sometimes you’ll need to reheat the edge a few times and keep working that suction cup before things start moving.
If your gap game isn’t strong yet, heat things up a bit more and give it another shot.
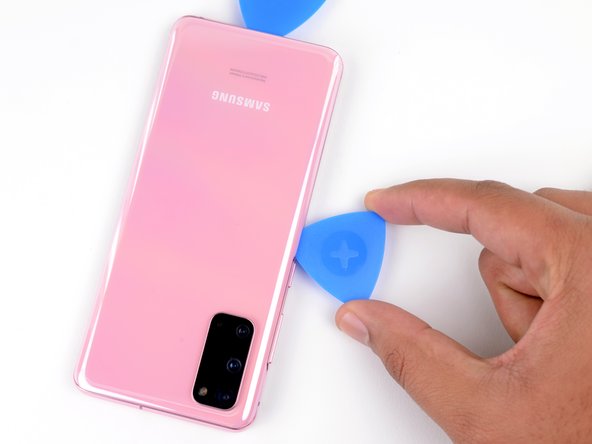
- Stick a suction cup on the back of your phone, aiming for the middle of the bottom edge—like you're putting a badge on its jacket.
- Give the suction cup a firm, steady pull. You're not trying to launch it into space, just enough to make a tiny gap between the back cover and the frame.
- Slip the tip of an opening pick into that gap—nice and gentle, like sneaking a cookie from the jar.
Tools Used
Step 5


Be extra careful around the corners of the phone where the glass curves. Cutting adhesive too close could crack that delicate glass panel. Take your time!
- Gently wiggle the prying tool along the bottom edge to cut through the adhesive. Keep the pick in the seam afterward to stop the adhesive from sealing back up. If you need a hand, you can always schedule a repair.
Step 6

- Place a heated iOpener on the left edge of the back cover and hold it there for about two minutes. This helps loosen the adhesive so you can lift the cover more easily. If you need a hand with the repair, you can always schedule a repair.
Tools Used
Step 7


Go easy with the pick—trying to muscle through can turn your back cover into a glass jigsaw puzzle.
Getting this just right might take a few tries—don’t sweat it, patience pays off.
The glass curves along this edge, so you won’t be able to slide the pick in very far. As long as you catch the very tip under the edge, you’re good to go.
If the gap is being stubborn, hit it with a bit more heat and give it another go.
- Stick a suction cup on the back of your phone, aiming for the middle of the left side.
- Give the suction cup a steady pull to pop open a little gap between the back cover and the frame.
- Slide the pointy end of an opening pick into the gap you just made.
- Got stubborn adhesive? A few drops of strong (90%+) isopropyl alcohol along the seam can help loosen things up.
Step 8


- Slide the pick under the edge of the glass, then angle it downward and push in a bit more to break up the sticky glue and get that back cover loose.
Step 9


Be gentle while maneuvering around the edge near the volume and power buttons—those glass cutouts can be a bit temperamental and might crack if you're not careful.
- Gently glide that pick along the left edge of your phone to break free the sticky adhesive holding the back cover in place.
- Keep that pick snugly under the left edge of the glass near the top left corner to stop the adhesive from sticking back together.
Step 10

A hair dryer, heat gun, or hot plate can help with heating, but keep it friendly—don't let the device get too hot, since both the display and internal battery are pretty sensitive to heat. A gentle touch is all you need to avoid any heat-related mishaps.
- Place a heated iOpener on the right edge of the back cover and let it warm up for two minutes. This will make it easier to remove the cover later on.
Tools Used
Step 11


Just like last time, give that opening pick a little tilt downward to slide it all the way under the back cover. You got this!
- Stick a suction cup onto the back of your phone, aiming for the center along the right edge—it’s like playing pin the tail on the donkey, but with tech.
- Give the suction cup a steady, confident pull to open up a little gap between the back cover and the frame. Slow and sure wins the race here.
- Slide the tip of your opening pick into the gap you’ve created—think of it as sneaking a backstage pass into your phone’s inner world.
Step 12


While you're working, the back cover might let go of one or both of the picks and send them tumbling. No worries—just grab the pick(s) and set them aside. At this stage, the bottom edge isn't going to snap shut again.
- Glide your pick along the right edge of the phone to loosen up the back cover’s adhesive. Take it slow and steady—no need to rush.
- Leave the pick hanging out under the top right corner of the glass. That way, the sticky stuff won’t try to sneak back together while you work.
Step 13

- Warm up the top edge of the back cover with a heated iOpener for about two minutes. Keep it cozy to loosen things up.
Tools Used
Step 14


Watch out for those curved corners—the glass here is pretty fragile and loves to crack under pressure. Take it easy as you work on this step to keep your back cover looking sharp.
If slicing starts feeling like a struggle, hit pause and give it another round of heat before you get back to it.
- Gently glide the pick from the right edge of your device, making your way around the top right corner like a pro.
- Keep slicing along the top edge until you reach the top left corner, ensuring the back cover adhesive is fully separated. You're doing great!
Step 15


- Gently lift the back cover. Use opening picks to work through any stubborn adhesive that's still hanging on.
- Carefully remove the back cover.
- During reassembly:
- Here's a solid moment to power on your device and give it a quick test before you seal everything up. Just remember to turn it off completely before you continue with the rest of the steps.
- If you're dealing with sticky adhesive, grab some tweezers or your fingers to remove any stubborn chunks. A little heat can help if it's being extra difficult.
- If you're working with custom-cut adhesives, follow this guide.
- Got double-sided tape? Just follow this guide to get it right.
Tools Used

Step 16

- Grab a Phillips #00 screwdriver and loosen those five 4 mm screws holding down the motherboard bracket. Easy peasy—if you need a hand, you can always schedule a repair.
Keep tabs on each screw as you go—making sure it finds its way back to exactly where it came from keeps things running smoothly and avoids mix-ups. Staying organized is your best friend here, so take your time and double-check your work before moving on. If you need a hand along the way, you can always schedule a repair.
Tools Used

Step 17


Hold up! Don't yank the bracket off just yet—it's still hanging on to the wireless charging coil.
- Grab your trusty tweezers and gently coax that motherboard bracket away from the plastic midframe. It's like giving it a little hug to unclip it—just be gentle and steady!
Tools Used
Step 18


The coil is tethered to the rest of the device using spring contacts, so there's no need to disconnect any connectors. Just a simple connection, no fuss.
- Lift up that wireless charging coil gently—no need for Hulk strength here.
- Slide the coil out and set it aside like you’re saving the best piece of pizza for later.
- When you’re putting things back together, start by putting in those motherboard bracket screws first. It’ll help the charging coil line up perfectly. Then, press the rest of the coil down so it sticks just right.
Step 19


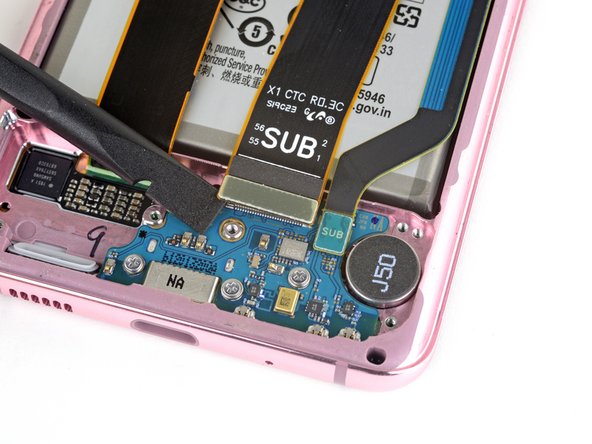
Watch out for those tiny surface-mounted components around the socket when you're unplugging connectors like these. They can be a bit jumpy, so handle with care!
- Grab your trusty spudger and gently pry up the battery connector to disconnect it. You've got this!
Tools Used

Step 20

- Grab your Phillips #00 screwdriver and remove the five 4 mm screws holding in the loudspeaker and lower midframe. Easy does it—just a few turns to get the parts loose.
Tools Used
Step 21


- Grab your trusty spudger or a pair of tweezers and gently slide the tip into the notch at the top left corner of the midframe. Give it a little pry to pop those clips loose and set it free!
- Now, go ahead and lift out the loudspeaker along with the lower midframe. You're doing great!
Step 22

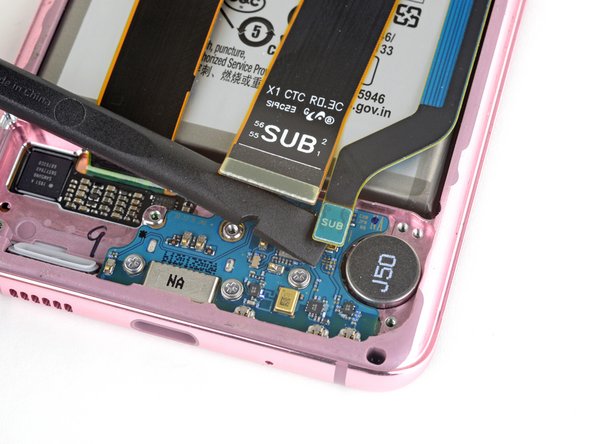
- Grab a spudger and gently pry up the main and auxiliary flex cables from the daughterboard near the bottom of the device. When it’s time to reconnect the connectors, carefully line them up and press down on one side until you hear a click, then do the same on the other side. Avoid pressing on the middle—misalignments can bend the pins and cause damage. If you need a hand with tricky parts, you can always schedule a repair.
Tools Used
Step 23
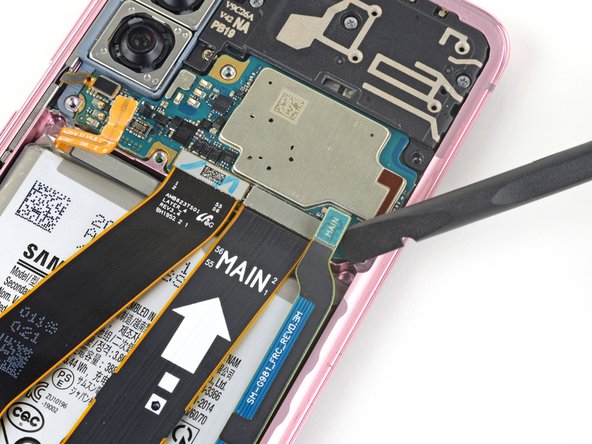


- Take your trusty spudger and gently pop up both the main and auxiliary flex cables from the motherboard. Easy does it—these cables don’t like drama.
Tools Used
Step 24


- Carefully lift and slide out both the main and auxiliary flex cables—think of it as giving them a gentle send-off from the device.
Step 25


- Grab your trusty spudger and gently pop up the main display flex cable to disconnect it from the motherboard. Easy does it!
Tools Used
Step 26


- Carefully lift up the display flex cable and gently move it aside so it's not blocking the motherboard or battery.
Step 27

- Grab your Phillips #00 screwdriver and take out those four 4 mm screws holding down the upper midframe.
Tools Used
Step 28


- Slide the tip of your spudger into the little notch on the right side of the upper midframe. Give it a gentle twist to pop those clips loose.
- Lift off the upper midframe and set it aside like a pro.
Tools Used
Step 29


- Grab your trusty spudger and gently pop the side button flex cable off the motherboard—like opening a stubborn pickle jar, but way less messy.
- With tweezers in hand, carefully nudge that cable away from the motherboard. Give it a little bend, just enough to keep it out of your repair zone.
Step 30


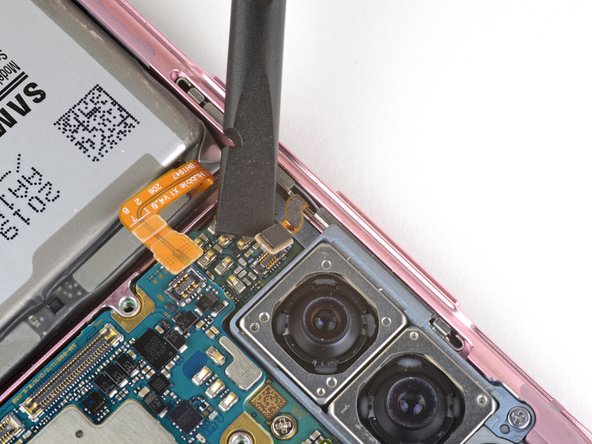
- Gently pop up the front camera flex cable from its cozy spot on the motherboard.
- Swing that cable aside like you're clearing space for a dance floor—just make sure it’s out of the motherboard’s way.
Step 31

- Gently pop up the front-facing sensor array cable from the motherboard. Think of it like giving it a little handshake—no rough stuff.
- Swing the cable aside so it's not in your way. Give yourself some elbow room for the next moves.
Step 32

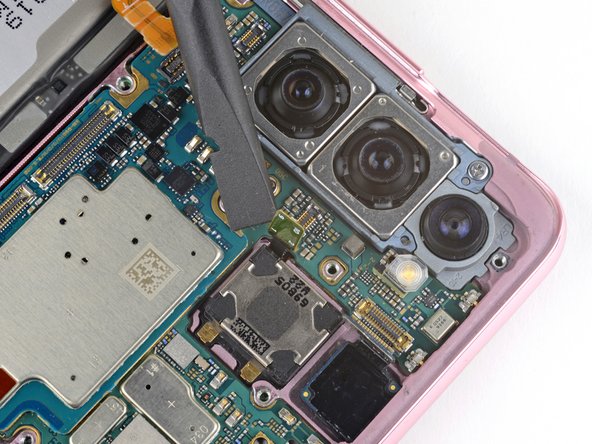
- Grab your Phillips #00 screwdriver and start by removing the two screws that hold down the motherboard and camera assembly. One screw measures 4 mm, and the other is 3 mm long. Take your time and keep track of those tiny screws. If you need a hand at any point, you can always schedule a repair.
Tools Used
Step 33
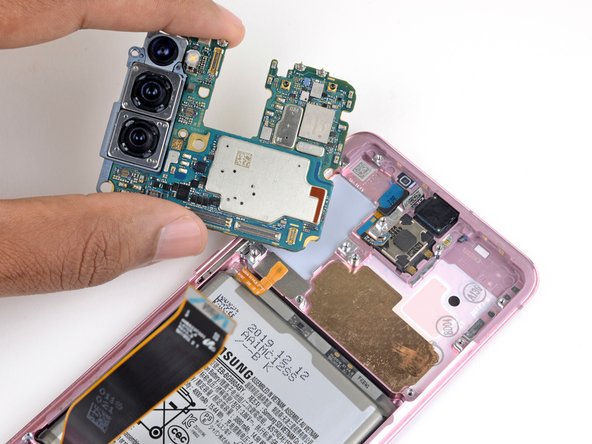

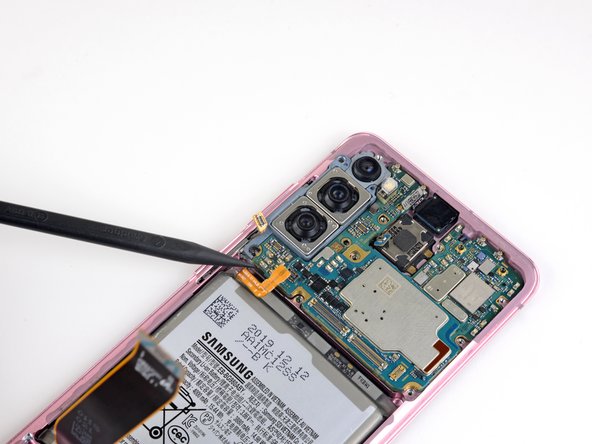
- Gently slide the flat end of your trusty spudger into the bottom left corner of the motherboard assembly and give it a little nudge to pop it free from the phone's body.
- Now, go ahead and lift out the motherboard assembly with care.
Tools Used
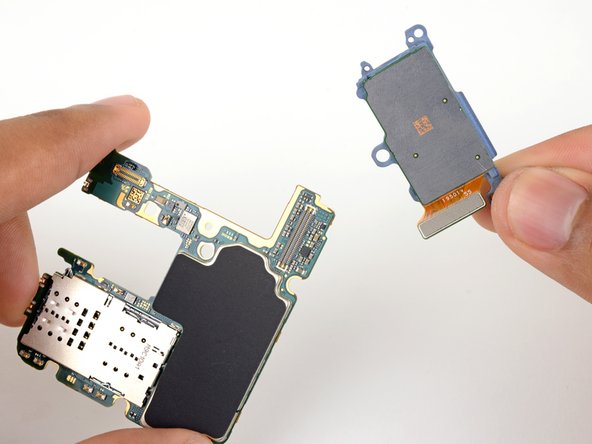
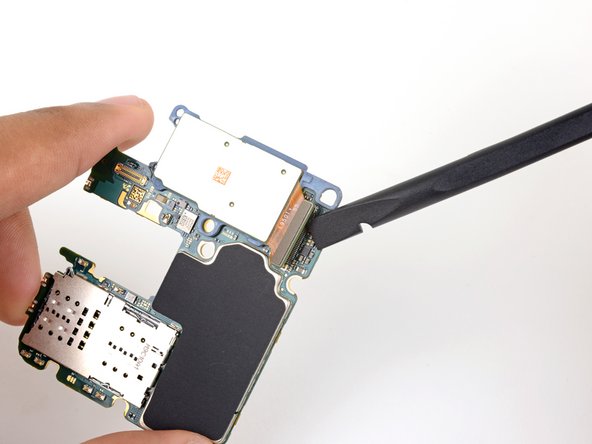
Step 34

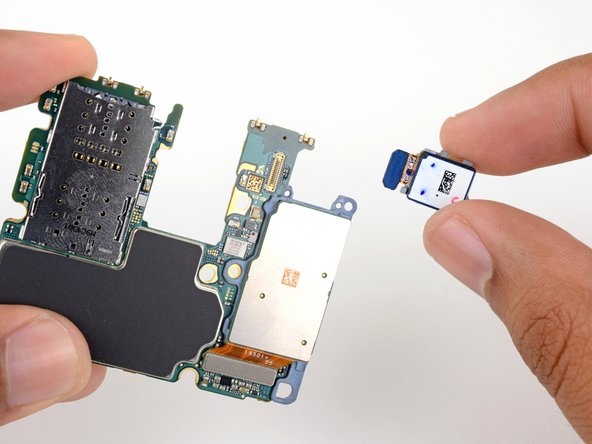
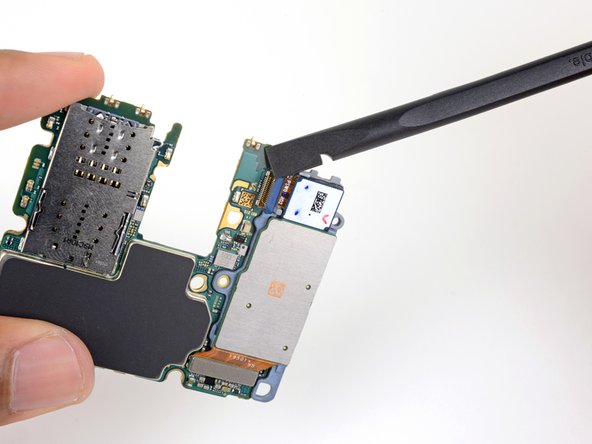
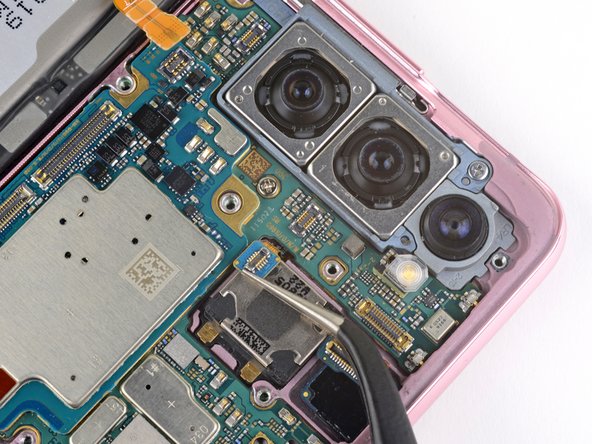
The module is gently attached to the other cameras' frame by a little post, but with a bit of wiggling, it should come loose without much fuss.
- Grab that trusty spudger and gently wiggle it to pop up the ultrawide camera connector from the motherboard—easy peasy!
- Now, let's give that ultrawide camera module a little nudge and remove it from its cozy home.
Tools Used
Step 35

- Double-check that your shiny new part matches the old one before diving in—sometimes you’ll need to peel off adhesive or move over little bits and bobs.
- Ready to wrap it up? Just reverse the steps above to put everything back together.
- Once you’re done, give your device a quick test drive using our guide to make sure everything’s working smoothly.
- Got leftover bits you don’t need? Toss them responsibly at an R2 or e-Stewards certified recycler.
- If your repair took a detour or your camera’s acting up, swing by our Answers community or our S20 camera troubleshooting wiki for extra tips.
- And hey, if you’re stuck or just want a pro to handle it, you can always schedule a repair with Salvation Repair.