Samsung Galaxy S21 5G Front Camera Replacement Guide DIY Tutorial
Duration: 45 minutes
Steps: 29 Steps
To keep things safe and smooth, make sure your battery level is below 25% before you start taking apart your device.
Get ready to tackle that front camera replacement on your Samsung Galaxy S21! Before diving in, make sure your battery is below 25%—it’s a smart move to keep things safe and sound. We want to avoid any surprise thermal surprises if the battery gets a little too adventurous during the repair. And hey, if your battery looks like it’s been hitting the gym and is all swollen, take the proper precautions. You’ve got this!
Step 1

Make sure to power down your device completely before starting. It’s all about getting those electronics some well-deserved rest!
– Warm up your trusty iOpener and give the bottom edge of the back cover a cozy two-minute embrace.
Tools Used

Step 2


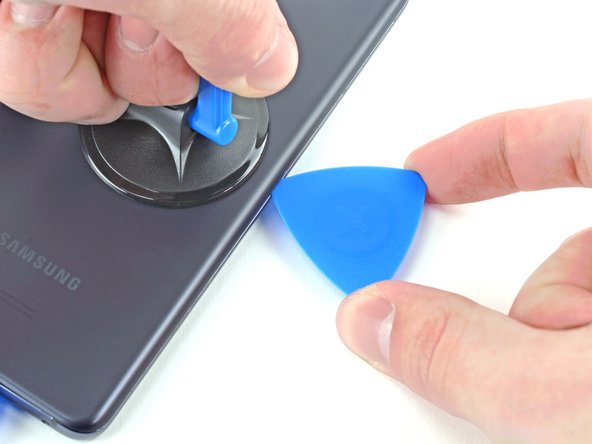
– Grab a trusty suction cup and place it lovingly on the back of your phone, right in the middle at the bottom.
– Give that suction cup a good ol’ tug with some strong, steady oomph to create a sweet gap between the back cover and the frame.
– Slide in your opening pick into the gap like a pro, ready to work its magic.


Step 4

– Warm up that trusty iOpener and give the left edge of the back cover a cozy two-minute hug.
Tools Used
Step 5


– Get a good grip! Attach a trusty suction cup to the back of your device, aiming for the middle of the left side.
– With all your might, pull up on that trusty suction cup to create a nifty gap between the back cover and the frame.
– Slide in an opening pick into that cool little gap you just made.
Step 6


– Gently slide an opening pick down the left edge, making your way to the bottom left corner to slice through that sticky adhesive like a pro.
– Keep that pick in place to stop the adhesive from making a comeback!
Step 7

– Warm up a heated iOpener and give some love to the right edge of the back cover for a cozy two minutes.
Tools Used
Step 8


– Stick a trusty suction cup onto the back of the device, aiming for the center of the right edge.
– Gently but firmly, give the suction cup a good yank to create some breathing room between the back cover and the frame.
– Slide in an opening pick into that sweet little gap.
Step 9


– Wiggle that opening pick back and forth along the right edge of the back cover to slice through the adhesive like a pro.
– Keep the pick in place to make sure the adhesive doesn’t try to seal up again on you!
Step 10


Feel free to tackle this procedure on every corner, just steer clear of the top-left one where the rear-facing camera hangs out.
– Gently maneuver the right-edge opening pick around the top-right corner of your phone, like you’re giving it a little dance to help it open up.
Step 11


– Gently slide the top pick into the gap, getting as close to that camera shell as you can. You got this!
– Now, let’s give some love to the left edge! Repeat the same smooth sliding action with the left-edge pick.
Step 12

– Warm up an iOpener and place it on the camera shell for a good two minutes of heat therapy.
Tools Used
Step 13


If this approach isn’t doing the trick, don’t sweat it! Just hop on to the next step for another awesome option; otherwise, feel free to skip ahead.
– Twist the back cover anti-clockwise to make a gap between the camera shell and the frame.
– Gently slide an opening pick into the gap.
Step 14


Take it easy with this technique; there’s a chance you might crack the plastic back cover. Stay cool and proceed with care!
– Hey there! Let’s gently slide those two picks toward the camera shell so they snugly fit under the corners of the back cover next to the camera shell.
– Now, the fun part – move those picks back and forth along the bridge between the back cover and the camera shell until you’ve created a nice little gap between the camera shell and the frame.
Step 15


– Gently slide an opening pick in between the camera shell and the frame to carefully slice through the adhesive.
Step 16


Watch out for that sneaky plate on the back cover around the phone’s flash—it loves to play hide and seek with your pick!
– Be sure to slice through the extra adhesive to the right of the camera. You’ve got this!
Step 17


– Align the tip of your opening pick with the flash of your phone.
– Gently slide the pick in, taking care to steer clear of the flash’s plate.
– Carefully slice through the adhesive located to the right of the camera.


Step 19

Keep track of each tiny screw buddy, ’cause we don’t want any surprises later. Gotta make sure each one gets back to its original spot – like puzzle pieces awaiting their rightful place!
– Grab your trusty Phillips screwdriver and get ready to tackle this! Remove the five screws, each measuring 4 mm long, that are holding the motherboard bracket snugly to the frame. You’re doing great—keep it up!
Step 20


Hold tight, buddy! That bracket is still connected to the wireless charging coil. Hang on a sec before completely taking it off!
– Grab a trusty pair of tweezers and carefully lift up to unclip the motherboard bracket from the frame. You’re doing great!
Tools Used

Step 21


– Using tweezers or your fingers, gently keep the motherboard bracket out of the way while you grab your trusty spudger and lift the battery press connector up. You’ve got this!
– To reattach press connectors like a pro, take your time to align one side perfectly and press down until you hear that satisfying click. Then, do the same for the other side. Just a heads up—avoid pressing in the middle. If things get misaligned, those little pins can bend, and we definitely don’t want that! If you need help, you can always schedule a repair.

Step 22


– While making sure the motherboard bracket is still holding its own, have some fun using a spudger to gently lift and disconnect the press connector of the wireless charging coil.
Tools Used
Step 23


Great news, the wireless charging coil is gently attached to your phone with a tiny bit of sticky glue. It’s like a little dance between your phone and the charging coil, sticking just enough to keep your phone charged!
– Gently peel off the wireless charging coil with your fingers. Go on, you got this!
– When putting things back together, start by screwing in the motherboard bracket screws first. This will help line up the charging coil perfectly. Then, press down firmly on the rest of the coil to make sure it sticks in place.
Step 24
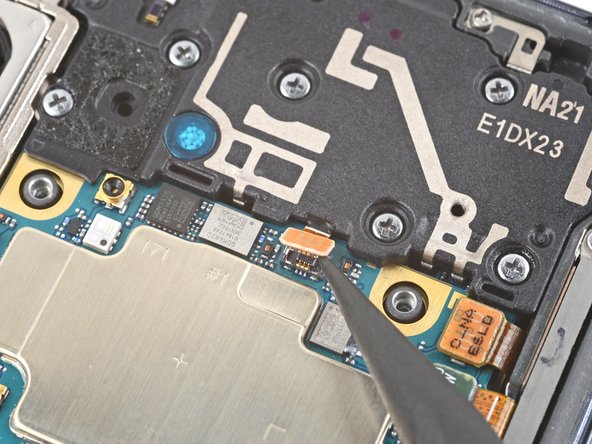

– Grab your trusty spudger and gently use its pointy end to lift up and disconnect the earpiece speaker cable’s press connector. You’re doing great!
Tools Used
Step 25

– Grab that trusty Phillips screwdriver and get ready to work your magic! You’ll want to carefully take out the seven 4 mm screws that are keeping the earpiece speaker snug against the motherboard. Let’s make this assembly dance!
Step 26


– Gently slide the tip of a spudger into the tiny gap between the edge of the earpiece speaker and your phone. Be careful, it’s a snug fit!
– Now, use that spudger to pop up and free the clips that are holding the earpiece speaker hostage. You’ve got this!
– With a little finesse, use tweezers or your fingers to lift out the earpiece speaker and say hello to your phone’s inner workings!
Step 27

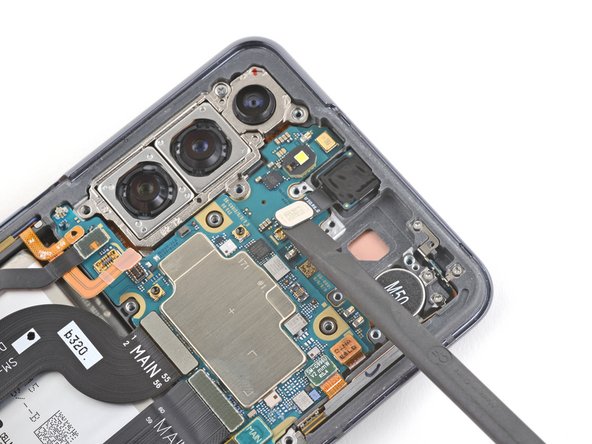
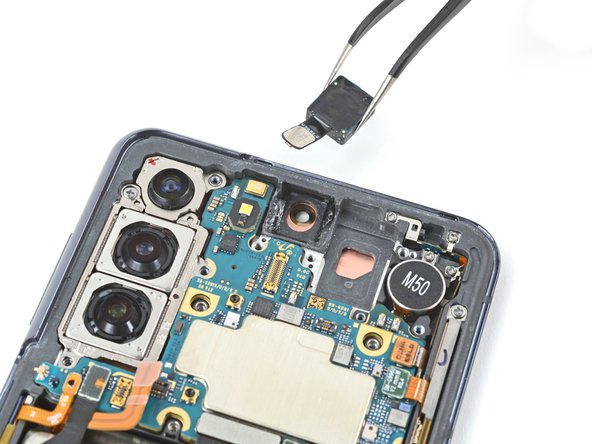
– Grab your trusty spudger and gently slide the flat end under the front camera’s press connector. Give it a little pry to disconnect it, and voila! You’re one step closer to your repair success.
Tools Used
Step 28

– Drop a couple of squirts of high-concentration (over 90%) isopropyl alcohol into the little nooks around the front camera’s edge. It’s a simple trick to keep things clean and clear!
Step 29

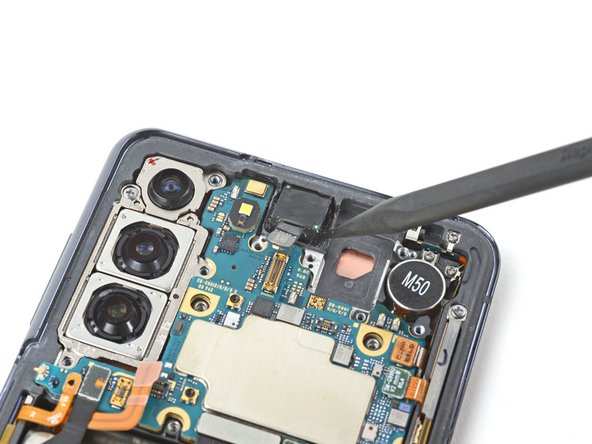
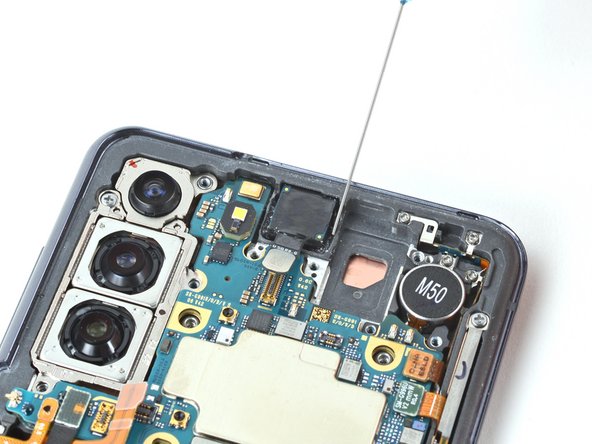
– Gently slip the tip of a spudger into the little gap between the frame and the front camera.
– Carefully pry upwards with the spudger to free the front camera from its cozy spot.
– Now, grab those tweezers or just use your fingers to lift out the front camera with ease.


