
Samsung Galaxy S21 5G Motherboard Replacement Guide
Duration: 45 minutes
Steps: 39 Steps
Hey there, superstar! Before you start tinkering with your phone, make sure to bring that battery down to below 25%. Safety first, right?
Get ready to tackle the adventure of removing or swapping out the motherboard in your Samsung Galaxy S21! Before diving in, make sure to drain that battery down to below 25%. This helps keep things cool and safe in case your battery gets a little too comfortable during the repair. If your battery is looking puffy, remember to take the right safety steps. This guide is based on a Verizon model and includes steps for the 5G mmWave antenna. If you have a different model, feel free to skip those 5G mmWave steps. The rest of the process remains the same. And hey, if you need a hand, you can always schedule a repair.
Step 1

Whoa there, cowboy! Before you dive into the repair, make sure to give your device a well-deserved break. Power it down completely, and then you’re good to go! If you need help, you can always schedule a repair.
– Warm up your iOpener and gently press it against the bottom edge of the back cover for a cozy two minutes.
Tools Used

Step 2


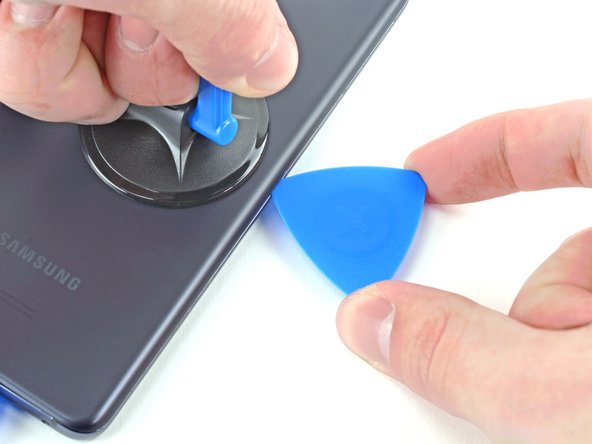
– Grab a trusty suction cup and stick it to the back of your phone, aiming for the center of the bottom edge.
– With a firm grip on the cup, start pulling up gently but steadily. Your goal is to create a little space between the back cover and the frame.
– Now, take your handy opening pick and slide it into that gap you created. Let’s keep this repair groove going!


Step 4

– Warm up the left edge of the back cover with a heated iOpener for a solid two minutes.
Tools Used
Step 5


– Get that suction cup ready and stick it to the back of the phone, aiming for the center of the left edge.
– Now, it’s showtime! Pull up on that suction cup with some muscle power to make some space between the back cover and the frame.
– Time for the opening pick to join the party! Gently slide it into the gap.
Step 6


– Gently slide an opening pick along the left edge, making your way towards the bottom left corner to slice through that stubborn adhesive.
– Keep the pick in place to stop the adhesive from getting all clingy again.
Step 7

– Warm up that iOpener and give some love to the right edge of the back cover for a solid two minutes!
Tools Used
Step 8


– Alrighty, tech enthusiasts! 👍 Let’s embark on this exciting repair adventure together! 🛠️ First, find yourself a trusty suction cup and place it as close to the center-right edge on the back of your device. Then, let’s give it some might and pull up with strong steady force. Isn’t it exhilarating? 🙌 Now, insert an opening pick into that lovely gap you’ve created. Buckle up, we’re on our way to fixing this badboy! 🚀 If you find yourself in a tight spot, hey, no worries! You can always schedule a repair and let our pro tech squad swoop in and save the day! 💪💥
Step 9


– Glide a cool opening pick along the right edge of the back cover to cut through the adhesive.
– Keep the pick in place to make sure the adhesive doesn’t try to reseal itself.
Step 10


Feel free to apply this method to every corner, except for the top-left corner where you’ll find the rear-facing camera.
– Spin the right-edge opening pick around the top-right corner of the device.
Step 11


– Gently slide that top pick in as close to the camera shell as you can get. You’re doing great!
– Now, let’s give some love to the left-edge pick. Repeat the same sliding magic!
Step 12

– Grab a cozy iOpener, warm it up, and give the camera shell a nice two-minute spa treatment.
Tools Used
Step 13


If this approach doesn’t do the trick, feel free to jump to the next step for another option; otherwise, you can glide past the following step.
– Twist the back cover to the left until you see a little opening between the camera shell and the frame. You’re doing great!
– Now, slide an opening pick into that gap you’ve just created. Keep going!
Step 14


Handle this method with care, as there’s a chance you could end up cracking that sleek plastic back cover.
– Carefully slide those two trusty picks towards the camera shell, tucking them right under the corners of the back cover next to the camera shell.
– Gently wiggle the picks back and forth along the seam between the back cover and the camera shell until you’ve created a little gap between the camera shell and the frame. You’re doing great!
Step 15


There’s quite a bit of glue holding the frame to the camera shell, so you might want to give it a couple of rounds of heat to make things easier.
– Gently slide an opening pick between the camera shell and the frame to slice through that adhesive like a pro.
Step 16


When tackling this step, be mindful of the plate surrounding the phone’s flash that the pick can sometimes cling to unexpectedly:
– Make sure to slice through the extra adhesive located to the right of the camera. You’ve got this!
Step 17


– Get ready to line up the opening pick’s tip with your phone’s flashy flash!
– Gently slide in the pick, being extra careful to dodge the flash’s cool plate.
– Time to slice that adhesive to the right of the camera – slice and dice!
Step 18


– Hey there! Can you believe it’s time for a lil’ DIY action? Let’s work together to remove that back cover. And during reassembly, woot-woot! Let’s shake things up and get your device feeling brand new again. If you need any extra help, you know what to do, you amazing repair Kardashian! 😉😉🛠️✨
Step 19

During this repair journey, remember to treasure each screw and guide them back to their cozy homes.
– Grab your trusty Phillips screwdriver and let’s get to work! Start by unscrewing those five 4 mm-long screws holding the motherboard bracket snugly to the frame. You’ve got this!
Step 20


Hold your horses on fully detaching that bracket! It’s still hanging out with the wireless charging coil.
– Grab a trusty pair of tweezers and gently coax the motherboard bracket away from the frame. It’s like giving it a little hug to help it unclip!
Tools Used

Step 21


– Hold the motherboard bracket to the side with some tweezers or your trusty fingers, then grab a spudger and gently pry up that battery press connector. You’re doing great!
– To snap those press connectors back in place, align one side carefully and press down until you hear a satisfying click, then do the same on the other side. Remember, no pressing in the middle! If the connector gets misaligned, those little pins could bend, and that’s a one-way ticket to trouble. Keep it aligned and you’ll be golden!

Step 22


– Hey there tech whiz! Time to disconnect that wireless charging coil’s press connector. We’ve got your back, just grab a spudger and gently pry it up while keeping that motherboard bracket out of the way. Rock on and don’t forget, if you need help, you can always schedule a repair.
Tools Used
Step 23


The wireless charging coil is held in place on the phone with a bit of light adhesive magic.
– Let’s get started by using your nimble fingers to gently peel away the wireless charging coil from the phone.
– When putting things back together, make sure to fasten those motherboard bracket screws first to get that charging coil perfectly in place. Then, give the rest of the coil a good, firm press down to keep it secure.
Step 24

– Channel your inner geek and use a spudger to carefully lift and unplug the earpiece speaker cable’s connector, just like a real tech guru would! If you need help, you can always schedule a repair.
Tools Used
Step 25

– Grab a trusty Phillips screwdriver and start by removing the fortunate seven 4 mm screws that are holding the earpiece speaker securely in place on the motherboard.
Step 26


– Get ready to rock by sliding the point of a spudger into the cool gap between the right-most edge of the earpiece speaker and the phone.
– Time to dance! Use the spudger to gently pry up and release the clips that are holding the earpiece speaker in place.
– Now it’s showtime! Use tweezers, or simply your awesome fingers, to smoothly remove the earpiece speaker.
Step 27


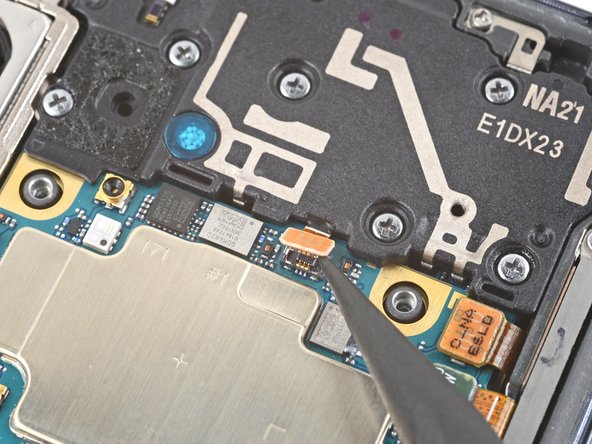
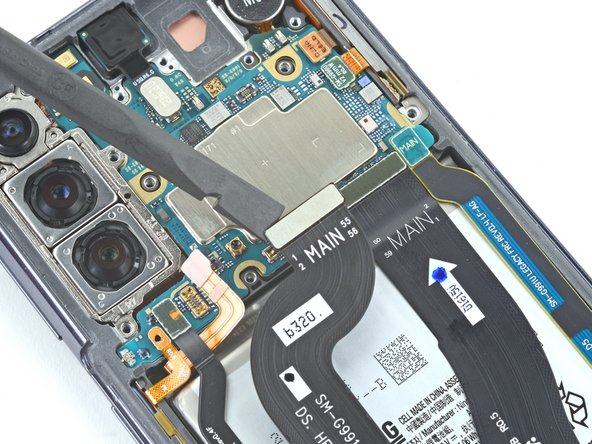
– Gently insert the flat end of a spudger to lift and disconnect the front camera’s press connector. You’ve got this!
Tools Used


Step 30


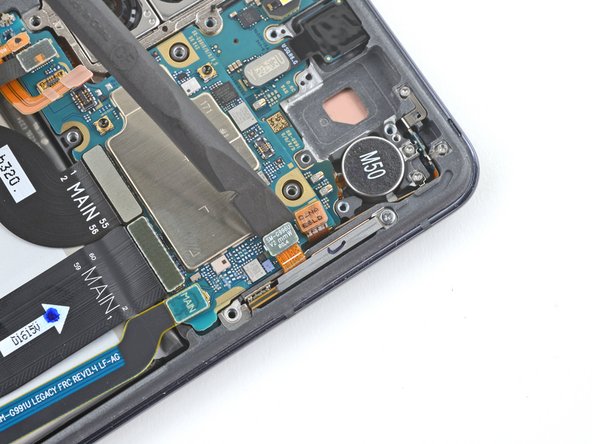
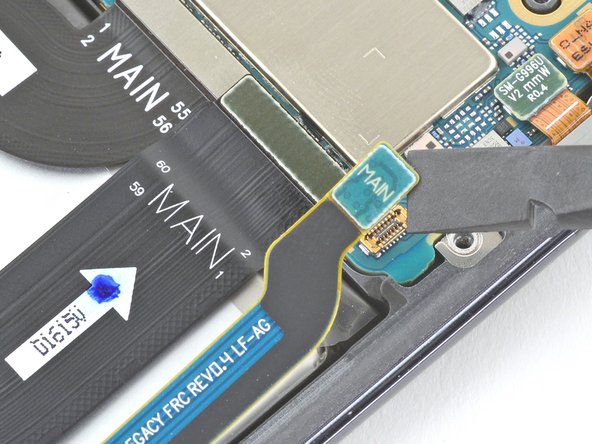
– Use the super cool spudger to gently lift and disconnect the power button cable’s press connector.
Tools Used


Step 33

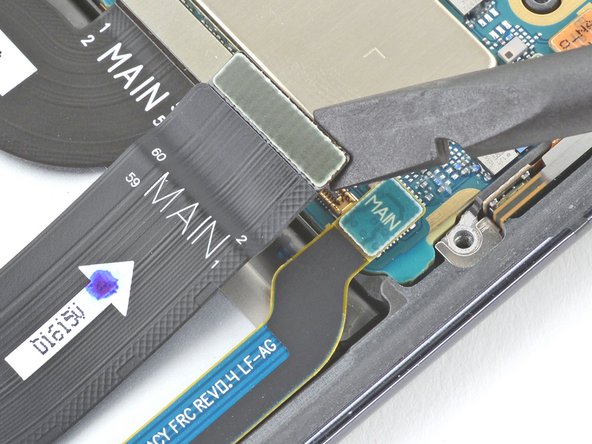
Remember to treat the cables gently while rearranging them; rough handling could result in cable damage.
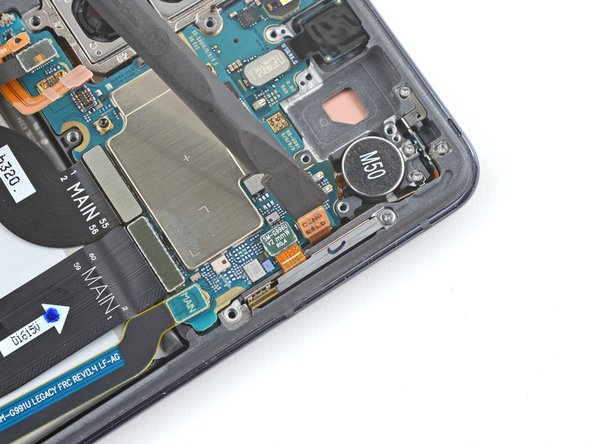
– Grab a spudger or just your trusty fingers and carefully nudge that power button cable away from the phone. You’ve got this!
– Now, let’s give some love to the left-edge 5G antenna cable—repeat the same gentle bending action!
Tools Used
Step 34
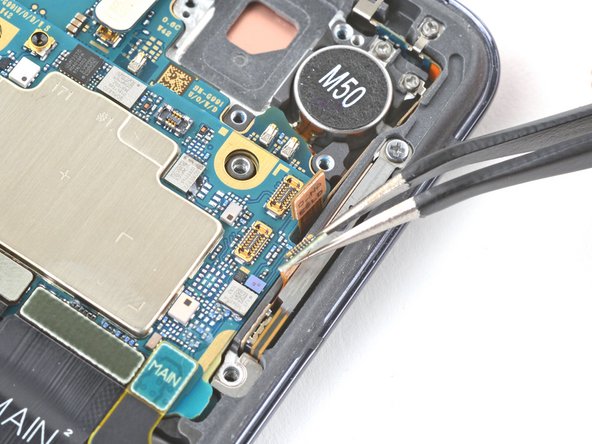


Take care not to bend or fold those cables too much while you’re moving them around; you wouldn’t want them to get torn apart, right?
– Grab your trusty tweezers or just use your fingers to gently nudge that orange 5G antenna cable away from the phone. You’ve got this!
– Now, do the same for the green 5G antenna cable. Easy peasy!
Tools Used
Step 35

– Grab your trusty Phillips screwdriver and unscrew that 4 mm screw that’s holding the camera bracket and the motherboard snugly to the frame. You’re on your way to a successful repair!
Step 36
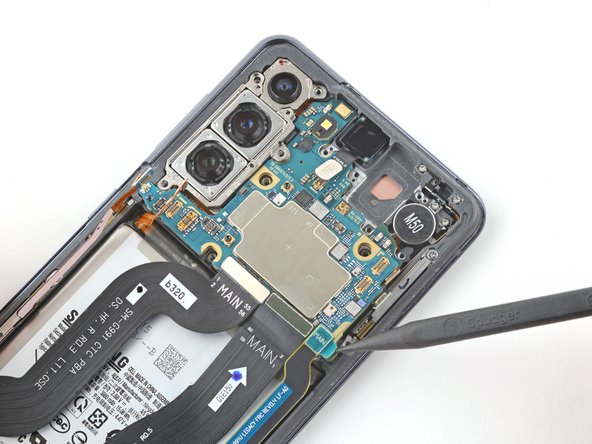
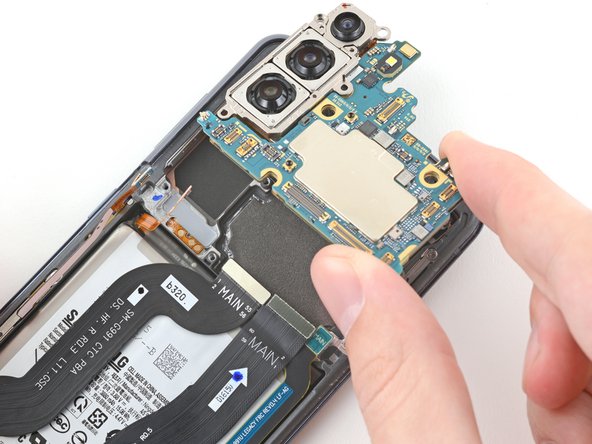

– Gently slide a spudger into the gap between the bottom-right corner of the motherboard and the frame—it’s like giving it a little nudge!
– Give that spudger a friendly pry to pop those clips loose that are holding the motherboard assembly in place. You’re doing great!
– Now, with a little finesse, use your fingers to lift out the motherboard assembly. You’re almost there!
Tools Used
Step 37
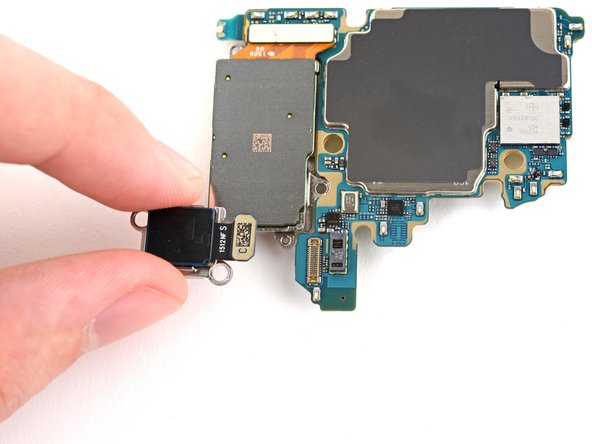

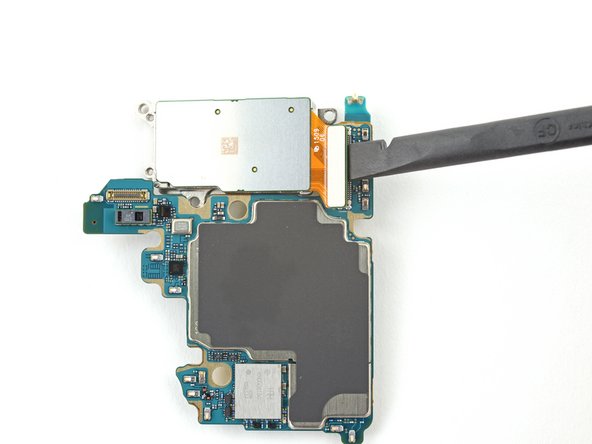
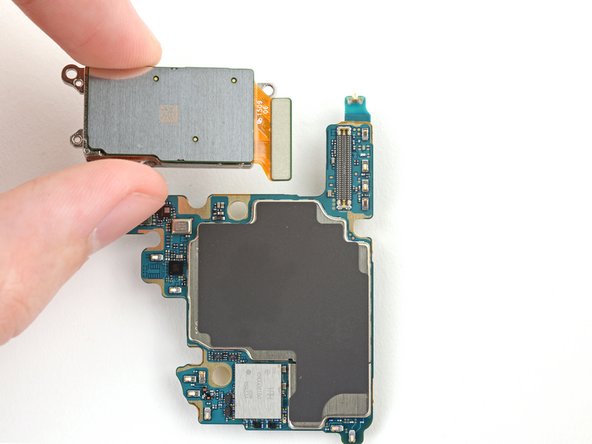
– Time to work some magic! Grab the trusty spudger and gently pry up the ultra wide camera’s press connector from the motherboard.
– Get those tweezers ready or just use your fingers to whisk away the ultra wide camera.
Step 38

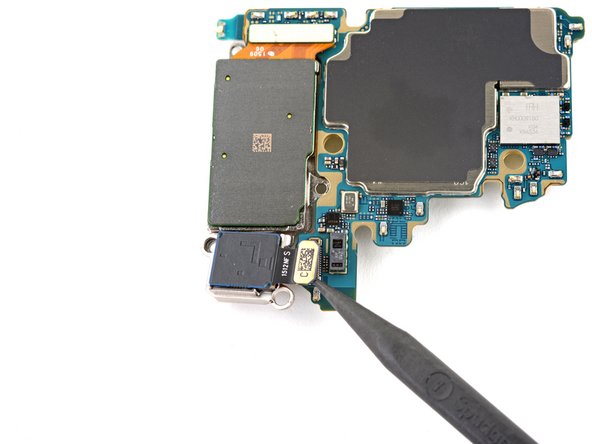
– Grab your trusty spudger and gently wiggle it under the wide and telephoto camera’s press connector. Give it a little pry to disconnect it from the motherboard. You’ve got this!
– Now, with either tweezers or your fingers, carefully lift out the wide and telephoto camera. Easy peasy!


