Samsung Galaxy S21 5G Secondary Interconnect Cable Replacement Guide
Duration: 45 minutes
Steps: 28 Steps
For your safety, make sure to drain that battery to below 25% before diving into disassembling your phone. Trust us, it’s for the best!
Hey there, repair champ! Want to swap out that secondary interconnect cable in yourSamsung Galaxy S21? Don’t sweat it, we’ve got you covered. Discharge that batt below 25%before you start tearing into your phone. It’s all part of keeping you safe and sound whileyou’re at it. And yes, if your battery’s got a bit of a belly, play it safe and take someprecautions. Don’t hesitate to reach out if you need some help, you can always
Step 1

Alright tech hero, make sure to power down your phone completely before you dive in. If you need help, you can always schedule a repair
– Get your iOpener nice and warm, then gently press it against the lower edge of the back cover for a couple of minutes.
Tools Used

Step 2


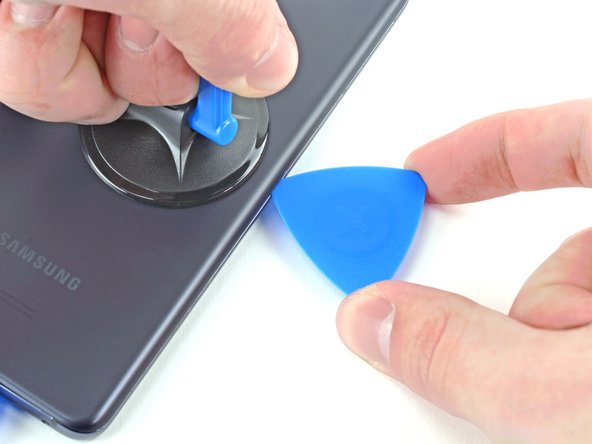
– Get your suction cup buddy ready to party by slapping it onto the back of the phone near the center of the bottom edge.
– Channel your inner superhero strength as you pull up on the suction cup like a champ to create a gap between the back cover and the frame.
– Slide an opening pick into the groove like a smooth operator, easing your way into the heart of the repair.
Step 3


– Wooo-wee! Now, slide your handy-dandy pick all along that bottom edge like there’s no tomorrow. This’ll help you slice right through that adhesive like a pro. And hey, when you’re done, just leave that pick in there and give it a little dance. This’ll make sure that adhesive doesn’t seal itself right back up on ya! If you need help, you can always schedule a repair.

Step 5


– Grab a suction cup and stick it on the back of your phone, aiming for the center of the left edge for the best grip.
– Give that suction cup a strong, steady pull to create a nice little gap between the back cover and the frame.
– Slide an opening pick into that gap and you’re one step closer to victory!
Step 6


– Gently glide an opening pick along the left edge, making your way to the bottom left corner to slice through that adhesive like a pro.
– Keep the pick in place to stop the adhesive from rejoining the party.
Step 7

– Give the back cover’s right edge a warm hug with a heated iOpener for two minutes.
Tools Used
Step 8


– Get ready to jazz up your repair skills! Place a suction cup right in the middle of the phone’s right edge.
– Put some muscle into it and pull up on that suction cup like a boss to create some space between the back cover and the frame.
– Time to groove it out – slide an opening pick into the gap you just made. Keep up the good work!
Step 9


– Gently slide an opening pick from side to side along the right edge of the back cover to gracefully cut through the adhesive.
– Keep the pick in place to make sure the adhesive doesn’t decide to stick back together.
Step 10


Feel free to apply this technique to each corner, just steer clear of the top-left where the rear-facing camera is hanging out.
– Swing the right-edge pick around the top-right corner of your phone.
Step 11


– Gently slide the top pick right up to the edge of the camera shell—you’re doing great!
– Now, give that left-edge pick the same loving attention. Keep it up!
Step 12

– Warm up an iOpener and place it on the camera shell for a couple of minutes.
Tools Used
Step 13


If this technique doesn’t do the trick, no worries! Just head on to the next step for another great option. If it does work, feel free to skip ahead to the next step.
– Twist the back cover counterclockwise to open up a gap between the camera shell and the frame.
– Slide an opening pick into the gap.
Step 14


Handle with care, as there’s a chance you might accidentally crack the plastic back cover. Keep it cool and steady!
– Keep it breezy and slide those two picks under the backplate’s corners by the camera gently. Now groove on those picks as they dance between the cover and shell, soon you’ll have a peep gap and bam! We’re in.
Step 15


– Gently slide a helpful opening pick between the camera shell and the frame to cheerfully cut through the adhesive.
Step 16


Hey there! Just a heads-up: there’s a plate on the back cover surrounding the phone’s flash that the pick can get stuck on.
– Oh, look out! There’s some extra adhesive hanging out to the right of the camera that you’ll want to slice through.
Step 17


– Time to get your phone fixed up! Align the opening pick’s tip with the flash on your device. Slowly slide it in, being careful to steer clear of the flash plate. Now, let’s cut through the adhesive to the right of the camera.


Step 19

Throughout this repair, keep track of each screw, as we’ll be using it to put everything back together like a satisfying puzzle! If you face any challenges, remember that you can always schedule a repair.
– Grab your trusty Phillips screwdriver and get ready to make some magic happen! Carefully unscrew those five 4 mm-long screws that are holding the motherboard bracket snugly to the frame. You’ve got this!
Step 20


Hold up! Don’t yank off that bracket just yet – it’s still chilling with the wireless charging coil.
– Grab those tweezers and carefully lift up and unclip the motherboard bracket from the frame. If you need help, you can always schedule a repair.
Tools Used

Step 21


– Grab your trusty tweezers or fingers and gently hold the motherboard bracket aside. Now, let’s use that spudger to nudge the battery press connector up, nice and easy!
– When it’s time to snap those press connectors back in, make sure you align one side perfectly and press down until you hear that satisfying click. Go ahead and do the same on the other side, but remember, don’t press in the middle! If things get a bit off-kilter, those pins could bend and nobody wants that kind of drama. If you need help, you can always schedule a repair.

Step 22


– While delicately holding the motherboard bracket off to the side, gently use a spudger to lift and disconnect the press connector of the wireless charging coil.
Tools Used
Step 23


The wireless charging coil is gently attached to the phone with a light adhesive. If you need help, you can always schedule a repair.
– Gently coax the wireless charging coil away from the phone using your fingers. Treat it like a delicate flower, and it will thank you!
– When it’s time to put everything back together, start by securing the motherboard bracket screws. This ensures the charging coil sits perfectly in its cozy spot. After that, give the rest of the coil a firm press to make sure it sticks around.
Step 24

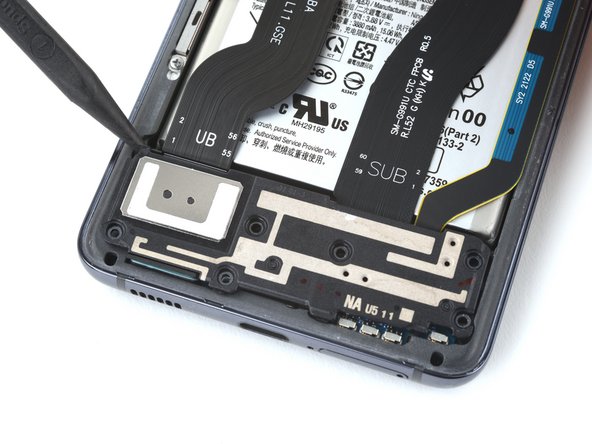
– Grab your trusty Phillips screwdriver and let’s get to work! Carefully unscrew the six 4 mm screws that are holding the loudspeaker snugly to the frame. You’ve got this!


Step 26


– Grab your trusty spudger and gently lift up the secondary interconnect cable’s bottom press connector. If you need help, you can always schedule a repair.
Tools Used


