Samsung Galaxy S21+ Earpiece Speaker Replacement Guide
Duration: 45 minutes
Steps: 18 Steps
SM-G996B/DS
Ready to swap out that earpiece speaker on your Samsung Galaxy S21 Plus? You’re in the right place! This guide is based on the SM-G996B/DS (international) model, but keep in mind that other models might have an extra antenna cable lurking in the edge of the midframe. Remember, if you skip replacing the adhesive seals during reassembly, your device will still work like a champ, but you might lose some of that water protection magic. So, grab some replacement adhesive to ensure everything sticks together nicely when putting your device back together. If you need help, you can always schedule a repair.
Step 1

– Grab your trusty iOpener and let it work its magic on the back cover for a solid three minutes. This will help loosen up that sticky adhesive hiding beneath. You’re doing great!
Tools Used

Step 2


– Attach a cool suction handle to the bottom edge of the back cover, right on the edge like a pro.
– With a confident grasp, lift the back cover using the suction handle to create a small gap between the back cover and the frame.
– Gently slide an opening pick into the gap you cleverly made.
– Take the opening pick down to the bottom left corner to smoothly slice through the adhesive.
– Keep that opening pick in place to ensure the adhesive stays put.
Tools Used

Step 3


– Pop in another opening pick at the bottom part of your phone.
– Gently move the opening pick to the lower right corner to cut through the adhesive.
– Keep those opening picks right where they are to make sure the adhesive doesn’t seal back up.
Step 4


If the adhesive is giving you a tough time and feels like it’s gone all hard and crusty, it probably just needs a little warmth to get back in the groove. Grab your iOpener and give it a cozy two to three minutes of heat to revive it.
– Grab a third opening pick and gently insert it in the bottom right corner of your phone.
– Now, glide that opening pick along the right edge to neatly cut through the adhesive.
– Pop the opening pick into the top right corner to keep the adhesive from getting all clingy again.
Tools Used
Step 5


When you’re slicing close to the camera assembly, just gently slide in the tip of the opening pick (about 4-5 mm) to keep that camera safe and sound. No smudges or scratches on our watch!
– Time to get funky! Gently slip a fourth opening pick right under the cool top right corner of your phone.
– Now, groove that pick along the top edge to smoothly slice through the adhesive.
– Party on! Keep the opening pick chillin’ in the top left corner to make sure that adhesive doesn’t start sticking again.
Step 6


– Slide a fifth opening pick right under that bottom left corner like a pro.
– Gently glide the opening pick along the left edge of the back cover to carefully slice through the last bit of adhesive.


Step 8


Handle that battery with care! Avoid puncturing or bending it with your tool—doing so might unleash some not-so-friendly chemicals or even cause a thermal event. Yikes!
Watch out for the sneaky cable hiding beneath the charging coil. Take your time and if your pick gets stuck on it, pause before pushing further. We want to keep everything safe and sound!
– Stay cool and slide an opening pick underneath the left bottom end of the NFC antenna and charging coil assembly.
– Gently glide the opening pick along the bottom left edge of the assembly to detach it from the battery.
Step 9


– Slide an opening pick under the lower edge of the NFC antenna and charging coil assembly—just work it in gently.
– Now, give that opening pick a little shimmy along the bottom of the assembly to help it break free from the loudspeaker. You’ve got this!
Step 10


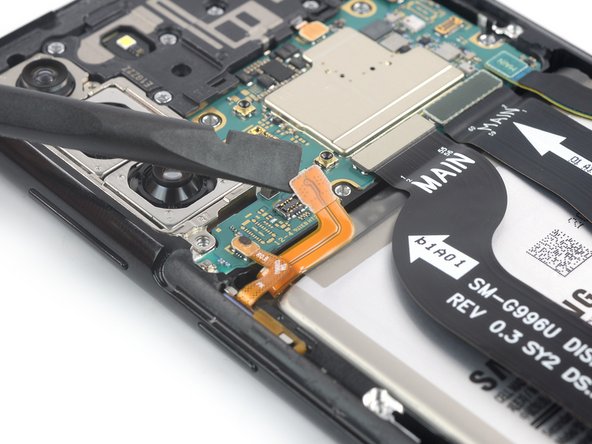
– Grab your trusty spudger and gently pry the charging coil connector straight up from its socket. It’s like giving it a little lift-off!
Tools Used


Step 12

– Grab your trusty Phillips screwdriver and take out those five 3.9 mm-long screws that are holding the NFC antenna and charging coil assembly in place. You’ve got this!
Step 13


– Get ready to earn your repair stripes by delicately removing the NFC antenna and charging coil assembly using a pair of tweezers or your nimble fingers.

Step 15

– Grab your trusty Phillips screwdriver and get ready to tackle those seven 3.9 mm-long screws that are keeping the earpiece speaker assembly in place. You’ve got this!
Step 16

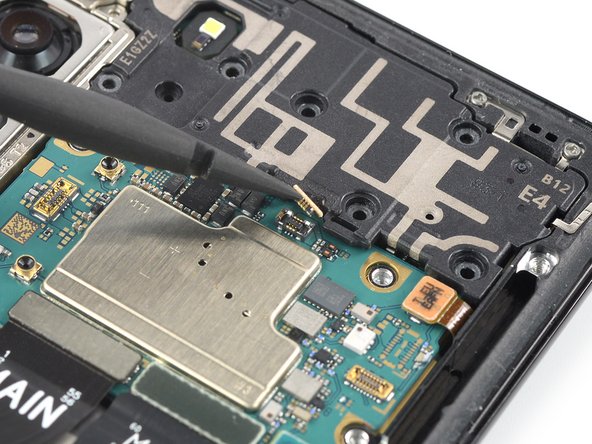
– Grab your trusty spudger and gently pry the earpiece speaker cable connector straight up from its socket. You’ve got this!
Tools Used
Step 17


– Slide in a spudger sneakily under the cool corner of the earpiece speaker assembly.
– Get your spudger ready to give that earpiece speaker assembly a friendly lift.
Tools Used
Step 18


– Grab a pair of tweezers or use those nimble fingers of yours to delicately lift off the earpiece speaker assembly.
– When putting things back together, be sure to lay down fresh adhesive in the right spots. After giving those areas a good clean with isopropyl alcohol (>90%), of course.


