
Samsung Galaxy S21 Plus Display Cable Replacement
Duration: 45 minutes
Steps: 19 Steps
Ready to tackle the display cable replacement on your Samsung Galaxy S21 Plus? You’re in for a treat! This guide is based on the SM-G996B/DS (international) model, but don't fret if you have a different version—just keep an eye out for an extra antenna cable tucked away in the midframe. Remember, if you skip replacing those adhesive seals during reassembly, your phone may still work like a champ, but it might lose a bit of its water resistance. Make sure you grab some replacement adhesive to keep everything snug when putting your device back together. If you ever find yourself in a pickle, don’t hesitate to schedule a repair!
Step 1

You can use a hair dryer, heat gun, or hot plate, but make sure to keep it cool—your phone’s display and internal battery can get a little too hot to handle!


Step 2


If your back cover is feeling a bit worse for wear with a crack, don't fret! You can give that suction handle a fighting chance with some strong tape. If you're feeling crafty, superglue it in place and let it cure like a pro so you can keep moving forward with your repair.
Struggling to create a gap? No worries! Just crank up the heat a bit more to loosen that adhesive. Remember to keep an eye on the iOpener instructions so you don’t go overboard with the heat.
- Grab a suction handle and stick it to the bottom edge of the back cover, getting as close to the edge as you can.
- Give that back cover a gentle lift using the suction handle to make a tiny gap between it and the frame.
- Slide an opening pick into the gap you've made.
- Carefully glide the opening pick towards the bottom left corner to slice through that pesky adhesive.
- Keep the opening pick in place to stop the adhesive from playing tricks and sealing back up.
Tools Used

Step 3


- Place a second opening pick at the bottom edge of your device.
- Carefully slide the pick towards the bottom right corner to cut through the adhesive.
- Keep the opening picks in place to prevent the adhesive from sealing back up.
Step 4


If the adhesive starts acting stubborn and tough to slice through, it's probably cooled off. Give your iOpener a cozy two-to-three minute warm-up to get things moving again.
- Pop in a third opening pick at the bottom right corner of your phone.
- Gently glide that opening pick along the right edge to cut through the adhesive like a pro.
- Keep the opening pick snug in the top right corner to stop that pesky adhesive from trying to reseal.
Tools Used
Step 5


When you're getting close to the camera assembly, just slide in the tip of the opening pick (about 4-5 mm) to keep that camera safe and sound. We want it to shine, not to get smudged!
- Pop a fourth pick under the top right corner—like you’re sneaking an extra fry on your plate.
- Glide that pick along the top edge to slice through the adhesive, smooth moves only.
- Leave your pick chillin’ in the top left corner so the adhesive doesn’t get any ideas about sticking things back together.
Step 6


When you’re slicing near the power button, just sneak the tip of your opening pick in there—about 3–4 mm is plenty—so you don’t accidentally poke the power/volume flex cable and send it to an early retirement.
- Slip a fifth opening pick under the bottom left corner—like you're sliding a secret note to your device.
- Glide the pick up the left edge to slice through the last bits of sticky stuff holding the back cover on.
Step 7


- Pop off the back cover.
- When you're putting things back together:
- Now’s a smart time to power up your phone and check that everything’s working. Make sure to shut it down again before you jump back in.
- Clear away any leftover adhesive with tweezers or your fingers. For any sticky residue, a little isopropyl alcohol (90% or higher) will work wonders.
- Rocking Samsung custom-cut adhesives? Here’s a guide for that.
- Going with double-sided tape? Check out this guide.
Step 8


Hey there, battery whisperer—keep your prying tool chill so the battery doesn’t get stabbed or squished; a bent or punctured power-pack can throw a spicy tantrum.
Also, mind the sneaky cable hiding under the charging coil—slide your pick like you’re buttering toast, and if it snags, just pause and regroup. You’ve got this!
- Slip an opening pick under the bottom left corner of the NFC antenna and charging coil combo—like you're sneaking dessert before dinner.
- Gently glide the pick along the lower left edge to free the assembly from the battery. Smooth moves, minimal fuss!
Step 9


- Slide an opening pick beneath the lower edge of the NFC antenna and charging coil assembly. You've got this!
- Gently glide the opening pick along the bottom of the assembly to separate it from the loudspeaker. Take your time, and remember, you're doing great!
Step 10


- Grab your spudger and gently pop the charging coil connector straight out of its socket. Take it easy, no need to rush—just a little lift and you're good!
Tools Used

Step 11


- Grab your spudger and gently pop the NFC antenna connector straight up from its socket. Easy does it!
Tools Used
Step 12

- Grab a Phillips screwdriver and unscrew those five 3.9 mm screws holding down the NFC antenna and charging coil assembly. Easy does it—once those screws are out, you're one step closer to the fix. If you need a hand along the way, you can always schedule a repair.
Step 13


- Gently grab your trusty tweezers or just your fingers and carefully lift out the NFC antenna and charging coil assembly. You've got this!
Step 14

- Grab your trusty spudger and gently pry the battery cable connector straight up from its socket. You've got this!
Tools Used
Step 15

- Grab your trusty Phillips screwdriver and get ready for some action! Unscrew those six 3.9 mm-long screws holding the loudspeaker assembly in place. You've got this!
Step 16


- Slide an opening pick into the tiny gap between the top of the loudspeaker assembly and the midframe. You're doing great!
- Now, gently tilt that opening pick downward to pry up the loudspeaker assembly. Keep going, you've got this!
Step 17


- Time to say goodbye to that loudspeaker assembly - carefully remove it.
- When you're putting everything back together, don't forget to add some fresh adhesive where it's needed. First, give the relevant areas a good clean with isopropyl alcohol (>90%).
Step 18


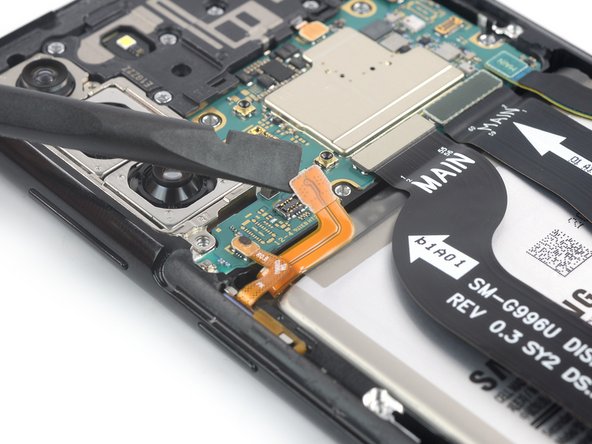
- Grab your trusty spudger and gently pop the display flex cable’s top connector straight up out of its socket. Easy does it—no need to wrestle with it!
Tools Used
Step 19


- If you can, power up your device and give your repair a quick test before you seal it all up with new adhesive.
- Check out your new replacement part against the original one—don't forget to transfer any leftover components or peel off those pesky adhesive backings before you install.
- To put everything back together, just follow these instructions in reverse order.
- Once you've wrapped up the repair, use this guide to test your handiwork.
- Got some e-waste? Make sure to drop it off at an R2 or e-Stewards certified recycler.
- Things didn't go as smoothly as you'd hoped? No worries! Try some basic troubleshooting, or if you’re still stuck, feel free to schedule a repair for some extra help.


