
Samsung Galaxy S21 Primary Interconnect Cable Replacement
Duration: 45 minutes
Steps: 28 Steps
For your safety, make sure the battery is drained below 25% before you start disassembling your device. Stay safe and keep it chill!
Ready to swap out the primary interconnect cable in your Samsung Galaxy S21? Let's get into it! Before you crack open your phone, make sure the battery is under 25%. This makes things way less risky if the battery gets bumped during the repair. If your battery is looking a little puffy, play it safe and handle with care.
Step 1

Make sure to power down your phone completely before diving in!
A heat gun, hot plate, or even a hair dryer can do the trick, but keep it gentle—too much heat can fry the display, battery, or plastic back cover. Think of it like a warm hug, not a sauna session. If you need a hand, you can always schedule a repair.
- Warm up an iOpener and gently press it against the bottom edge of the back cover for about two minutes. This helps loosen the adhesive so you can get inside more easily. If you need a hand, you can always schedule a repair.
Tools Used

Step 2


Be careful to only insert the pick up to 5 mm, as going deeper could lead to some unintentional damage to the internal components. Keep it light and gentle, and you'll be just fine!
If your phone’s a bit older, this part can be tricky. Try warming up the edge a little more and give it another go.
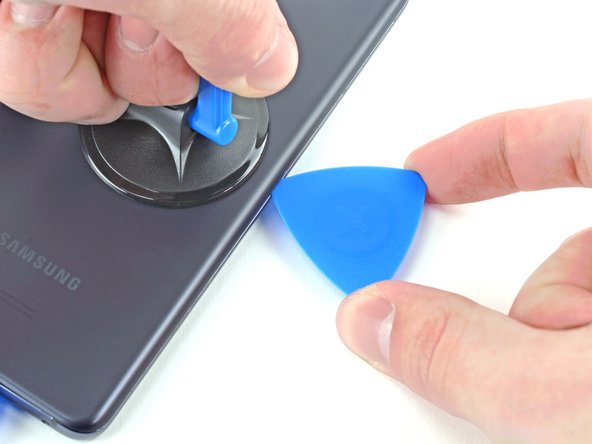
- Stick a suction cup near the bottom center of the phone's back. Give it a good press—firm but steady, no tug-of-war needed.
- Gently pull up on the suction cup, applying consistent pressure to create a small gap between the back cover and the frame.
- Slide an opening pick into that gap and get ready to peel it apart.
Step 3


- Gently glide the pick along the bottom edge, back and forth, to cut through that pesky adhesive.
- Keep the pick in place to ensure the adhesive doesn’t seal back up.
Step 4

- Warm up the back cover's left edge by applying a heated iOpener for about two minutes. This softens the adhesive, making it easier to lift. If you need a hand, you can always schedule a repair.
Tools Used
Step 5


Keep your pick insertion to just 5 mm or less! Going deeper could accidentally poke something important and cause some unexpected issues.
- Stick a suction cup onto the back of your phone, aiming for the center along the left edge.
- Give the suction cup a good, steady pull to pop a gap open between the back cover and the frame.
- Slide an opening pick into that newly made gap and get ready to work your magic.
Step 6


Careful! If you slice past where the camera shell hugs the back cover, you might end up with a cracked plastic situation—and nobody needs that kind of drama.
- Carefully glide an opening pick down the left edge, aiming for that bottom left corner to slice through the adhesive like a pro.
- Keep that pick in place to make sure the adhesive doesn't decide to make a comeback!
Step 7

- Gently press a heated iOpener against the back cover’s right edge and hold it there for about two minutes to loosen things up.
Tools Used
Step 8


Stick to just 3 mm with the pick on this side—any deeper and you risk playing hide-and-seek with the secondary interconnect cable running along the right edge.
- Grab a suction cup and stick it on the back of your phone, aiming for the center near the right edge for the best grip.
- Give that suction cup a strong, steady pull! This will help you create a little gap between the back cover and the frame.
- Now, slide an opening pick into the newly formed gap and let the fun begin!
Step 9


- Work that opening pick along the right edge of the back cover—think of it as slicing through stubborn glue.
- Park your pick in place to keep the adhesive from playing reunion.
Step 10


Be careful! Only insert the pick up to 5 mm—going deeper could risk damaging those delicate internal components. Proceed with caution!
You can tackle this process at each corner, just steer clear of the top-left where the rear-facing camera hangs out.
- Gently rotate the right-edge opening pick around the top-right corner of the phone to get things started.
Step 11


- Glide the top pick as close as you can to the camera shell—like you’re sneaking past a sleeping cat.
- Do the same for the pick on the left edge. Stealth mode: activated.
Step 12

- Warm up an iOpener and gently press it onto the camera shell, holding it there for about two minutes. This helps loosen things up so you can get inside more easily. If you need a hand, you can always schedule a repair.
Tools Used
Step 13


Just slide in the pick about 5 mm – no need to go deeper, or you might scratch the camera. Keep it light and easy, and if you need a hand, you can always schedule a repair.
If this trick doesn’t do the job, roll on to the next step for a fresh approach. If it works, feel free to skip ahead!
- Twist that back cover to the left and watch as a little gap appears between the camera shell and the frame. Magic, right?
- Now, slide an opening pick into that gap and let’s get this party started!
Step 14


Take it easy with this step—too much force and the plastic back cover might get a nasty crack.
- Slide the two picks toward the camera shell until they’re sitting right under the corners of the back cover next to the camera shell. Nice and easy, no need to rush.
- Work those picks back and forth along the bridge between the back cover and the camera shell, wiggling gently until you spot a gap forming between the camera shell and the frame.
Step 15


That frame is clinging to the camera shell like it owes it money, so you'll probably want to warm it up a few times before it lets go.
- Gently slide an opening pick between the camera shell and the frame to break that pesky adhesive seal.
Step 16


Watch out for the plate around the flash on the back cover—it’s a sneaky spot where your pick can get stuck!
- There's a bit more sticky stuff hanging out to the right of the camera—slide your pick through it and keep things moving.
- Tilt your pick downward like a pro to steer clear of any accidental damage.
Step 17


The resistance of the plate can feel a bit like it's glued down. Tilt that pick downwards to prevent it from slipping into the plate. You've got this!
- Get that opening pick lined up with your phone’s flash—precision is the name of the game.
- Ease the pick in nice and slow, steering clear of the flash plate. No sudden moves!
- Work the pick to slice through the sticky stuff just to the right of the camera. Smooth operator!
Step 18


If that back cover is still clinging to the frame like a stubborn sticker, just keep gliding your pick around the edges until it finally lets go and comes off. You got this!
- Pop off the back cover.
- On your way back to reassembly:
- Now’s a great moment to power up your phone and check that everything’s working before you button it all up again. Don’t forget to shut it down completely before you get back to business.
- Pick off any leftover adhesive bits with tweezers or your fingers. Wipe up the sticky residue using high-strength (over 90%) isopropyl alcohol.
- If you grabbed Samsung’s custom-cut adhesives, check out this guide.
- If double-sided tape is your jam, hit up this guide.
Tools Used

Step 19

As you tackle this repair, remember to keep an eye on each screw and put it back in its rightful home when you're done. It's like a little puzzle, and you want to make sure all the pieces fit perfectly!
- Grab your trusty Phillips screwdriver and get ready to tackle those five 4 mm-long screws holding the motherboard bracket snugly to the frame. Let's get this party started!
Step 20


Hold up! Don't go yanking that bracket off just yet—it's still cozy with the wireless charging coil.
- Grab a pair of tweezers and gently lift the motherboard bracket from the frame, unclicking it with a light touch. If you hit any snags, remember you can always schedule a repair for extra help.
Tools Used
Step 21


Gently slip your tool under just the edge of the connector—keep clear of the socket and its neighbors to avoid any accidental damage.
- Gently move the motherboard bracket aside using tweezers or your fingers, and grab a spudger to lift the battery press connector. Be careful—it's a delicate little move.
- To snap that press connector back in place, align one side first, then press down gently until it clicks. Do the same for the other side. Avoid pressing in the middle, as that could bend the pins and lead to some costly damage. Slow and steady wins this race.

Step 22


- Keep the motherboard bracket out of your way and grab your trusty spudger—gently pop up that wireless charging coil's connector like you're opening a stubborn pickle jar. Easy does it!
Tools Used
Step 23


The wireless charging coil is stuck to the phone with a bit of adhesive magic.
- Gently lift the wireless charging coil away from the phone using your fingers—think of it like peeling a sticker, but with more care. When you're ready to put everything back together, start by tightening the motherboard bracket screws first—that'll help line up the charging coil just right. Once that's in place, press down firmly on the rest of the coil to make sure it sticks well. If you need a hand along the way, you can always schedule a repair.
Step 24

- Grab your trusty Phillips screwdriver and get ready to tackle those six 4 mm screws holding the loudspeaker snugly to the frame. Let's get this party started!
Step 25


- Take your spudger and slide it into the notch in the top-left corner of the loudspeaker. Give it a gentle twist to pop those clips loose.
- Lift out the loudspeaker and set it aside. Easy does it!
Tools Used
Step 26


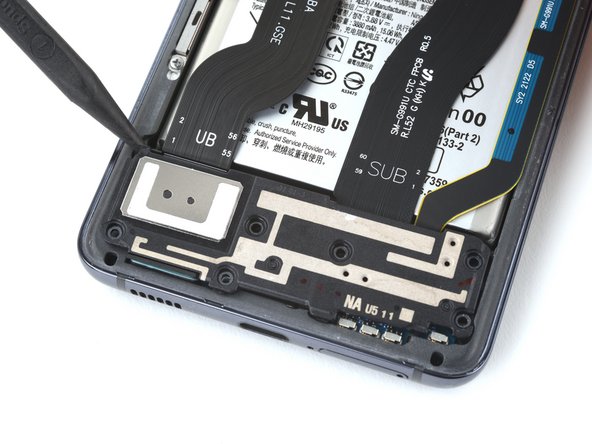
- Grab your trusty spudger and gently pop up the bottom press connector on the primary interconnect cable—like opening a stubborn jar, but with less risk of pickle juice everywhere.
Tools Used
Step 27
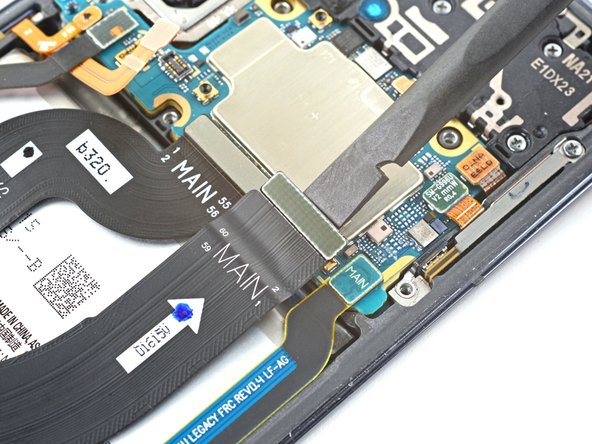

- Grab the flat end of a spudger and gently pry up to disconnect the top press connector of the main interconnect cable. Keep it smooth and steady—no rush, and if you need a hand, you can always schedule a repair.
Tools Used
Step 28

- Give your new part a quick side-by-side with the old one—sometimes a few bits need swapping or a sticky needs peeling before it’s ready to go.
- Putting things back together? Just reverse the steps above and you’re golden.
- Once you’re done, check out our testing guide to make sure everything’s working like a charm.
- Got leftover parts? Take your e-waste to a certified recycler and keep things green.
- Hit a snag? The Salvation Repair Answers community is packed with troubleshooting tips.
- If you’re still stuck, you can always schedule a repair.


