Samsung Galaxy S21 Ultra Front-Facing Camera Replacement Guide: DIY Repair Steps to Fix Your Phone
Duration: 45 minutes
Steps: 19 Steps
SM-G998B/DS
Ready to swap out your Samsung Galaxy S21 Ultra’s front-facing camera? This guide covers the SM-G998B/DS (international) model. Other models might have an extra antenna cable tucked in the midframe. Skipping the adhesive seals when reassembling means your device will still work like a charm but say goodbye to its water protection. So, grab some replacement adhesive to stick the parts back together. And remember, if you need help, you can always schedule a repair.
Step 1

First things first, make sure to unplug and power down your phone before diving in. Safety first, right?
If you’re feeling fancy, you can use a hair dryer, heat gun, or hot plate to help out. Just remember, keep it cool—overheating can cause some serious trouble for your display and internal battery. Let’s keep those safe!
– Grab your iOpener and pop it on the back cover for at least three minutes to soften up that adhesive. If you need help, you can always schedule a repair.


Step 2


If your back cover is looking a bit worse for wear with some serious cracks, a layer of clear packing tape can help the suction cup stick better. If you’re feeling adventurous, you can also use some super strong tape instead of the suction cup. And if you’re really in a bind, a little superglue can go a long way in securing that suction cup to the broken cover.
Having a tough time getting that gap started? No worries! Just apply a bit more heat to soften the adhesive further. Remember to follow the iOpener instructions to keep things from getting too toasty.
– Grab a suction handle and stick it to the bottom edge of the back cover, close to the edge.
– Lift the back cover with the suction handle to create a small gap between the back cover and the frame.
– Pop an opening pick into the gap you just made.
– Slide the opening pick to the bottom left corner to slice through the adhesive.
– Leave the opening pick in place to keep the adhesive from resealing.
Tools Used

Step 3


– Pop a second opening pick into the bottom edge of your phone.
– Gently glide that pick to the bottom right corner to cut through the adhesive.
– Keep those opening picks in place to stop the adhesive from sealing back up.
Step 4


If the adhesive is giving you a hard time and feels tough to slice through, it probably just needs a little warmth. Give your iOpener a go for two to three minutes to heat things up again.
– Pop in a third opening pick at the bottom right corner of your phone.
– Gently glide that opening pick along the right edge to cut through the adhesive like a pro.
– Keep the opening pick snug in the top right corner to stop the adhesive from sticking back together.
Tools Used
Step 5


When you’re slicing close to the camera assembly, just slide in the tip of the opening pick (about 4-5 mm) to keep that camera safe and sound—no smudges or damage here!
– Slide a fourth opening pick under the top right corner of your phone like a pro.
– Gently glide the opening pick along the top edge to cut through that sticky adhesive.
– Keep the opening pick in the top left corner to stop the adhesive from sealing back up.
Step 6


Hey there! When you’re delicately working around the power button, just slide in the very tip of the opening pick (~3-4 mm) to keep those power and volume buttons safe and sound. You’ve got this, champ!
– Slide a fifth opening pick under the top left corner like a pro.
– Gently glide the opening pick down the left edge of the back cover to cut through the last bits of adhesive.
Step 7


– Hey there, tech hero! 👊 Let’s get your device back in action. First, remove that back cover like a detective uncovering a mystery. After reassembly, give your phone a test run to make sure everything’s copacetic. Swiffer away any adhesive chunks with those pointy tweezers or your trusty fingers, and then use some strong isopropyl alcohol to erase any sticky residue. If you’re a pro and are using custom-cut adhesives, check out this guide for the lowdown. And if double-sided tape is more your jam, this guide’s got you covered. Remember, if you need help, you can always schedule a repair 🛠️
Step 8


– Slide an opening pick under the left bottom corner of the NFC antenna and charging coil assembly. You’re doing great!
– Gently glide the opening pick along the bottom left edge of the assembly to detach it from the battery. Keep it up!
Step 9


– Pop an opening pick underneath the bottom part of the NFC antenna and charging coil setup.
– Gently glide the pick along the bottom of the setup to detach it from the loudspeaker.
Step 10


– Grab your trusty spudger and gently pry the charging coil connector straight up from its socket. It’s like giving it a little lift to say, ‘Time to disconnect!’
Tools Used


Step 12

– Grab your trusty Phillips screwdriver and tackle those five 3.9 mm-long screws that are holding the NFC antenna and charging coil assembly in place. You’ve got this!
Step 13


– Grab a trusty pair of tweezers or just your fingers, and gently lift out the NFC antenna and charging coil assembly. You’ve got this!


Step 15

– Grab your trusty Phillips screwdriver and get ready to tackle those four 3.9 mm-long screws holding the earpiece speaker and laser AF module assembly in place. You’ve got this!
Step 16


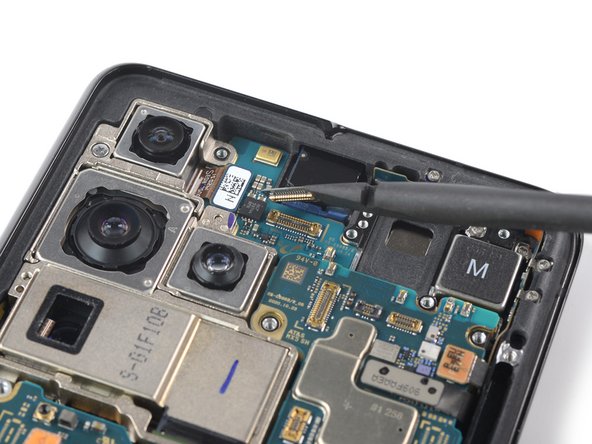
– Grab your trusty spudger and carefully lift the connectors to disconnect the laser AF module and earpiece speaker flex cables. Need a hand? You can always schedule a repair.
Tools Used
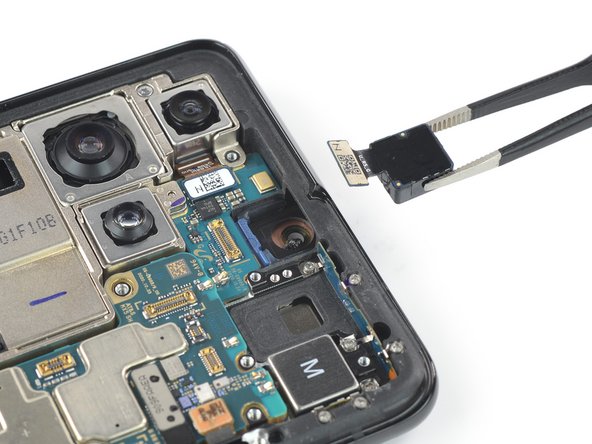
Step 17


– Gently grasp the bottom right corner of the earpiece speaker and laser AF module assembly with a pair of blunt nose tweezers, then carefully lift it up.
– Remove the earpiece speaker and laser AF module assembly.

Step 19


– Grab your trusty tweezers and gently lift that front camera out of its cozy little spot—it’s time for it to shine! Just be careful not to pull too hard.
– When you’re putting things back together, don’t forget to apply some fresh adhesive where needed. A little cleaning with isopropyl alcohol (over 90% is the magic number) will make sure everything sticks like it should!


