
Samsung Galaxy S21 Vibrator Replacement
Duration: 45 minutes
Steps: 38 Steps
For your own safety, make sure to drain that battery to below 25% before diving into the disassembly of your phone. Let's keep things safe and sound!
Ready to get your Samsung Galaxy S21 vibrating again? Start by making sure the battery is below 25%充电 to avoid any potential thermal issues during the repair pocess. If your battery looks a bit swollen~ take the necessary precautions, safety first! You'll also want to have some replacement adhesive Handy to complete the job. Let's get started with this step-by-step repair guide from Salvation Repair!
Step 1

Make sure to turn your phone all the way off before you get started—no accidental pocket-dials mid-repair, please!
You can use a hair dryer, heat gun, or hot plate to help with the process, but keep an eye on the temperature! Overheating your phone can lead to some serious issues, as the display, internal battery, and plastic back cover are all a bit sensitive to heat. So, let’s keep it cool and get this done right!
- Warm up your iOpener and let it chill on the bottom edge of the back cover for a couple of minutes.
Tools Used

Step 2


Insert the pick-up to 5 mm gently—pushing further might risk damaging those internal parts. Take it slow and steady, and if you need a hand, you can always schedule a repair.
If your phone’s a bit older, this step might put up a fight. Try warming up the edge a little more and give it another go.
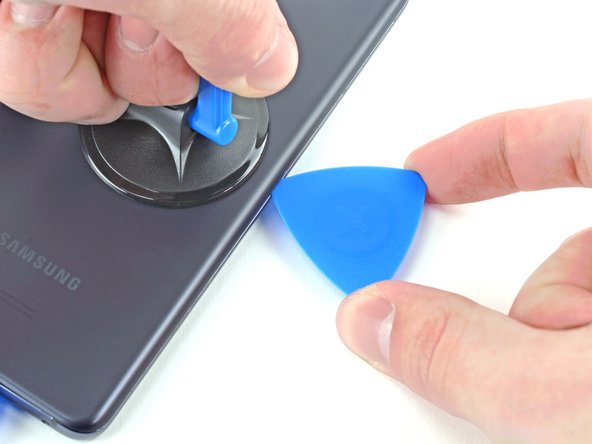
- Stick a suction cup on the back of your phone, aiming for the center near the bottom edge—like a pro.
- Give the suction cup a strong, steady pull upward to open up a little gap between the back cover and the frame. Don't be shy!
- Slide an opening pick into that gap you just made—get in there gently, like you're sneaking snacks at midnight.
Step 3


- Gently slide the plastic pick back and forth along the bottom edge to cut through the adhesive. Keep the pick in place afterward to stop the adhesive from sealing itself back up.
Step 4

- Warm up the back cover's left edge with a heated iOpener for about two minutes to loosen things up.
Tools Used
Step 5


Keep the pick shallow—no deeper than 5 mm—to avoid poking at parts that really don’t want to be poked.
- Stick a suction cup on the back of the phone, pretty close to the center of the left edge—think of it as giving the phone a tiny high-five.
- Gently but firmly tug the cup upward until the back glass pops up a smidge and you’ve got a gap worth bragging about.
- Slide an opening pick into that fresh gap like it’s VIP at the back-cover club and keep the momentum going.
Step 6


Be careful not to go beyond where the camera shell meets the back cover—cutting there could lead to some unwanted plastic cracking. Keep it neat and stay in the safe zone.
- Gently slide a plastic opening pick along the left edge towards the bottom left corner to slice through the adhesive. Keep the pick in place afterward to stop the adhesive from sticking back together.
Step 7

- Warm up the back cover's right edge with a heated iOpener for about two minutes. This helps loosen things up so it's easier to get inside. If you need a hand, you can always schedule a repair.
Tools Used
Step 8


Keep your pick shallow—no more than 3 mm—so you don’t bump into the secondary interconnect cable that's chilling right along the right edge.
- Stick a suction cup onto the back of your phone, aiming for the center along the right edge—like giving your phone a little hug.
- Give that suction cup a firm, steady pull to open up a gap between the back cover and the frame. No need to wrestle, but don't be shy!
- Slide an opening pick into the gap you’ve made. Nice and easy!
Step 9


- Work an opening pick back and forth along the right edge of the back cover to loosen up the sticky adhesive.
- Leave the pick in place so the adhesive doesn't try to make a comeback.
Step 10


Gently insert the pick no more than 5mm—pushing further might nudge internal parts the wrong way. Take it slow and steady, and if you need a hand, you can always schedule a repair.
You can tackle each corner with this method, except for the top-left—because that's home to the rear-facing camera and we don't want to mess with its vibe.
- Swing that opening pick around the top-right edge of your phone like you’re drawing a smile—just take it slow and keep things smooth.
Step 11


- Gently slide the top-most opening pick as close to the camera shell as you can—aim for precision.
- Now, repeat the process on the left edge—don't rush, just let it glide in.
Step 12

- Warm up your iOpener and let it work its magic on the camera shell for around two minutes.
Tools Used
Step 13


Be gentle and only insert the pick up to about 5 mm to keep that camera scratch-free. A little goes a long way!
If this trick doesn’t do the job, just roll on to the next step for another cool option. If it works, you can skip ahead like a pro.
- Give the back cover a cool counterclockwise twist to open up a gap between the camera shell and the frame.
- Slide an opening pick into that gap like you're sneaking into a secret club.
Step 14


Take it easy with this method—going too hard could crack the plastic back cover.
- Gently slide the two picks toward the camera shell, slipping them under the corners of the back cover next to the camera. Think of it as giving the cover a gentle lift with some finesse.
- Work the picks back and forth along the seam between the back cover and the camera shell until you pop a small gap open—like creating just enough space for a friendly nudge. If you run into resistance, take your time and keep it smooth—salvation repair is all about patience!
Step 15


- Gently slide an opening pick between the camera shell and the frame to carefully separate the adhesive. Take your time and be patient—this part's all about precision.
Getting the frame off the camera shell involves tackling some pretty stubborn adhesive. It’s sticky stuff that likes to cling on, so don’t be surprised if you need to go through a few rounds of gentle heating to loosen it up. Patience is key here—keep at it, and you’ll free that frame in no time. If you need help, you can always schedule a repair.
Step 16


Heads up: There's a plate around the flash on the back cover, and your pick might snag on it. Give it a gentle wiggle to keep things moving smoothly!
- There's a sneaky patch of adhesive lurking just to the right of the camera—slice through it like a pro.
- Tilt your pick downward as you go, so you don’t end up poking something important.
Step 17


The plate's resistance can feel a bit like sticky tape. Tilt the pick downward to keep it from slipping into the plate—that way, you're in control and ready for the next step.
- Carefully position the tip of your opening pick right next to your phone's flash. Make sure it's lined up just right!
- Gently slide the pick in, but be cautious—steer clear of the flash's metal plate as you go.
- Cut through the adhesive to the right of the camera—nice and smooth!
Step 18


If your back cover is still playing hard to get, gently slide the pick around the edges of your phone until it finally decides to part ways with the frame.
- Start by removing the back cover to access the internal parts. During reassembly, it's a good idea to power on your device and test all functions before sealing everything back up — saves you from surprises later. Make sure to fully shut down your device before continuing. To clear away stubborn adhesive bits, use tweezers or your fingers and a bit of high-concentration (over 90%) isopropyl alcohol for a clean swipe. If you're working with Samsung-specific adhesives, follow this guide. For double-sided tape, refer to this guide to get it done right.
Tools Used

Step 19

As you work through this repair, keep tabs on each screw and remember to put it back exactly where it belongs. Staying organized makes the job smoother and helps you avoid any mix-ups. If you need a hand, you can always schedule a repair.
- Grab your Phillips screwdriver and unscrew those five 4mm screws holding the motherboard bracket in place. Once they're out, you'll be ready to move on to the next step. If you need help at any point, you can always schedule a repair.
Step 20


Hold off on fully removing the bracket for now—it's still hanging on to the wireless charging coil.
- Grab your tweezers and give a gentle tug to pop the motherboard bracket loose from the frame—no need to wrestle with it, just a smooth lift and unclip.
Tools Used
Step 21


Gently sneak your tool under just the edge of the connector—don't let it wander, or you'll risk messing up the socket and its nearby buddies.
- Hold the motherboard bracket aside using tweezers or your fingers. Take your trusty spudger and pop up the battery press connector—gentle prying wins the day.
- When reconnecting these press connectors, line them up carefully and press down on one edge till you hear that sweet click, then do the same on the other side. Skip pressing in the middle—misaligned connectors can bend pins, and that’s a headache no one wants.

Step 22


- While keeping the motherboard bracket out of the way, grab your trusty spudger and gently pop up that wireless charging coil's press connector to disconnect it.
Tools Used
Step 23


The wireless charging coil is held in place with a bit of light adhesive—think of it as the phone's way of giving a gentle hug to stay put.
- Gently peel off the wireless charging coil with your fingers—think of it as giving your phone a little spa treatment.
- When putting everything back together, start by tightening the motherboard bracket screws so the charging coil lines up just right. After that, press the coil down so it sticks in place. Smooth sailing!
Step 24

- Grab your spudger and gently pop up that earpiece speaker cable connector—think of it like opening a stubborn jar, but way less messy.
Tools Used
Step 25

- Grab your trusty Phillips screwdriver and carefully unscrew the seven 4mm screws holding the earpiece speaker in place on the motherboard. Easy, right? Just keep track of those screws!
Step 26


- Grab a spudger and gently slide its tip into the gap between the right edge of the earpiece speaker and the phone body.
- Use the spudger to carefully pry up and loosen the clips holding the earpiece speaker in place.
- Once loosened, grab some tweezers or your fingers to lift out the earpiece speaker. If you need help, you can always schedule a repair.
Step 27


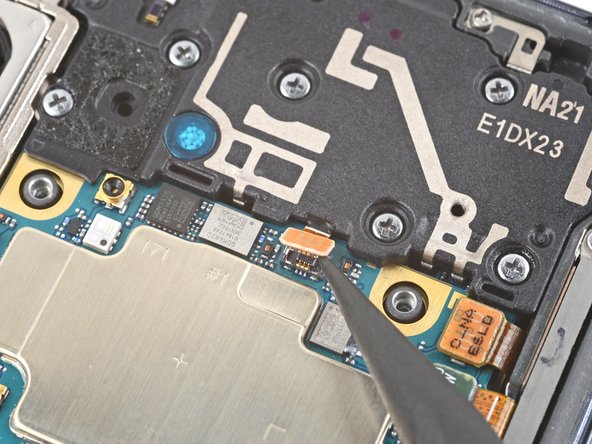
- Grab the flat end of a spudger and gently pry up the front camera's press connector to disconnect it. Take your time—patience is key here. If you need a hand, you can always schedule a repair.
Tools Used
Step 28

- Grab your trusty spudger and gently pop up the orange press connector hanging out next to the 5G antenna cable’s connector. It’s a quick lift—no heavy lifting required.
- Do the same for the green 5G antenna cable’s connector. Give it a little nudge, and you’re good to go.
Tools Used
Step 29


- Grab your spudger and gently pop up the 5G antenna cable’s press connector—easy does it!
Tools Used
Step 30


- Grab your spudger, angle it like a tiny sword, and gently pop the power button cable’s press connector loose—you’ve got this!
Tools Used
Step 31

- Grab the flat end of a spudger and gently pry up the display cable's press connector. Keep it steady and work your way under the connector to disconnect it smoothly. If you need a hand, you can always schedule a repair.
Tools Used
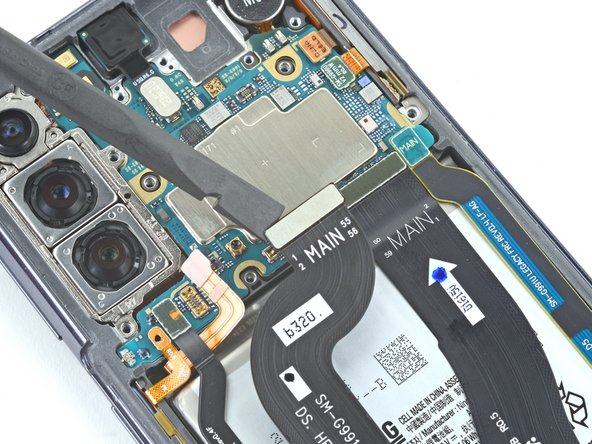
Step 32
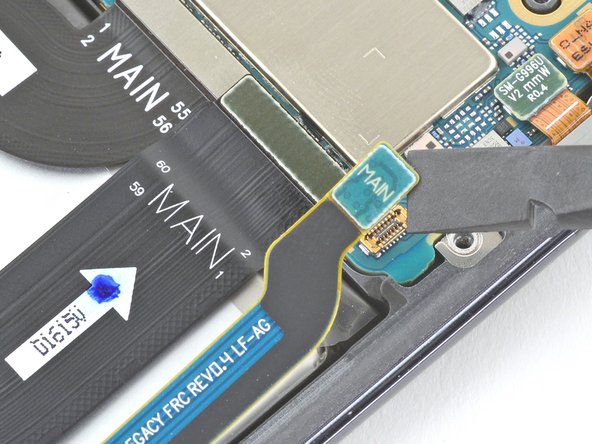

- Grab your trusty spudger and gently lift up the press connector for the secondary interconnect cable. It's like giving it a little high-five.
- Do the same move for the main interconnect cable’s press connector. Double spudger action—nice!
Tools Used
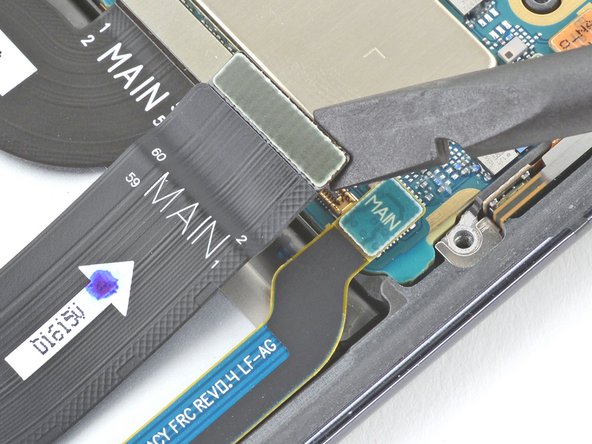
Step 33

Handle those cables gently—no folding or sharp bends! They're not fans of acrobatics and could end up torn.
- Gently nudge the power button cable out of the way with a spudger or your fingers—no need to wrestle with it.
- Do the same for the left-edge 5G antenna cable. It's all about smooth moves!
Tools Used
Step 34

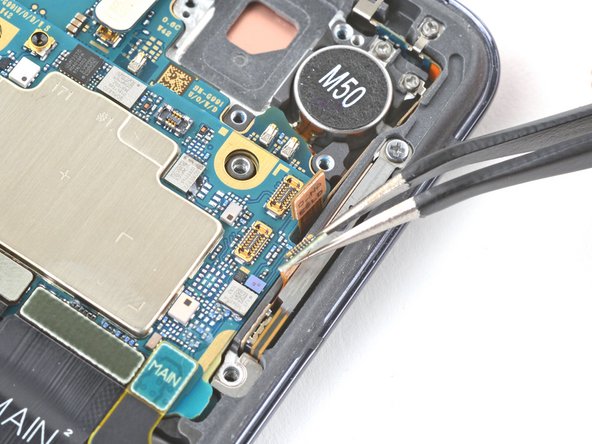

Handle those cables with care! Avoid giving them any sharp bends or folds while you're moving them around; you wouldn't want to risk a tear, right?
- Grab those tweezers or just use your fingers to gently coax the orange 5G antenna cable away from the phone. It's like giving your phone a little stretch!
- Now, let's show that green 5G antenna cable some love by doing the same. Just bend it away, and you’re one step closer to a happy device!
Tools Used
Step 35

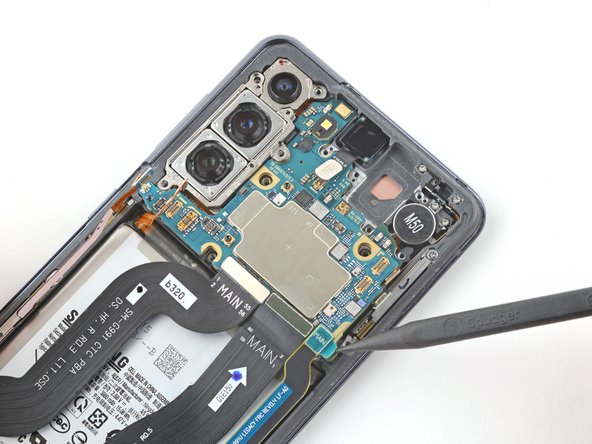
- Grab your Phillips screwdriver and take out the 4 mm screw that's holding the camera bracket and motherboard to the frame. Easy does it!
Step 36

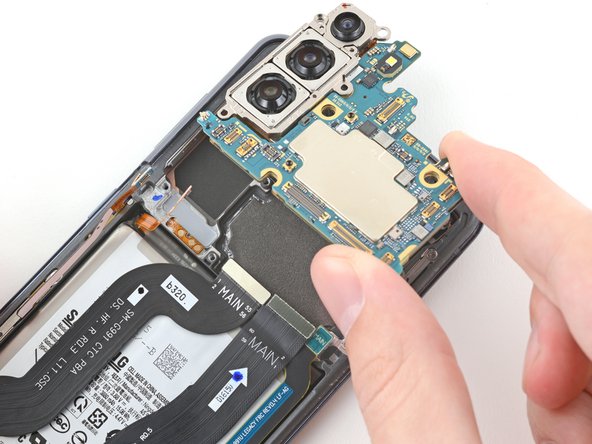
- Slide a spudger between the bottom-right corner of the motherboard and the frame—think of it as giving the board a gentle nudge to wake up.
- With a little upward lift, pop those clips like bubble wrap until the motherboard says 'I'm free!'
- Lift the whole assembly out with your fingers—easy peasy, no gymnastics required.
Tools Used
Step 37

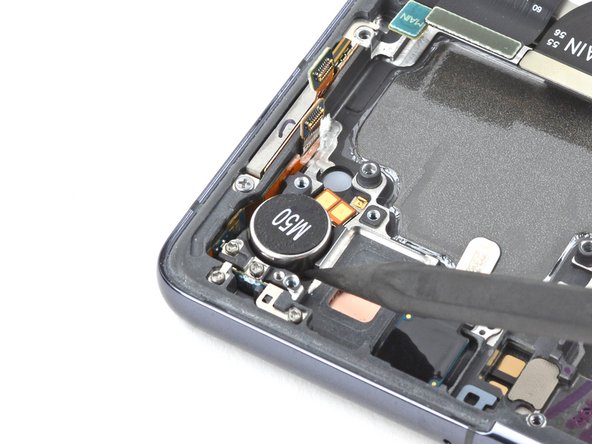
Start with just a couple of drops and add a little more only if you need to. Remember, too much isopropyl alcohol might put a damper on those copper pads and we don't want that!
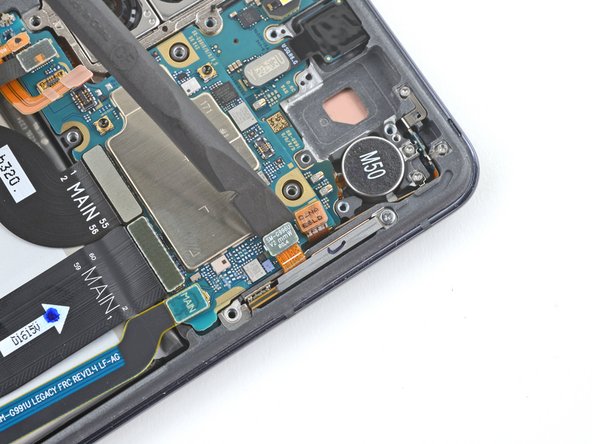
There's a bit of light adhesive holding the vibrator to the frame. You'll want to gently work around it to loosen and lift it without causing any damage.
- Drop a few drops of high-concentration isopropyl alcohol (90% or more) into the gaps around the edges of the vibrator.
- Give it a minute or two to let the alcohol work its magic and loosen up the adhesive. Patience is key!
Step 38

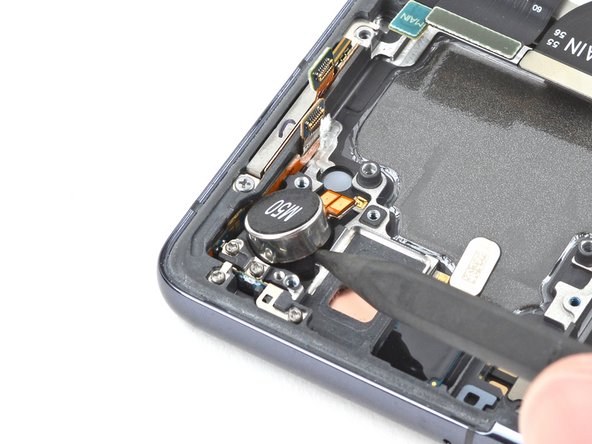
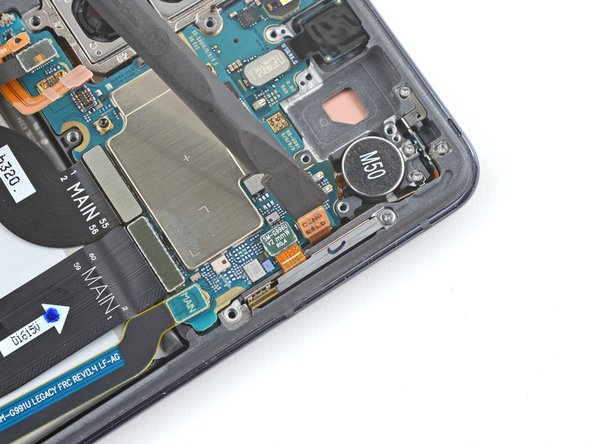
Having a tough time prying the vibrator away from the frame? No worries! Just dab a little more isopropyl alcohol on there. Give it some time to work its magic and loosen up that adhesive. You've got this!
- Check out your shiny new part—make sure it matches the old one. You might need to shift over a few bits or peel off any leftover stickers before popping it in.
- To put your device back together, just cruise through the steps backwards.
- Once you're done, take a moment to test everything out using this guide.
- Got parts you’re ditching? Drop them off at an R2 or e-Stewards certified recycler.
- If things didn’t go as planned, our Answers community has your back for troubleshooting.
- Need a helping hand? You can always schedule a repair.


