Samsung Galaxy S24 Plus Rear Cameras Replacement
Duration: 45 minutes
Steps: 36 Steps
Follow this guide to swap out the rear cameras in your Samsung Galaxy S24+. Whether you're fixing a single camera or all of them, we've got you covered with clear, easy-to-follow steps to get your phone back to snapping pictures like a pro. If you run into any issues along the way, don't hesitate to schedule a repair.
Step 1


Let your phone’s battery drain below 25% to keep it safe—charging a lithium-ion battery that’s too full can be a bit risky. And if you notice your battery is swollen, take some precautions to avoid any mishaps. If you need help, you can always schedule a repair.
- First things first, let's disconnect any cables from your phone. Give it some space!
- Now, press and hold the side button along with the volume down button, then tap 'Power off' to switch off your phone. Easy peasy!
Step 2

You can use a hair dryer, heat gun, or hot plate to loosen things up, but go easy—too much heat can mess with your screen or battery. Handle with care!
- Warm up your iOpener and let it chill on the right edge of the back cover for about two minutes. Give that adhesive a chance to loosen up.
Tools Used


Step 3

If you're struggling to create a gap, give the adhesive a little more heat to loosen it up. Just be sure to follow the iOpener instructions carefully so you don’t accidentally overheat. If you need a hand, you can always schedule a repair.
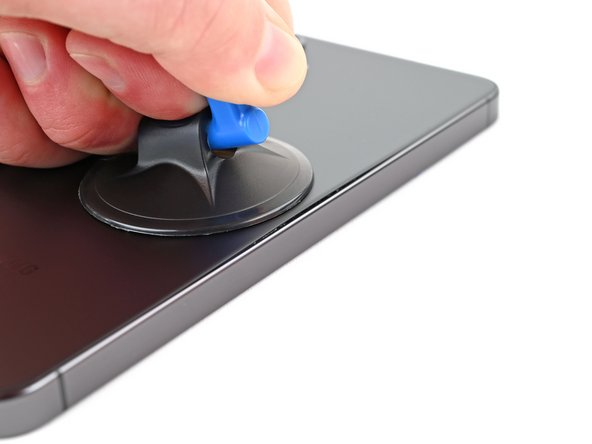
- Get a grip on that back cover by applying a suction handle as close to the center of the right edge as you can - it's go time!
- Now, pull up on the suction handle with some solid force to create a gap between the cover and the frame. You got this!
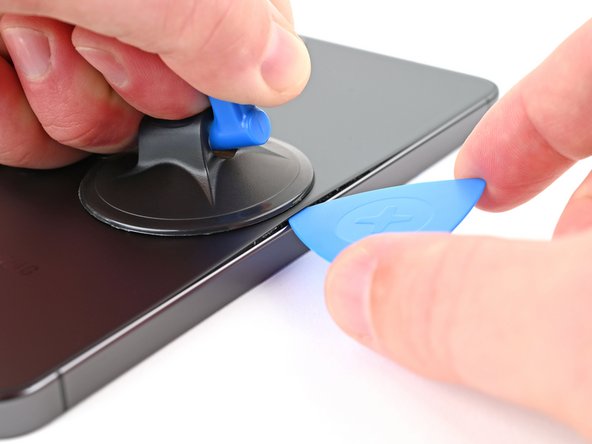
- Time to bring in the opener - insert an opening pick into the gap you just created and let's keep moving forward!
Tools Used

Step 4


- Glide your pick along the right edge, rocking it back and forth to break up the sticky adhesive.
- Keep your pick chillin' near the bottom right corner so that glue doesn’t sneak back together.
Step 5

- Place a heated iOpener on the bottom edge of the back cover and hold it there for about two minutes. This helps loosen the adhesive so you can gently lift the cover later. If you need help, you can always schedule a repair.
Tools Used
Step 6


- Gently wiggle the opening pick around the bottom right corner to loosen the adhesive. Keep it steady and work your way around—you're just easing things apart.
Step 7

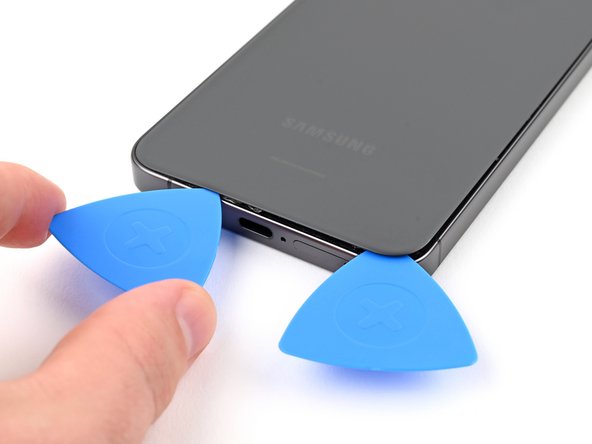
- Pop a second pick into the bottom right corner—double the picks, double the fun.
- Scoot that pick along to the bottom left, slicing through the clingy adhesive as you go.
- Let your pick chill in the bottom left corner to keep the sticky stuff from sneaking back together.
Step 8

- Heat up a iOpener and gently press it against the left edge of the back cover for about two minutes. Keep it in place to soften the adhesive, making removal smoother. If you need a hand or prefer to leave it to the pros, you can always schedule a repair.
Tools Used
Step 9


- Swing that trusty opening pick around the bottom left corner to break free the sticky adhesive.
Step 10


- Pop in a third opening pick at the bottom left corner—steady hands, you got this.
- Slide that pick up toward the top left to break up the sticky stuff.
- Leave your pick chilling near the top left corner so the adhesive doesn’t sneak back together.
Step 11

- Warm up that trusty iOpener and give the top edge of the back cover a friendly two-minute hug with the heat. You got this!
Tools Used
Step 12


- Gently rotate the opening pick around the top left corner to loosen the adhesive and get things started.
Step 13


- Time to bring in the reinforcements - insert a fourth opening pick at the top left corner to help loosen things up.
- Now, gently slide the pick towards the top right corner to break down that adhesive. You're making great progress!
- Leave the pick hanging out near the top right corner - this will prevent the adhesive from sneaking back in and resealing. Nice work!
Step 14


There's a little patch of sticky goodness surrounding the rear microphone, just above the flash. Keep an eye out for it!
- Aim the tip of your opening pick at the flash—think of it as a bullseye.
- Glide the pick under the top edge of the back cover and feel for that sticky adhesive. It might put up a fight, but you’ve got this.
- Keep sliding the pick down toward the bottom of the phone, gently prying up as you go. Once the cover pops free from the adhesive, you’re officially winning.
Step 15


Having trouble getting the back cover to budge? No worries, just grab an opening pick and gently pry apart any adhesive that might be holding it in place.
Now's a great time to fire up your phone and make sure everything is working smoothly before you seal it back up. Just remember to power it down completely before moving on to the next steps.
To keep your device water-resistant, you'll want to reapply the back cover adhesive with care. Keep in mind that even with a solid reseal, your device's IP rating will still be affected.
- Pop off the back cover—like opening a stubborn jar, just with more finesse.
- When you’re putting things back together:
- Get rid of every trace of old adhesive on both the cover and the phone. Tweezers, your fingers, a little heat, or isopropyl alcohol (90%+) with a lint-free cloth or even a coffee filter all work great. If the sticky stuff won't budge, don't be afraid to get creative.
- Using a custom adhesive? Stick to your guide.
Tools Used


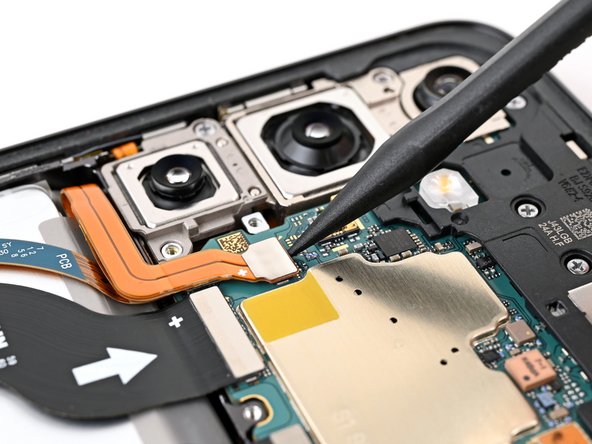
Step 16
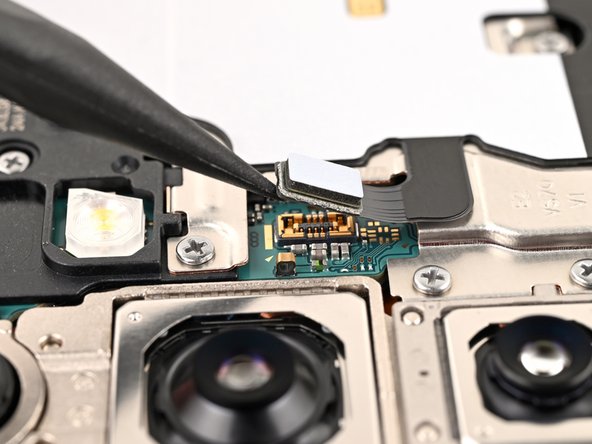

Hey, take a peek at the board near each press connector - you'll spot an arrow that shows you the best spot to pry.
- Grab your trusty spudger and gently lift up the wireless charging coil connector from the motherboard. No wrestling matches needed—just a smooth move!
- When reconnecting the press connector, line it up nicely over the socket. Use your fingertip to press down—start with one side, then the other—until you hear that satisfying click. No need to muscle it in; if it’s being stubborn, give it a quick realignment and try again.
Tools Used

Step 17


- Grab a Phillips screwdriver and start by removing the thirteen 3.5 mm screws holding down the wireless charging coil and the loudspeaker. First, take out the six screws keeping the wireless charging coil in place, then remove the seven screws securing the loudspeaker. Keep track of your screws so you don’t lose any. If you need a hand, you can always schedule a repair.
Step 18


- Slide the tip of your spudger into the notch at the top left corner of the loudspeaker—look for the arrow pointing the way.
- Gently pop the loudspeaker upward to free it from the frame.
Tools Used
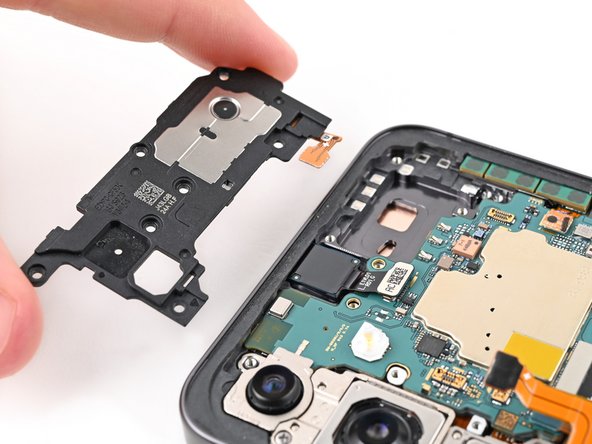
Step 19


- Gently use your fingers to lift that loudspeaker right off the frame, like you're peeling a banana!
- Next up, take out the wireless charging coil and the loudspeaker from the frame – they’ve done their job!
- When it's time to put everything back together, give a little press around the edges of the loudspeaker to snap it back into place before you screw things in. You've got this!
Step 20

- Grab your trusty spudger and gently pop up the battery connector to disconnect it. Easy does it!
Tools Used
Step 21


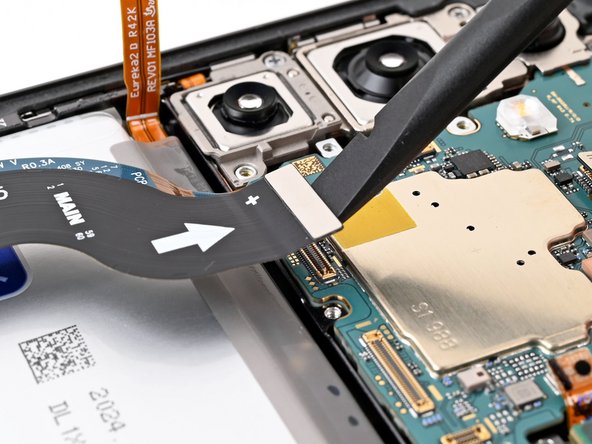
- Grab your trusty spudger and gently work it under the interconnect cable press connectors on the daughterboard. A little prying goes a long way, so be patient and disconnect both with care!
Tools Used
Step 22


- Grab a spudger and gently pry up to disconnect both interconnect cable press connectors from the motherboard. You've got this!
Tools Used
Step 23


- Gently disconnect the interconnect cables from the phone, making sure not to force anything. If you hit a snag, remember you can always schedule a repair for extra help.
Step 24


- Grab your trusty spudger and gently lift up the earpiece speaker connector to disconnect it. Easy does it!
Tools Used
Step 25


- Grab your Phillips screwdriver and take out the five 3.5 mm screws holding down the earpiece speaker—just keep track of those little guys!
Step 26
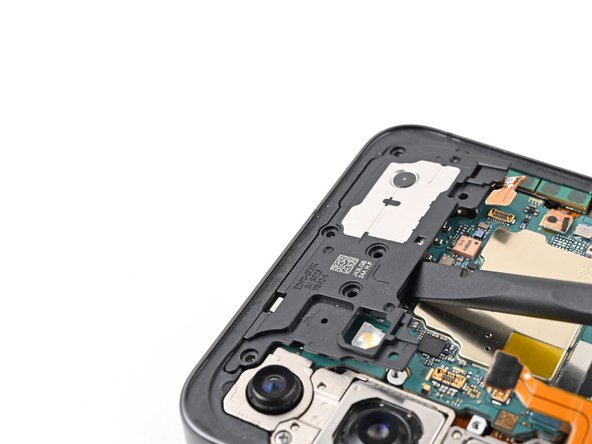

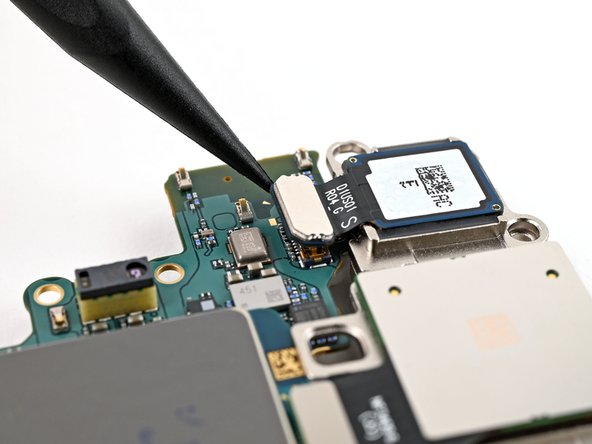
- Let's get started! Carefully insert the flat end of a spudger between the bottom edge of the earpiece speaker and the metal plate on the motherboard. This is where the magic happens!
- Now, gently twist the spudger to unclip the earpiece speaker from the frame. Don't worry, it's easier than it sounds! Once it's unclipped, you can remove it.
- When you're putting everything back together, remember to insert the top edge of the earpiece speaker into the frame first. Then, press down and clip it back in. You're doing great!
Tools Used
Step 27

Keep that spudger on track—stick to the marked spot so you don’t accidentally bump into any tiny surface parts hiding nearby.
- Slide the tip of a spudger under the top left corner of the upper antenna connector—think of it as giving your phone a gentle nudge.
- Lift up the connector until it pops free from the motherboard. Nice and easy!
Tools Used
Step 28

Stick to the spot shown—poking the spudger anywhere else could mess with tiny parts hiding nearby.
- Gently slide the spudger under the bottom right corner of the front camera press connector.
- Give it a little pry and disconnect the front camera press connector from the motherboard.
Tools Used
Step 29


- Grab a spudger and gently pry up the display and lower antenna cable press connectors from the motherboard. Take your time and work carefully—these connectors are delicate. If you need a hand, you can always schedule a repair.
Tools Used
Step 30

- Grab a Phillips screwdriver and get those two 3.5 mm-long screws holding the motherboard in place. Once they're out, you're all set to move forward. If you need a hand, you can always schedule a repair.
Step 31
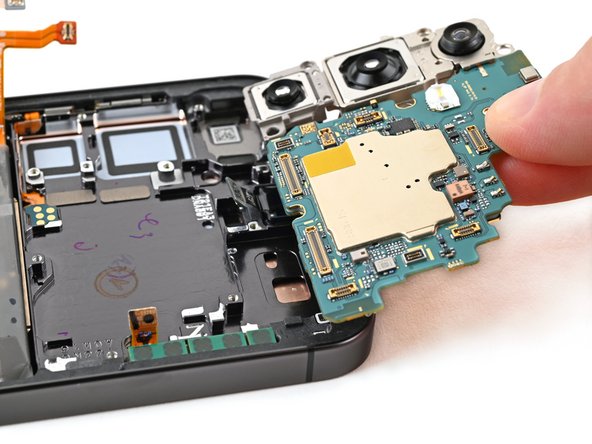

- Slide the flat end of your spudger between the top edge of the motherboard and the phone frame, right in the earpiece speaker cutout. Think of it like giving your motherboard a gentle nudge awake.
- Lever the motherboard up and out of its slot by prying against the frame. Lift it out with style!
- When you’re putting things back together, make sure all the cables are chilling out of the way before you seat the motherboard into the frame. No cable wrestling allowed.
Tools Used
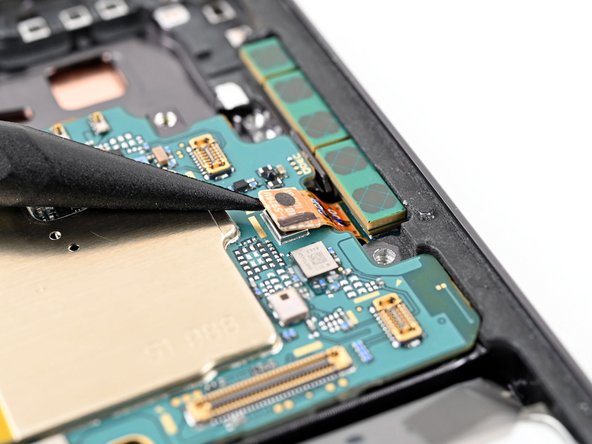
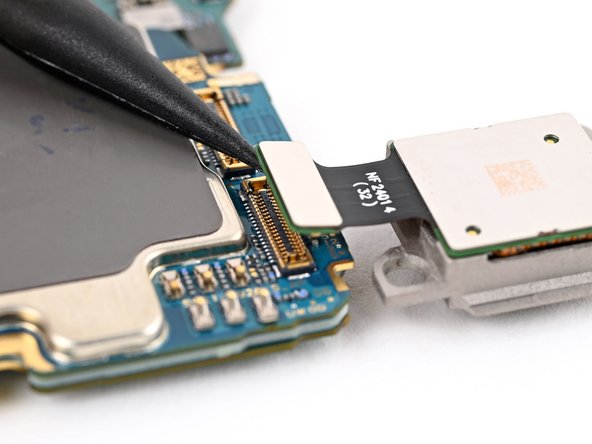
Step 32

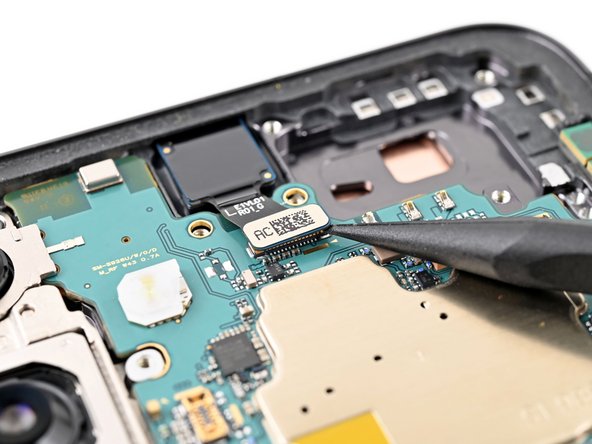
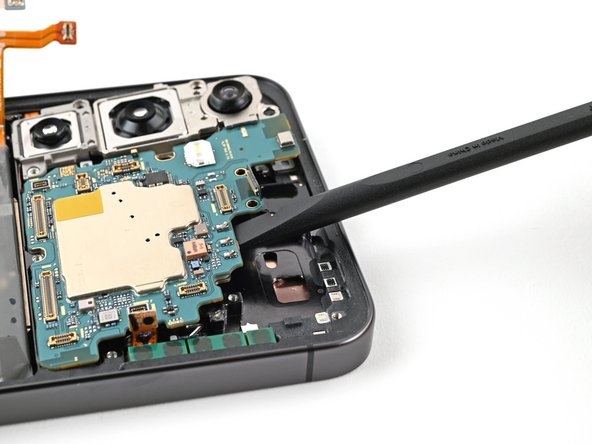
- Time to get up close and personal with that motherboard - flip it over and let's take a look at the rear camera press connectors.
- Now, grab your trusty spudger and carefully pry up and disconnect the ultrawide camera press connector. You got this!
The three rear cameras are stacked like a camera parfait and should be removed in this order: ultrawide, then main, followed by telephoto. When installed, the ultrawide sits at the very top, so keep that in mind when you're taking them out. If you run into any snags, remember you can always schedule a repair to get professional help.
Tools Used
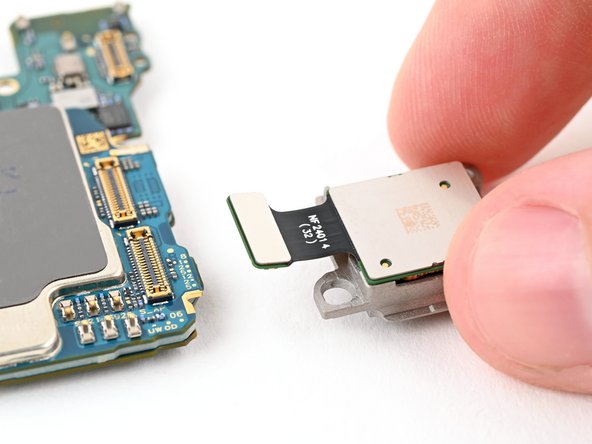
Step 33

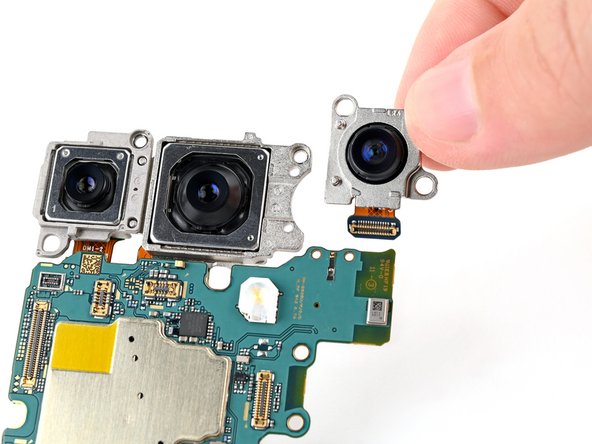
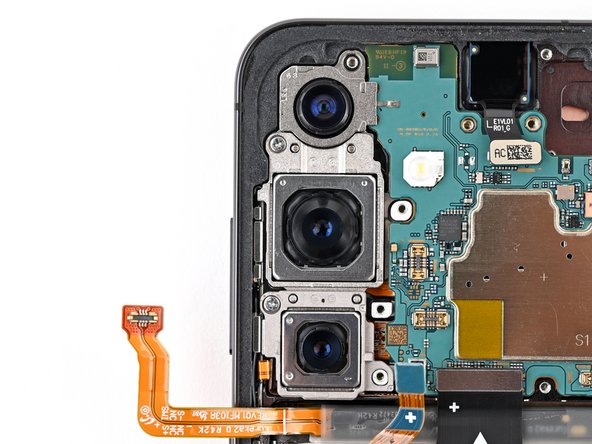
The ultrawide camera is secured to the motherboard with two little metal pegs holding it in place. Easy does it when you lift it out!
- Gently wiggle the pegs on the ultrawide camera and slide them out of their cozy little homes on the motherboard to free it up.
Step 34


The main camera is hanging out right in the center—easy to spot!
- Grab a spudger and gently pry up the main camera press connector to disconnect it. Then, lift the camera off the motherboard and set it aside. If you need a hand, remember you can always schedule a repair.
Tools Used
Step 35

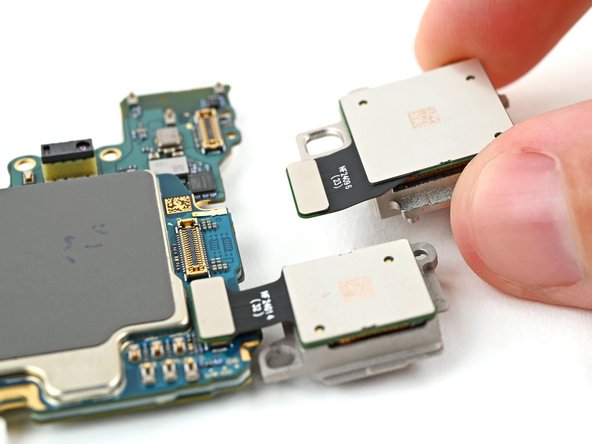
Heads up: when you're putting the cameras back, the telephoto lens goes at the bottom.
- Grab your trusty spudger and gently pop up the telephoto camera's connector—like opening a tiny treasure chest.
- Lift the telephoto camera straight off the motherboard and set it aside (no victory dance required, but strongly encouraged).
- When you’re putting everything back together, the rear cameras play musical chairs in this order:
- Telephoto (the small one with a metal back goes first)
- Main (the big one with a metal back joins next)
- Ultrawide (the plastic-backed one rounds out the trio)
Tools Used
Step 36

- You did it! To put everything back together, just follow these steps in reverse.
- If your repair didn't quite go as planned, don't worry! Try some basic troubleshooting or check out our Answers community for some helpful tips.
- Remember to responsibly recycle your e-waste with an R2 or e-Stewards certified recycler.
- If you need help or want to make sure the job is done right, you can always schedule a repair with Salvation Repair.