Samsung Galaxy S4 Speaker Enclosure Replacement Guide | DIY Tutorial
Duration: 45 minutes
Steps: 12 Steps
Heads up, tech adventurer! Make sure to have your tools ready and your workspace clear as we dive into this fix. Remember, if things get tricky, you can always schedule a repair with the pros at Salvation Repair. Let’s make this gadget happy again!
Ready to give your Galaxy S4 a little audio upgrade? Dive into this guide to swap out the speaker enclosure. This nifty component is snug against the midframe and comes with the speakerphone blaster plus a couple of antennas. Let’s crank up those tunes with a fresh speaker!
Step 1


– Grab a plastic opening tool or use your trusty fingernail to sneak into the little nook to the left of the rear camera, near the power button. It’s like unlocking a secret compartment!
Step 2


– Grab the rear case at the corner near the little divot and whoosh it off the phone. It’s like magic, but you’re the wizard!
Step 3


– Gently press the microSD card a tad further into its snug home with the flat end of a spudger or your handy fingernail until it clicks like a secret code.
– Once you hear that satisfying click, let go, and watch in amazement as the card leaps out like a tiny jack-in-the-box.
– Carefully pluck the microSD card from its nest.
– When putting it back together, just nudge the microSD card back into its cozy slot until you hear that reassuring click again.
Step 4


– Pop in a plastic opening tool, or even just your finger, into the little notch of the battery compartment and give it a gentle lift upwards.
– Slide the battery out of your phone and boom, you’re done!
Step 5


– Nudge the SIM card deeper into its slot with a plastic opening tool or your fingernail until you hear a satisfying click.
– Once you hear that click, let go and the card will spring out of its slot.
– Take the SIM card out.
– When putting it back together, just press the SIM card back into the slot until you feel it lock into place with a click.
Step 6

– Whip out your trusty Phillips #00 screwdriver and unscrew the nine 4.0 mm screws that are keeping the midframe cozy with the display assembly.
Step 7


Take it easy while prying open those clips! Just give them a gentle nudge—too much flex and you might snap the delicate bits in the midframe. Keep it cool, keep it safe!
The midframe is snugly tucked behind the chrome bezel, held by a bunch of sneaky plastic clips. Let’s dive in and pop those clips to liberate the midframe with some flair!
– Begin on the side of the phone with the volume buttons. Insert your plastic opening tool between the display glass’s chrome bezel and the larger chrome border. Look for the seam connecting these two parts.
– Glide the tool along the seam to detach the plastic clips as you advance.
Step 8


– Keep on prying around the corner of the phone like a pro.
– Glide your opening tool along the seam at the bottom of the device between the midframe and display, popping open those pesky plastic clips.
Step 9


– Once more, give it a little pry around the corner, closer to the power button—let’s keep things moving! Then, glide that opening tool right along the seam like you’re spreading butter on toast.
Step 10


Now’s a good time to give that plastic opening tool another whirl around your device’s edges to ensure all those sneaky clips have let go.
– Keep grooving with the opening tool along the top edge of your phone. Unsnap those last pesky clips, and voila! The midframe will part ways with the display assembly like a magic trick.
Step 11


– Let’s get started by removing the midframe from the display assembly. If you need help, you can always schedule a repair
Step 12

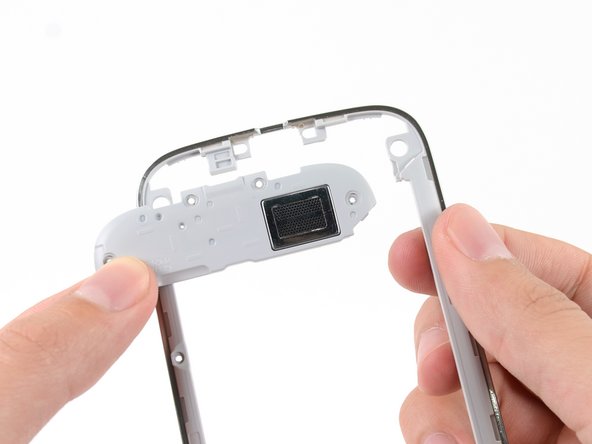

– Grab the midframe with one hand and the speaker enclosure with the other like you’re about to perform a magic trick.
– With a gentle twist, separate the speaker enclosure from the midframe as if you’re unlocking a secret compartment.
– Voilà! Now remove the speaker enclosure completely from the midframe and take a bow.