Samsung Galaxy S6 Edge Rear Facing Camera Replacement Guide
Duration: 45 minutes
Steps: 21 Steps
Hey there! If you’re feeling stumped, remember that help is just a click away. Feel free to schedule a repair with us for expert assistance. You’re not alone in this tech adventure!
Get ready to tackle that broken main camera on your Samsung Galaxy S6 Edge! In this guide, we’ll walk you through the steps to remove the rear glass. Just a heads up, taking off the rear glass will break the adhesive that keeps it snug. But no worries! We’ll also show you how to get it back on. Let’s dive in and make that camera shine again! And if you need a hand, you can always schedule a repair.
Step 1


Remember, don’t poke around the microphone hole—damages galore! Instead, find the outline of the SIM tray.
– Grab a paper clip or that handy SIM eject tool and poke it into the little hole on the SIM card slot at the top of your phone.
– Give it a gentle press to pop out the SIM card tray.
– Carefully pull the SIM card tray out of the phone and set it aside.
Step 2


For carousel microwaves: Ensure that the plate is spinning like a champ! If your iOpener gets a little too cozy and gets stuck, it might start to overheat and cause some trouble.
It’s a good idea to give your microwave a quick clean before diving in. Any leftover gunk on the bottom might just hitch a ride on the iOpener, and we don’t want that!
– Get ready to rock it by placing the iOpener right in the middle of the microwave.
Tools Used

Step 3

Keep an eye on that iOpener during your repair adventures! Overheating it could lead to a dramatic burst, and nobody wants that. Make sure it doesn’t go over 100˚C (212˚F).
If your iOpener looks like it’s been hitting the gym and is a bit swollen, steer clear of touching it.
If the center of your iOpener is still too hot to handle, just hang tight and let it cool down a bit more before giving it another heat-up. A well-heated iOpener should stay cozy for about 10 minutes!
Depending on your microwave’s wattage, you might need to adjust the time a bit. You’ll know the iOpener is ready when it’s just about too hot to handle!
– Give that iOpener a warm hug in the microwave for thirty seconds.
– As you dive into the repair, keep the iOpener cozy by giving it a quick reheat for another thirty seconds whenever it starts to cool down.
Tools Used
Step 4

The iOpener can get super hot, so handle with care! If it’s too toasty, grab an oven mitt. If you need help, you can always schedule a repair.
– Carefully take the iOpener out of the microwave, gripping one of the flat ends to keep your fingers safe from that toasty middle. Stay cool!
Tools Used
Step 5


Be cautious, the iOpener gets super toasty! Make sure to grip it by the end tabs only.
No microwave? No problem! Just pop that iOpener in some boiling water to warm it up.
– Get a pot or pan and fill it with enough water to totally cover the iOpener.
– Bring the water to a boil, then turn off the heat.
– Put the iOpener in the hot water for 2-3 minutes, making sure it’s fully submerged.
– Use tongs to take the iOpener out of the hot water.
– Dry the iOpener thoroughly with a towel.
– Your iOpener is all set! If you need to reheat it, just boil the water, turn off the heat, and place the iOpener back in for 2-3 minutes.
Tools Used
Step 6


Hey there! If things are heating up, remember you can always use a hair dryer, heat gun, or hot plate, just make sure not to give your device a toasty makeover—the OLED display and internal battery are not big fans of the heat. Stay cool, literally!
Opening your phone? Just a heads up, it might mess with those waterproof seals. Make sure you’ve got some replacement adhesive on hand before diving in, or be extra careful to keep it away from liquids if you decide to reassemble without it.
Got a shattered screen? No worries! Just slap some packing tape over the whole panel to keep it together while you work your magic.
You might find yourself reheating and reapplying the iOpener a few times to get your phone nice and toasty. Just follow the iOpener instructions to keep things from getting too hot to handle!
– Place the toasty iOpener gently on the back panel and let it work its magic for a couple of minutes. This will make the glue around the glass edge feel all warm and fuzzy.
– After that, move the iOpener around to warm up the other part of the panel for another two minutes. It’s teamwork time for that stubborn adhesive!
Tools Used
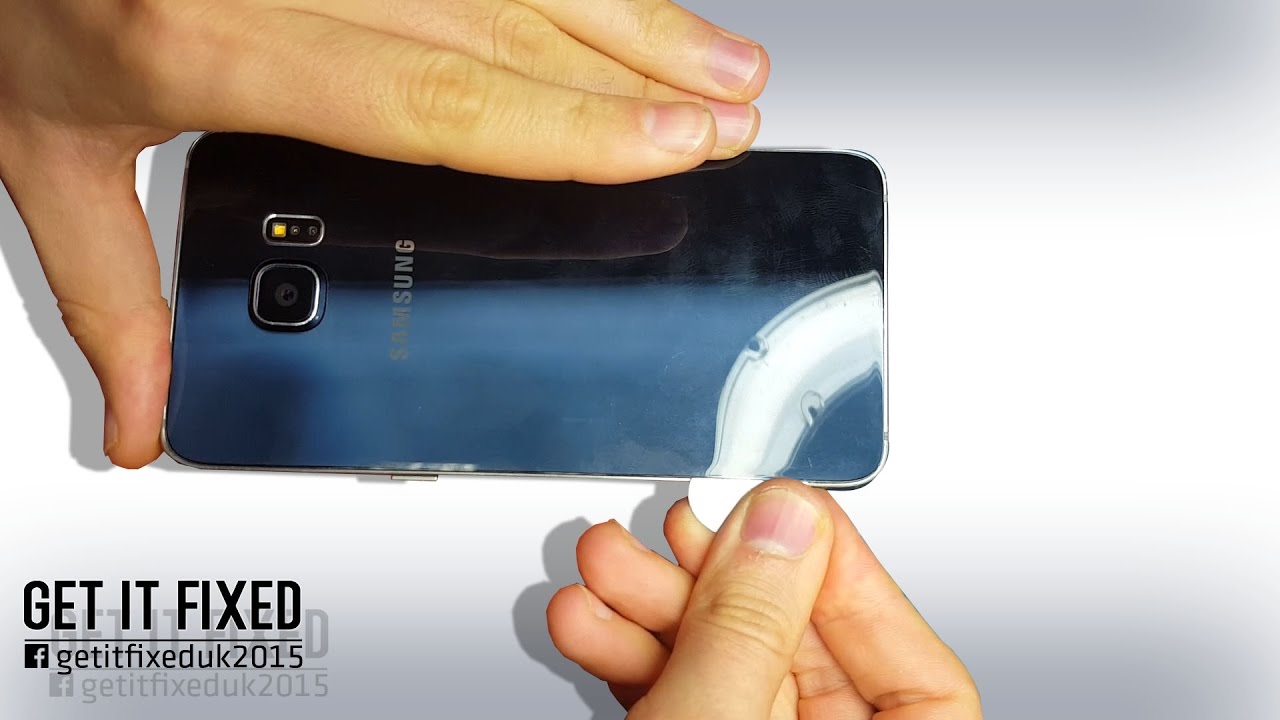
Step 7


For an extra boost, consider gently introducing a touch of isopropyl alcohol into the crevice after sliding in the pick. This can assist in loosening the adhesive further down the line.
– Once the rear glass feels warm to the touch, stick a suction cup near the bottom edge of the glass.
– Pull up on the suction cup to make a small gap underneath the rear glass, then slide an opening pick into the gap.
Step 8


To keep things moving smoothly, consider leaving the pick in place while you grab a second one for the next step. This little trick can help stop that sneaky glue from sticking back together!
Don’t forget to give the rear glass a little heat love as needed to keep that glue from getting all cool and hardening up on you.
– Gently glide the pick along the bottom edge of your phone to cut through the adhesive holding the rear glass in place. You’ve got this!
Step 9


– Keep the good vibes rolling by repeating the heating and cutting magic on the other three sides of your phone.
– Slide an opening pick under each edge to keep that pesky adhesive from playing tricks and resealing.
Step 10


– Grab an opening pick to slide through the leftover adhesive.
– Carefully take off the rear glass.
Step 11


– Hey there, ready to jazz up your device with a new rear glass?
– If you’re reusing your old rear glass or rocking a new one without adhesive, we’ve got your back!
– Grab those tweezers and groove to the beat of peeling away any leftover adhesive from your phone’s chassis.
– Let’s clean those adhesion areas with some high concentration isopropyl alcohol (90% or higher) and a lint-free cloth. Swipe like a pro in one direction only – no back and forth moves here. Time to prep that surface for the new adhesive!
– Peel off the adhesive backing from the fresh rear glass, strike a pose as you carefully align one edge of the glass with the phone chassis, and then seal the deal with a firm press onto your phone.
Tools Used

Step 12

– Unscrew the thirteen 3.3 mm Phillips #00 screws from the midframe. Need a hand? You can always schedule a repair.
Step 13


– Give that battery a little push down, then gently lift the edges of the midframe to pop it free from the rest of the phone. You got this!
Step 14


– Grab your trusty spudger and with its flat end, gently disconnect that battery ribbon cable from the motherboard. You’ve got this!
Tools Used

Step 15


– Unplug the home button ribbon cable from the motherboard. If you need help, you can always schedule a repair
Step 16


– Grab your trusty spudger and gently use the pointed end to disconnect those two antenna interconnect cables from the motherboard. You’ve got this!
Tools Used
Step 17


– Gently detach the display ribbon cable from the motherboard using the flat edge of your trusty spudger. You’ve got this!
Tools Used
Step 18


– Pop that earpiece ribbon cable off the motherboard. If you need help, you can always schedule a repair.
Step 19


Hey there tech whiz! Just a heads-up, the motherboard is super sensitive to static. Whenever you’re handling it, rock an anti-static bracelet for that extra protection swag to keep it in top shape.
Pro tip: Before popping out the motherboard, make sure to disconnect the sneaky ribbon cable on the underside first. Don’t yank it all the way out just yet!
– Hold onto the motherboard by its edges near the top of the device.
– Gently lift the motherboard away from the display, being careful not to strain the daughterboard ribbon cable too much.
Step 20


– Unplug the daughterboard ribbon cable from the bottom of the motherboard. If you need help, you can always schedule a repair
Step 21


– Use the flat end of a spudger to unplug the rear-facing camera from the motherboard. Easy does it!
– Pop out that rear-facing camera!
Tools Used