Samsung Galaxy S6 Repair Guide: Step-by-Step DIY Replacement
Duration: 45 minutes
Steps: 24 Steps
Ready to swap out the vibrator in your Samsung Galaxy S6? This guide will take you through the process, starting with the removal of the rear glass. Keep in mind, removing the glass means the adhesive will no longer stick. No worries though, we’ll show you how to reinstall the rear glass like a pro. If you need help, you can always schedule a repair.
Step 1
Go easy—if you press too hard, that SIM card tray might not make it!
– Grab a paper clip or SIM eject tool and gently insert it into the hole on the power button side of the phone’s SIM card slot.
– Give it a little press to pop the SIM card tray out.
Step 2
– Take out the SIM card tray from the phone.
Step 3
– Pop the iOpener right in the middle of the microwave, making sure it’s centered. This will help it heat up evenly!
For carousel microwaves: Double-check that the plate spins smoothly. If your iOpener gets stuck, it could overheat and burn—nobody wants a crispy iOpener!
Before you get started, it’s a good idea to give your microwave a quick clean. Any sticky mess or grime on the bottom could end up sticking to the iOpener, making things messier than they need to be. A clean surface helps everything go smoothly—so take a moment to wipe it down before moving forward. If you need help, you can always schedule a repair.
Tools Used
Step 4
– Warm up the iOpener in the microwave for about thirty seconds. Keep in mind, as it cools down, you can pop it back in for another thirty seconds to keep it nice and pliable.
– Throughout your repair session, whenever the iOpener starts to cool, just reheat it in the microwave for another thirty seconds. It’ll stay warm and flexible, making your job easier.
Be sure not to overdo it with the iOpener heat—going beyond 100˚C (212˚F) could make it burst! Keep it cool and safe.
If the iOpener looks swollen, just avoid touching it. Safety first!
If the iOpener is still a bit too hot to handle in the middle, just let it cool down for a little while longer before giving it another go. A well-heated iOpener should stay nice and warm for up to 10 minutes.
Microwave wattage varies, so cooking times might need a tweak—just keep an eye on it. The iOpener is ready when it’s warm enough that it’s barely too hot to touch. If you’re unsure, test carefully and adjust as needed. For any tricky steps, or if you’re just not feeling confident, you can always schedule a repair for help.
Tools Used
Step 5
Since the iOpener will be quite hot, handle it carefully—consider wearing an oven mitt if you want to play it safe. If you need help, you can always schedule a repair.
– Take the iOpener out of the microwave, but be sure to grab it by one of the flat ends. You don’t want to get too close to the hot center, trust us!
Tools Used
Step 6
Be cautious—the iOpener gets really hot, so hold it only by the end tabs to avoid any burns. If you need a hand, you can always schedule a repair.
No microwave? No problem! Just heat up your iOpener in some boiling water instead.
– Grab a pot or pan and fill it with enough water to completely immerse your iOpener.
– Heat the water until it’s boiling, then turn off the heat.
– Carefully place the iOpener into the hot water for 2-3 minutes. Make sure it’s fully submerged and ready to work its magic.
– Using tongs, gently lift the heated iOpener from the water.
– Pat the iOpener dry with a towel so it’s ready for action.
– You’re all set! If you need to reheat the iOpener, just boil the water again, turn off the heat, and give the iOpener another 2-3 minute soak.
Tools Used
Step 7
– Place the warmed-up iOpener on the back panel for about two minutes to help loosen up the adhesive along the edge.
– Move the iOpener around so the rest of the panel gets a nice even heat for another two minutes.
If you’re using a hair dryer, heat gun, or hot plate, be extra careful not to crank up the heat too high! The OLED display and internal battery are a bit sensitive to heat, so let’s keep it cool to avoid any damage.
Opening up your phone can break the waterproof seal, so make sure to have some fresh adhesive on hand before you start. If you skip it, be extra cautious to avoid liquid spills during reassembly. If your screen is shattered, a quick trick is to tape over the entire glass—this keeps the pieces together and makes removal safer. Also, reheating the iOpener a few times might be necessary to get the device warm enough to work with. Follow the instructions for the iOpener carefully to prevent overheating, and take your time—patience is key to a smooth repair!
Tools Used
Step 8
If you want to make things a little easier, slide in the pick and drip a bit of isopropyl alcohol into the gap. This will loosen up the adhesive for the next moves.
– Once the rear glass feels warm to the touch, stick a suction cup near the bottom edge of the glass.
– Gently pull on the suction cup to create a small gap underneath the rear glass, then slide an opening pick into that space.
Step 9
Once you’ve started to loosen the rear glass, it might be a good idea to leave your pick in place. Grab a second pick to keep the process smooth as you move to the next step. Keeping the pick inserted helps prevent the glue from sneaking back together and sticking things shut again.
If the glue starts to cool down and get stubborn, just re-heat the rear glass as needed. A little warmth keeps the adhesive soft and makes your removal job much easier.
– Gently slide the pick along the bottom edge of the phone to cut through the adhesive holding the rear glass in place. Take it slow and steady, and you’ll be good to go!
Step 10
– Keep the heat and cut steps going for the other three sides of the phone. Don’t forget to leave a small gap at each edge—that way, the adhesive won’t stick back together too quickly.
– Make sure to leave an opening pick beneath each edge to stop the adhesive from sealing up again. This keeps things nice and manageable as you work through the process.
Step 11
– Grab an opening pick and gently slice through any stubborn adhesive that’s still holding on.
– Carefully lift away the rear glass to reveal what’s underneath.
Step 12
– Ready to give that rear glass a fresh look? Whether you’re reinstalling old glass or using a new piece without pre-applied adhesive, here’s how to do it. First, gently peel away any leftover sticky stuff from the phone’s body using tweezers. Next, clean the area thoroughly with high-quality isopropyl alcohol (90% or higher) and a lint-free cloth—just swipe in one direction to prep the surface for the new adhesive. Finally, peel off the backing from the new rear glass, carefully align one edge with the phone chassis, and press down firmly to secure it in place. Need extra help? You can always schedule a repair with Salvation Repair.
Tools Used
Step 13
– Unscrew the thirteen 3.5mm Phillips #00 screws that are holding the midframe in place. It’s not as scary as it sounds, just take your time and make sure they come out clean.
Step 14
Hey there! Before you get started, make sure you’ve ejected the SIM card tray. And a quick heads-up—be gentle when inserting the opening pick; avoid slipping it between the glass and display to prevent any damage.
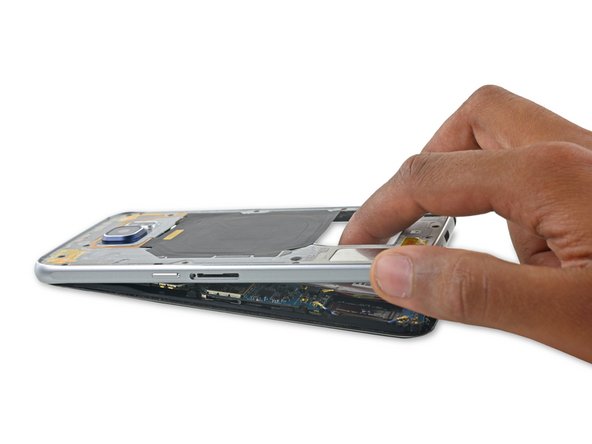
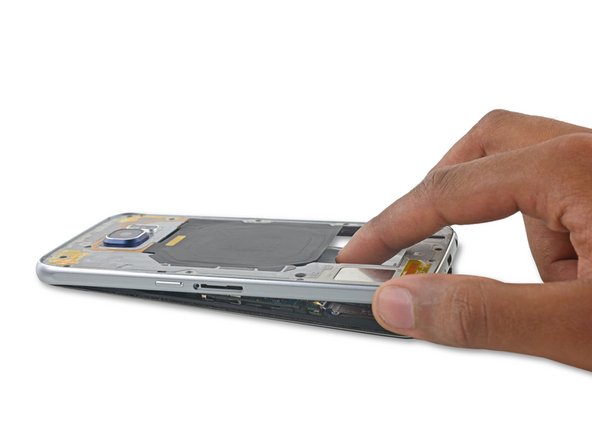
– Grab the edge of the midframe assembly with a firm but gentle grip.
– Lift the midframe assembly upwards while pressing the battery down to break it free from the rest of the phone.
– If things are sticking a bit too much, try heating and applying an iOpener to the edges of the display to loosen that stubborn adhesive.
– While lifting the midframe, be extra careful not to catch it on the audio jack or charging port.
– Once the midframe starts separating, gently run an opening pick around the rest of the phone to fully detach the top part of the midframe.
– To prevent any damage to the headphone jack, first remove the top of the midframe and then carefully push the rest of the midframe downwards to separate it.
Tools Used
Step 15
– Gently lift the midframe assembly up and away to free it from the rest of the phone. If things get tricky, remember you can always schedule a repair with Salvation Repair for extra help.
Step 16
– Gently take the flat end of your spudger and use it to disconnect the battery connector from its socket on the motherboard. Easy does it—no need to rush!
Tools Used
Step 17
– Gently pop the Bluetooth and Wi-Fi antenna cables off their connectors on the motherboard using the pointed end of your spudger.
Tools Used
Step 18
– Grab the flat end of your spudger and gently disconnect the home button connector—think of it as a little handshake to get things rolling.
Tools Used
Step 19
– Grab the flat end of a spudger and gently disconnect the display assembly cable from the motherboard. If you need help, you can always schedule a repair.
Tools Used
Step 20
– Gently disconnect the earpiece speaker assembly cable connector from the motherboard to keep everything safe and sound. If you need help, you can always schedule a repair.
Step 21
– Gently lift the camera-side end of the motherboard and give it a little nudge to separate it from the display frame. A little lift, and it’ll be free!
Hold up on pulling out the motherboard completely — it’s still hanging out attached to the daughterboard with a ribbon cable on the bottom side. Keep it connected until you’re ready to fully remove it.
You might need to gently nudge a few ribbon cables aside while lifting the motherboard. If it feels stuck, double-check that it’s totally unplugged and not tangled up with any sneaky cables.
Step 22
– Grab the flat end of a spudger and gently disconnect the daughterboard ribbon cable from its socket on the underside of the motherboard. Easy does it—take your time to avoid any damage. If you need a hand, you can always schedule a repair.
Tools Used
Step 23
– Gently lift the vibrator from the display assembly using the tip of a spudger, giving it a little wiggle to loosen it up.
– Carefully pry the vibrator along with its spring-contact connector, making sure not to force anything and keeping the process smooth.
Tools Used
Step 24
– Take out the vibrator.
Success!


