Samsung Galaxy S6 Volume Buttons Replacement Guide: DIY Fix and Repair
Duration: 45 minutes
Steps: 15 Steps
Hey there! Just a friendly heads-up: your device deserves some TLC, so make sure you’re following the steps carefully. If you run into any hiccups along the way, no worries! You can always schedule a repair to get it back in tip-top shape!
Ready to jazz up your Samsung Galaxy S6? Let’s give those volume buttons a stylish makeover! We’ll kick things off by gently removing the rear glass, which will release the adhesive that’s been holding it tight. Once we’ve got those buttons looking fresh and sleek, we’ll pop that rear glass back into place like a pro. Time to make your phone feel brand new again!
Step 1


Be gentle with that SIM card tray! Too much pressure might cause it to go on a little vacation—permanently.
– Stick a paper clip or a rad SIM eject tool into the hole within the SIM card slot on the groovy power button side of your cool phone.
– Give it a gentle push to pop out the SIM card tray.
Step 2

– Gently pop out the SIM card tray from your phone. You’ve got this!
Step 3


A hair dryer, heat gun, or hot plate can do the trick too! Just go easy on the heat—your phone’s OLED display and battery don’t love it too hot. If you need help, you can always schedule a repair.
Opening your phone means saying goodbye to those waterproof seals, so be sure to have some replacement adhesive handy before diving in! If you choose to reassemble without it, just be extra cautious around liquids.
Got a shattered screen? Slap some packing tape over the whole panel to keep it together while you work your magic.
You might find yourself reheating and reapplying the iOpener a few times to get your phone nice and toasty. Just follow the iOpener instructions to keep things from getting too hot to handle!
– Place the warm iOpener on the back panel for about two minutes to help loosen that pesky adhesive around the glass edges.
– Move the iOpener to heat up the rest of the panel for another two minutes, giving it some extra love.
Tools Used

Step 4


Once you’ve got the pick in, try adding a few drops of isopropyl alcohol into the gap. This can help loosen up the adhesive for the next steps.
– Let’s get started by gently heating up the back glass until it’s warm to the touch. Then, grab a trusty suction cup and place it near the lower edge of the glass.
– Give the suction cup a little lift to make a tiny space under the glass, and slide in an opening pick into that gap.
Step 5


To keep things smooth sailing, consider leaving the pick in place while you grab a second one for the next step. This little trick can help stop that pesky glue from sticking back together.
Don’t forget to give the rear glass a little heat boost as needed to keep the glue from cooling down and getting all hard on you.
– Glide the nifty tool along the lower edge of your device, smoothly cutting through the sticky stuff that keeps the back glass in place.
Step 6


– Follow the heat and slice technique for the other three sides of the phone. Keep an opening pick under each edge to stop the adhesive from re-sticking.
Step 7


– Alright, almost there! Now it’s time to cut through the last bits of adhesive with our trusty opening pick. Next up, let’s carefully remove that rear glass – you’re doing great! If you need a little extra help, remember you can always schedule a repair with us!
Step 8


– Ready to give your phone a fresh new look? Let’s install that rear glass!
– If you’re putting back the original rear glass or using one without pre-installed adhesive, we’ve got your back with this guide.
– Grab those tweezers and gently remove any leftover adhesive from the phone’s chassis. It’s time to tidy up!
– Clean up the adhesion areas with some high concentration isopropyl alcohol (at least 90%) and a lint-free cloth. Remember, swipe in one direction only—no back and forth! This will make sure the surface is all set for the new adhesive.
– Peel off the adhesive backing from the new rear glass, line up one edge against the phone chassis like a pro, and give it a good press down to make it stick!
Tools Used

Step 9

– Let’s start by loosening those thirteen 3.5mm Phillips #00 screws that are holding the midframe in place on the phone.
Step 10


Before diving into this step, double-check that you’ve popped out the SIM card tray. You don’t want any surprise guests!
Take it easy and avoid shoving the opening pick between the glass and display. We want to keep things smooth and crack-free!
– Grip the edge of the midframe with confidence.
– Lift the midframe while pressing down on the battery to separate it from the phone. It’s teamwork, not rocket science.
– If the midframe’s being stubborn, give it a little heat love with an iOpener to soften the display adhesive.
– Lift the midframe carefully to avoid snagging it on the audio jack or charging port. No one likes a tangle.
– Once you’ve started separating the midframe, use an opening pick around the phone’s edges to free the top of the midframe.
– To keep the headphone jack safe, remove the top of the midframe first, then push the midframe downwards to disengage it from the headphone jack.
Tools Used
Step 11

– Gently lift the midframe assembly to free it from the rest of the phone. You’re doing great!
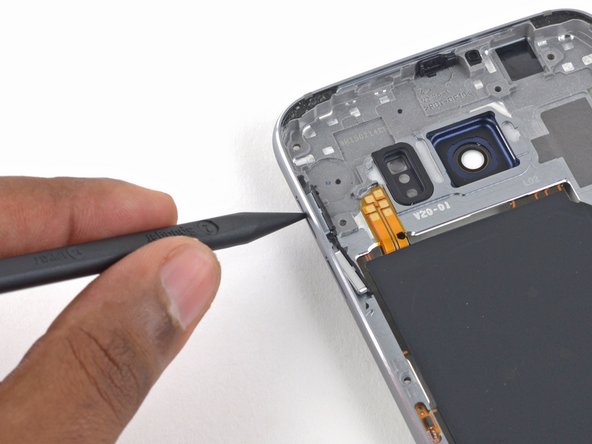
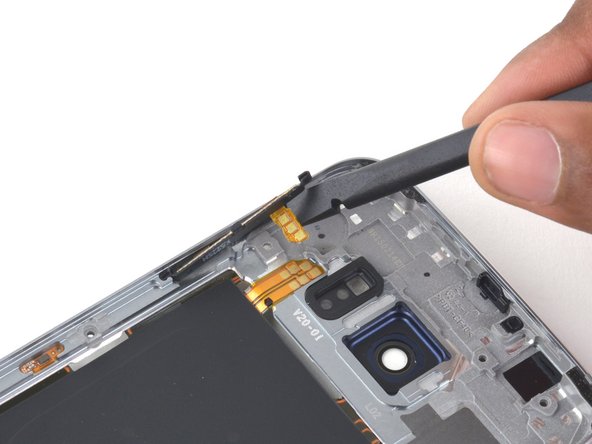
Step 12


– Grab the pointy end of the spudger and lift those volume button contact connectors like a pro!
Tools Used

Step 13
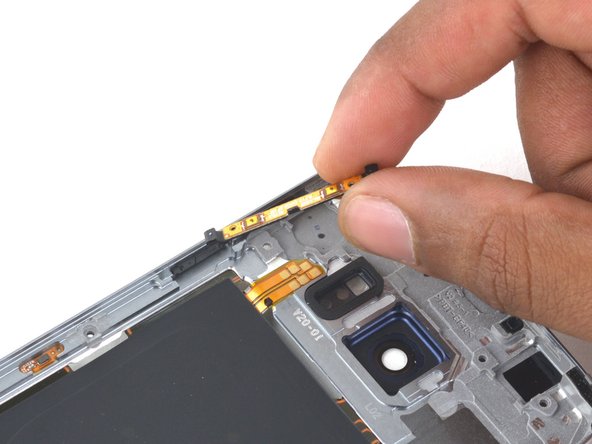

– Grab your trusty spudger and gently nudge those volume buttons out of the midframe. If you need help, you can always schedule a repair
Tools Used