Samsung Galaxy S7 Edge Teardown
Duration: 45 minutes
Steps: 13 Steps
Following our detailed teardown of the Samsung Galaxy S7, it’s time for the Galaxy S7 Edge to take center stage. With many dual-flagship releases, manufacturers often share similar design elements, so we’re expecting a fun game of ‘Spot the Differences’ here. Let’s dive in and compare the S7 Edge! And remember, if you need any help along the way, you can always schedule a repair.
Step 1


– Specs. Think you’ve seen them before? Nah, just a coincidence.
– Dual edge 5.5” Super AMOLED display with a crisp 2560 × 1440 resolution (534 ppi) – a total treat for your eyes.
– Qualcomm Snapdragon 820 processor, paired with 4 GB RAM and an Adreno 530 GPU – speed, power, and smooth performance.
– 12-megapixel rear camera with dual pixel autofocus and 4K video capture; plus, a 5-megapixel selfie camera for those perfect self-portraits.
– 32 or 64 GB of internal storage, and hey, you can add up to 200 GB more with a microSD card – because who doesn’t need extra space?
– IP68 water resistance rating – a little splash? No big deal.
– Android 6.0 Marshmallow – sweet, simple, and reliable.
Step 2


– Just had to give those Edge notifications a whirl and show off that smooth, curvy OLED. Too bad our new number isn’t in anyone’s contacts yet.
– A quick look back at last year’s Galaxy S6 Edge tells us that size really matters. The S7 Edge comes through with a bigger screen and keeps that solid IP68 rating along with the handy microSD slot we loved on the S7—features that were missing on last year’s model.
– Oh, and the camera bump? Way less noticeable now. This could be thanks to that tiny extra 0.7mm of thickness on the S7 Edge, but hey, every little bit helps, right?
Step 3


– Once more, the trusty NSEA Protector iOpener heads out to warm up another galaxy—er, device—near you.
– Just like with the standard S7, hit the back with plenty of heat. Grab your iSclack and picks, and you’ll power through even the most stubborn adhesive.
– Remember when a cracked back panel meant a quick swap? Those were the days.


Step 4


The S7’s back takes a cue from the Edge’s front, rocking smooth curves on its rear glass panel. It’s got that ‘mirror universe twin’ vibe—just swap out the goatee for some stylish glass curves.
– Let’s line up the S7 and S7 Edge for a little side-by-side action: focusing mainly on the similarities, with just a sprinkle of differences.
– Peek inside, and you’ll find both devices rocking the same camera, flash, overall design, and even the antenna spots (though those little squiggles have their own unique flair).
– Even with that strikingly similar layout, the Edge, which boasts its curved beauty, is surprisingly a bit less curvy from the back compared to its standard sibling.
Step 5


It seems like the standardization of the regular S7 has brought some nice perks for the Edge model too.
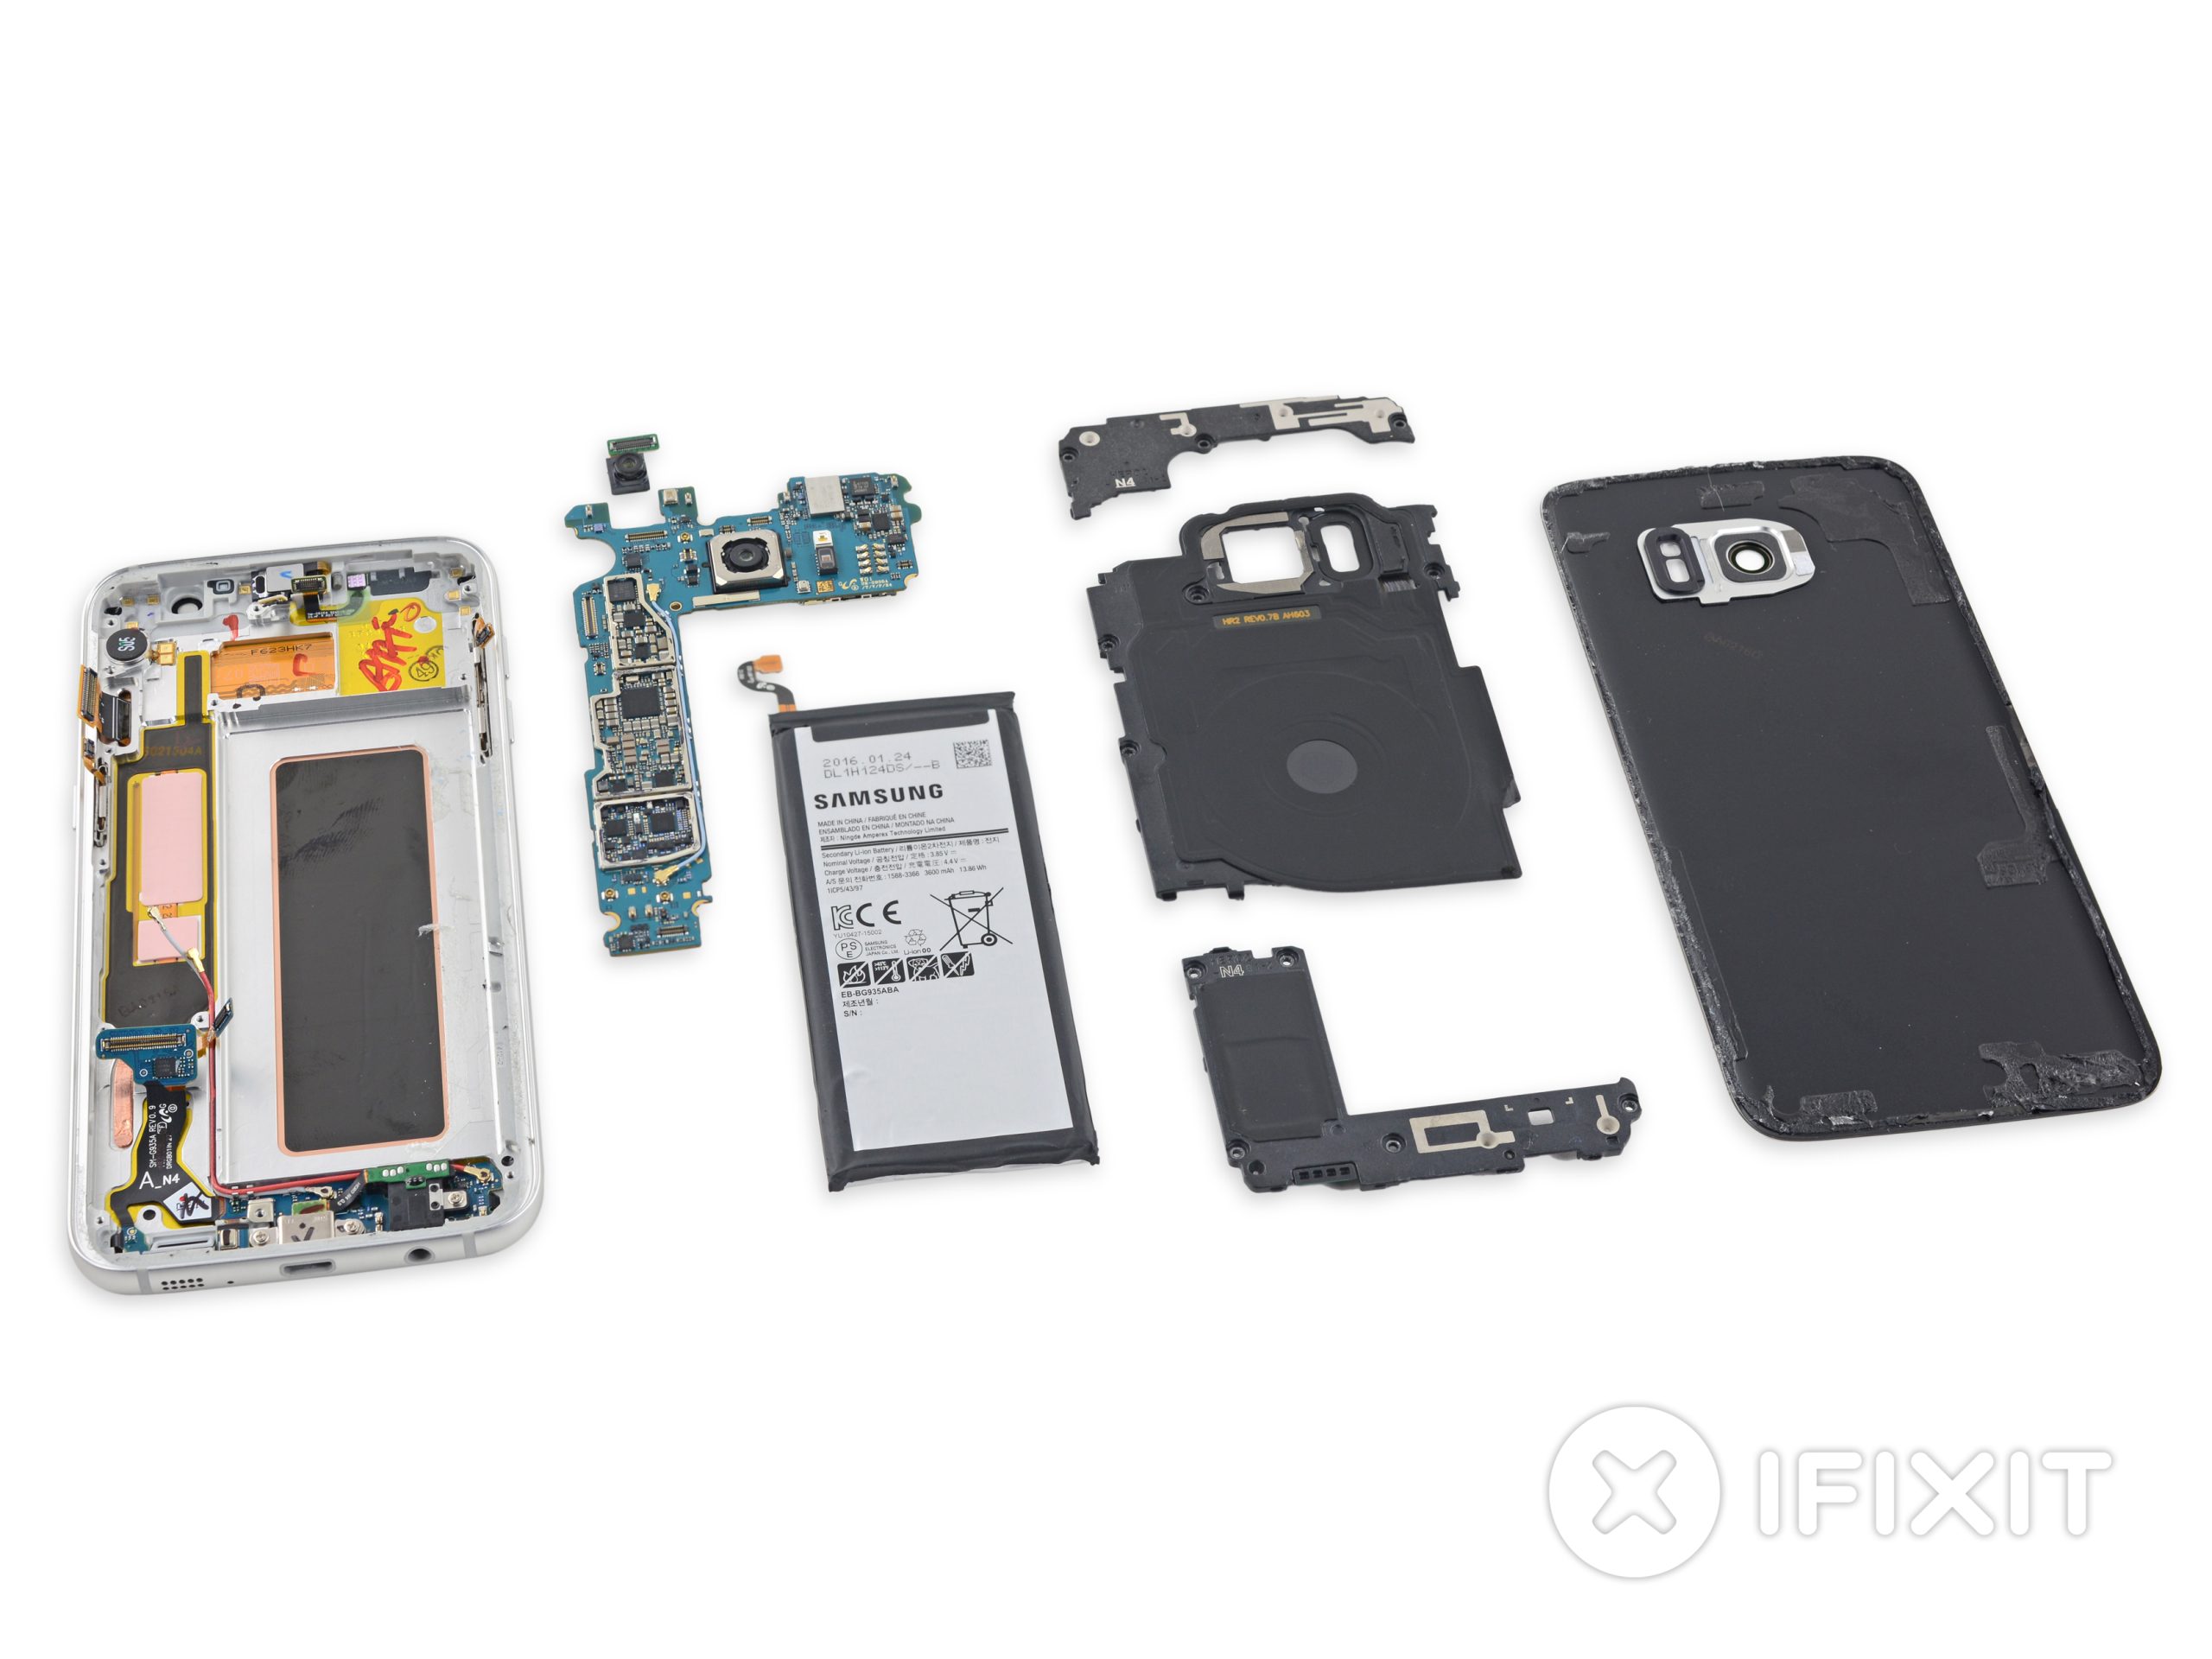
– Great news! The battery is now freed from under the motherboard, unlike the tricky spot it was in on last season’s Edge. We remove the impressive 3.85 V, 13.86 Wh, 3,600 mAh powerhouse of a battery. That’s a 20% boost over the original 3,000 mAh in the S7, meaning longer battery life and less frequent charging for your device. With a slightly thicker design, you’ll enjoy more lasting power and less wear on the battery. If you need help along the way, you can always schedule a repair.
Step 6


– We’ve ventured into the heart of the curved-screen wonder, and guess what? It’s remarkably similar to its flat-faced counterpart. Who knew?
– Now, let’s get that motherboard out and keep things moving!
Unfortunately, this year’s Edge took a step back and adopted our least favorite design feature: soft-button LED cables that wind around the midframe and need to be glued under the display glass. That daughterboard isn’t coming out anytime soon, so patience is key here. If you need help, you can always schedule a repair.
Step 7

– Alright, time to dig into the details and grab some chip IDs! Let’s start with the front of the motherboard and check out what we’ve got:
– SK Hynix H9KNNNCTUMU-BRNMH: 4 GB LPDDR4 SDRAM stacked on top of the Qualcomm MSM8996 Snapdragon 820
– Samsung KLUBG4G1CE-B0B1: 32 GB MLC Universal Flash Storage 2.0
– Avago AFEM-9040: Multiband Multimode Module
– Murata FAJ15: Front End Module
– Qorvo QM78064: High band RF Fusion Module and QM63001A: Diversity receive module
– Qualcomm WCD9335: Audio Codec
– Maxim MAX77854: PMIC and MAX98506BEWV: Audio amplifier
Step 8

– The S7 Edge’s chipset is basically having déjà vu, it’s so similar to the regular S7. Let’s check out what’s inside:
– Murata KM5D17074 Wi-Fi module (most likely rocking a Broadcom BCM4359 WiFi/Bluetooth chip)
– NXP Semiconductor 67T05 (PN67T) NFC controller for those tap-and-go moments
– IDT P9221 wireless power receiver (probably an updated version of the P9220)
– Qualcomm PM8996 and PM8004 PMICs keeping the power steady
– Qualcomm QFE3100 envelope tracker for efficient signal management
– Qualcomm WTR4905 and WTR3925 RF transceivers for all your connectivity needs
– Samsung C3 image processor and S2MPB02 PMIC—picture-perfect performance
Step 9


– Let’s dive into identifying those ICs! First up, we’ve got the DSP Group DBMD4 audio/voice processor, your go-to for sound and voice processing. Next, the Zinitix ZF115N haptic driver is here to control those vibrations – making sure your device feels just right when you tap or swipe.
– Power management? We’ve got that covered with the Maxim Integrated MAX77838EWO. It’s the smart chip making sure your device doesn’t run out of juice too soon.
– Protecting your device is key! The ETEK Microelectronics ET9529 is your over-voltage protector, while the ON Semiconductor FPF2495B keeps things safe by guarding against both over-voltage and current issues.
– Need stable, reliable voltage? The Diodes Incorporated AP7346D-3318FS6-7 and AP7340D-18FS4-7 LDO regulators are working in the background to keep everything flowing smoothly.
– For crystal-clear sound, we’ve got the Knowles MEMS microphone – capturing every little sound perfectly.
– Last but not least, the NXP Semiconductor NCX2200 comparator and Toshiba TC7SBD385FU bus switch are making sure everything communicates just as it should.
– If you need help, you can always schedule a repair.
Step 10


– IC Identification, pt. 3: Here’s where it gets interesting. Let’s start by checking out the RDA Microelectronics RDA6213N FM Radio Receiver – that’s your signal boost right there.
– Next up, we have the TDK D5275 and D5287 Antenna Switch Modules. They’re responsible for keeping your connection strong and reliable, so don’t forget about them.
– Then there’s the Qorvo TQF6260 Power Amplifier Duplexer. This little guy is the powerhouse that amplifies signals without breaking a sweat.
– Moving on, we’ve got the NXP Semiconductor BGU8103 GPS/GLONASS/Galileo/BeiDou Low Noise Amplifier. A bit of a mouthful, but it does a solid job making sure your GPS is sharp and clear.
– The NXP Semiconductor BGS8H2, BGS8L2, and BGS8M2 LTE Low Noise Amplifiers come next, making sure you stay connected even when you’re out of range.
– Infineon BGSX22GN10 DPDT RF Antenna Switch is up next, paired with another mysterious switch we don’t have the details on. These keep your antennas working like a charm.
– Lastly, we’ve got the Infineon BGS12PL6 and BGS12SN6 SPDT RF Switches, plus a set of 3 more unknown types. Don’t worry about them too much for now, but they’re essential for making sure everything switches smoothly and works like a pro.
Step 11


– Step 4: Let’s check out the sensors!
– Sony IMX260 12 MP image sensor (most likely hanging out here)
– Maxim Integrated MAX86902—it’s the all-in-one heart rate, pulse oximeter, and UV sensor module (pretty versatile, right?)
– STMicroelectronics LSM6DS3: this one’s your 3-axis accelerometer and gyroscope—keeps everything on track.
– Bosch Sensortec BMP280 pressure sensor: handling air pressure like a pro.
– AKM Semiconductor AK09911: your trusty 3-axis electronic compass.
– ABLIC S-5712CCDL1-I4T1U Hall-effect sensor—detects magnetic fields with style.
Step 12

The S7 Edge’s small heat pipe is almost identical to the one we took out of the S7. It’s designed to do a solid job spreading heat across the metal midframe, which means better cooling when you’re diving into those longer Samsung Gear VR sessions.
– And just a quick note!
– That whole ‘liquid cooling’ hype? It’s not really a game changer. If you missed it, we covered this in our S7 teardown, and it’s pretty much the same story here.
Step 13


– Samsung Galaxy S7 Edge Repairability Score: 3 out of 10 (10 is the easiest to repair).
– Good news: many components are modular, which means they can be replaced independently.
– Unlike the S6 Edge, the battery is a bit easier to remove—no need to mess with the motherboard first! However, tough adhesive and a glued-on rear panel might make this step trickier than you’d like.
– Heads up: you’ll need to remove the display (and probably say goodbye to it) if you’re aiming to replace the USB port.
– Both the front and back glass are prone to cracks, and that strong adhesive on the rear glass? Yeah, it’ll make getting into the device a bit of a challenge.
– Replacing the glass without damaging the display? Probably not going to happen, unfortunately.
Success!