Samsung Galaxy S8 Plus Rear Camera Bezel Replacement
Duration: 45 minutes
Steps: 18 Steps
Ready to swap out the rear camera bezel (yep, including that glass lens cover) on your Samsung Galaxy S8 Plus? If your new part doesn’t come with adhesive, you’ll need to grab some—look for pre-cut adhesive or get creative with some skinny high-bond tape. Let’s get your camera looking fresh again!
Step 1

- Grab an iOpener and gently warm up the back of the phone along its left edge for about two minutes. This helps loosen the adhesive holding the back cover in place, making it easier to remove.
A hair dryer, heat gun, or hot plate can work for loosening things up, but don’t get wild with the heat—your phone’s OLED screen and battery aren’t fans of a sauna session.
Opening up your phone can break its waterproof seals, so have some replacement adhesive handy before you get started. If you’re not replacing the adhesive, just be mindful to keep liquids away while you reassemble. You might need to warm up the iOpener a few times to get it just right—follow the instructions to avoid overheating. Take your time, stay patient, and if you need a hand, schedule a repair with Salvation Repair.
Tools Used

Step 2


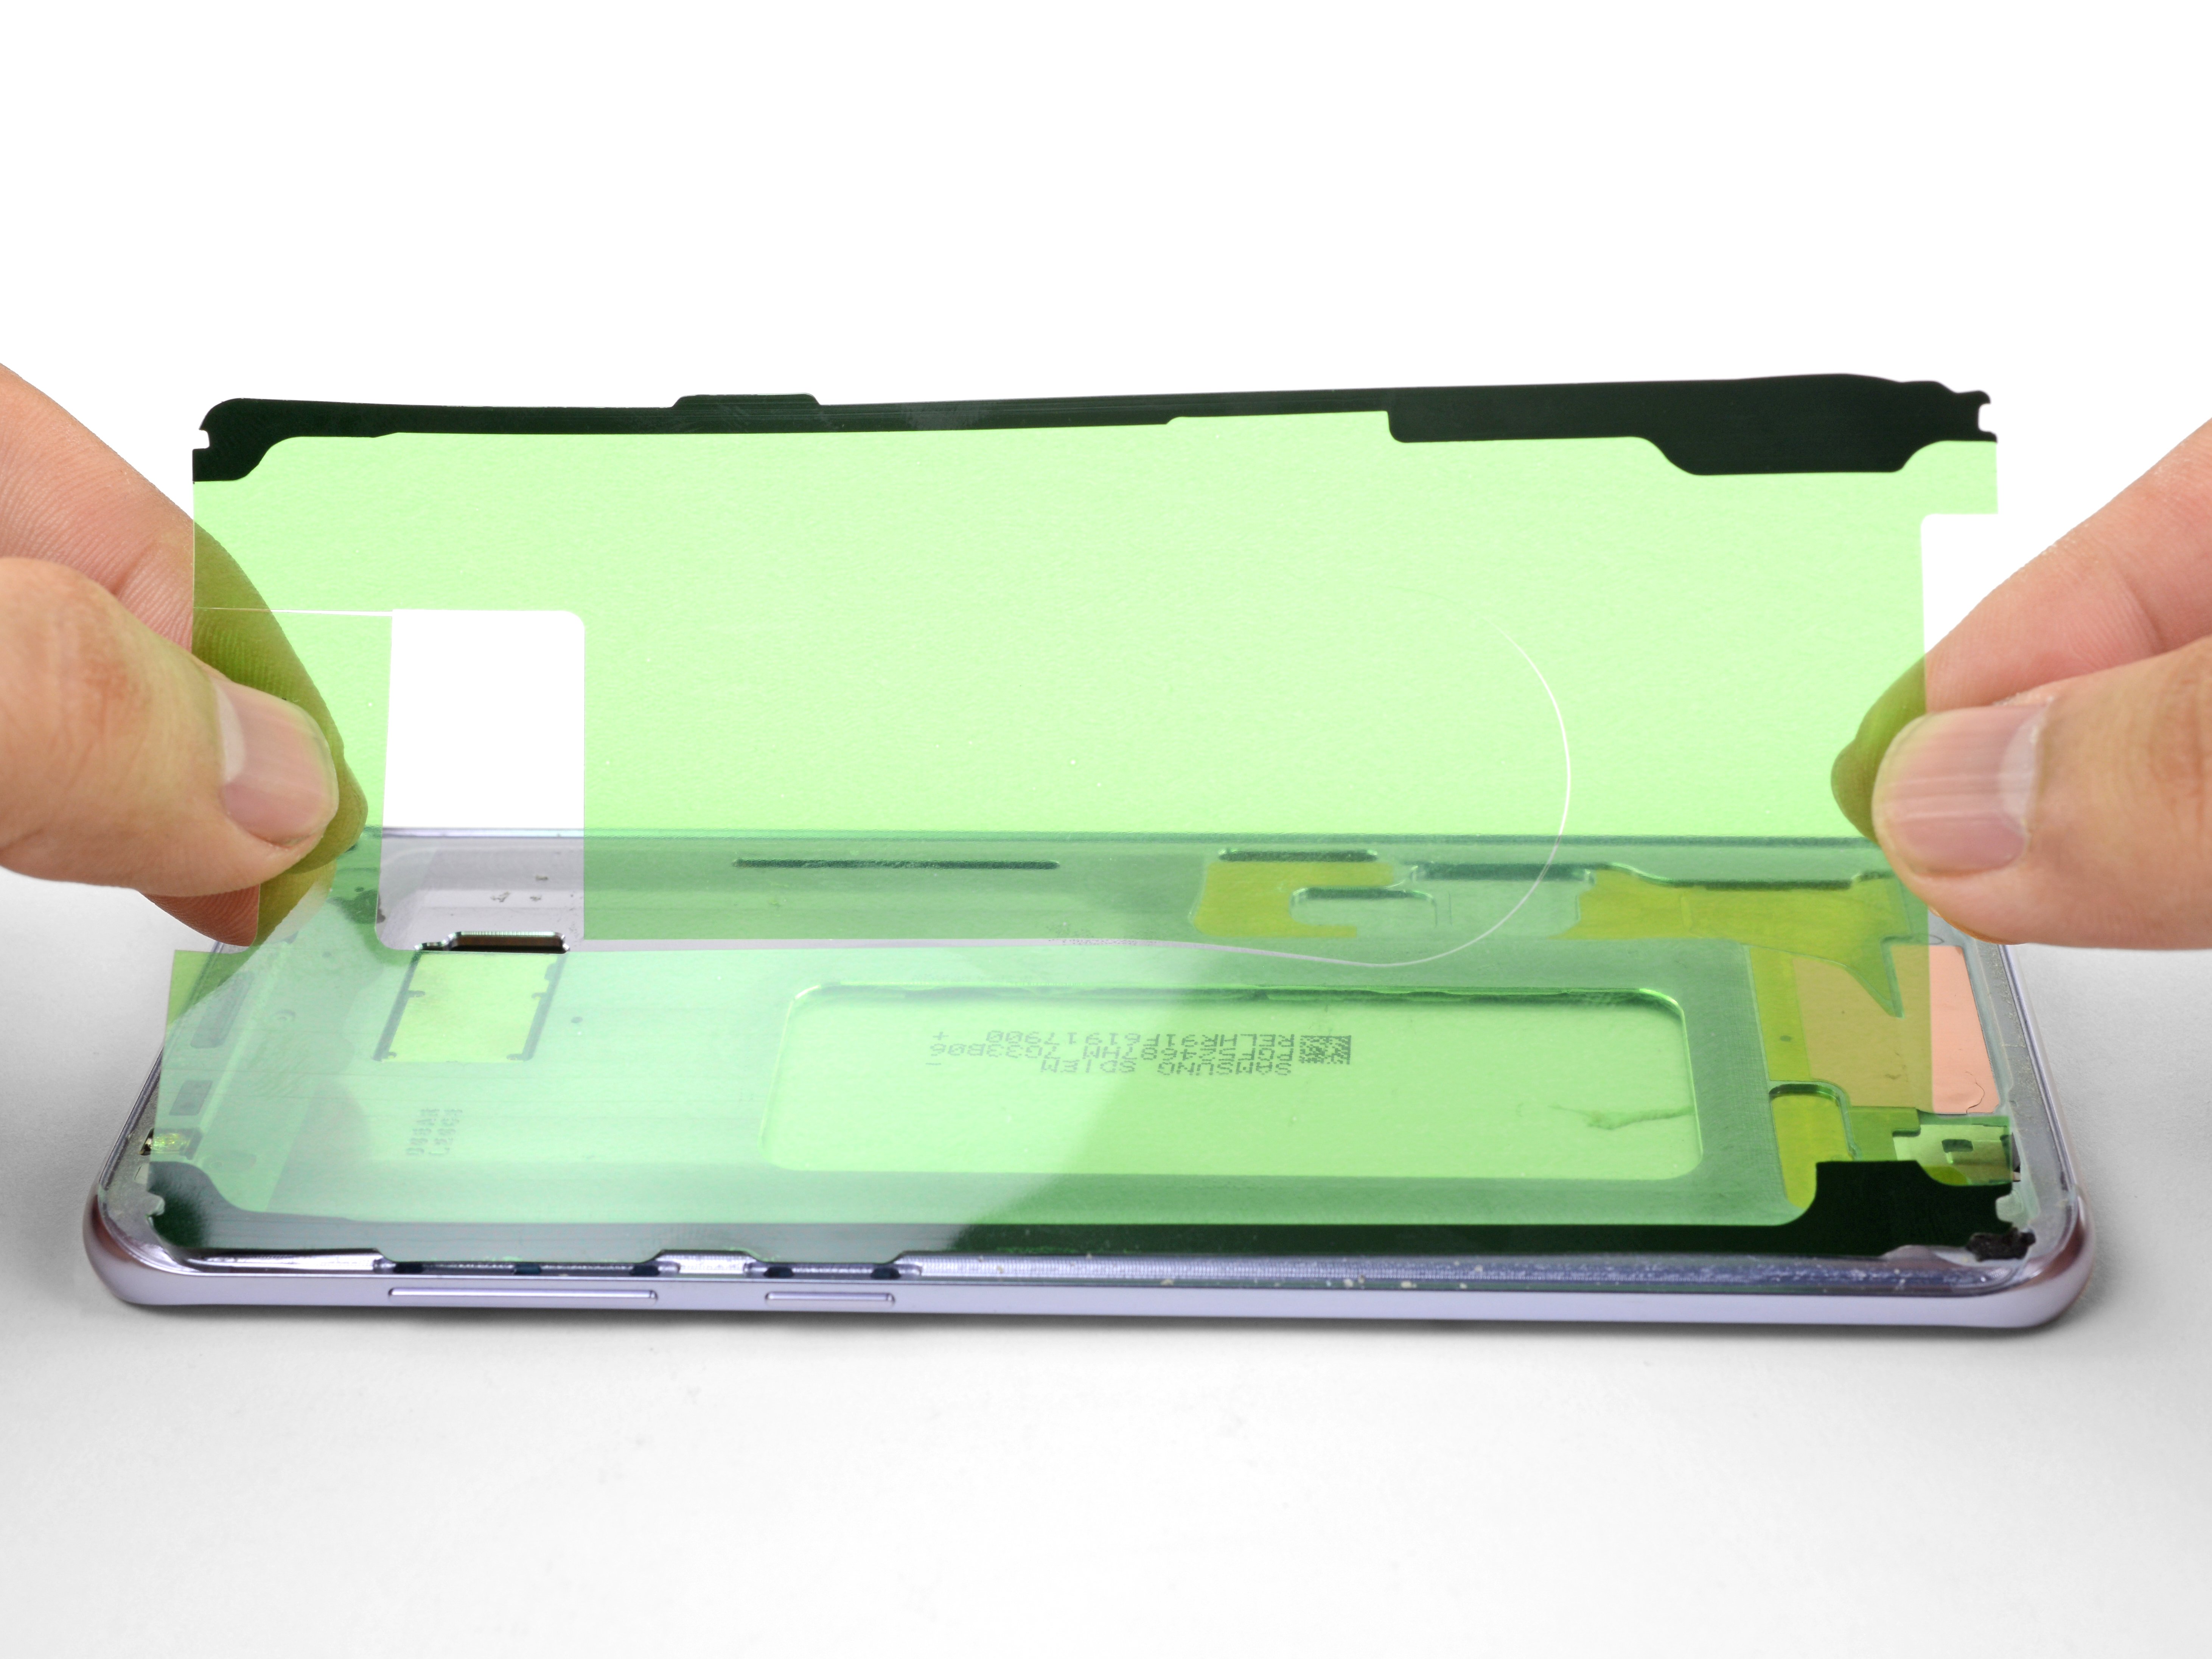
The adhesive layout is shown in the first image, revealing the inside of the cover after removal. This visual guide helps you see exactly where everything is placed, making the disassembly process smoother. If you need a hand at any point, you can always schedule a repair.
- Alright, here comes the fun part—time to slice through the glue holding the back cover.
- From the outside, you’ll be working in the zones highlighted here:
- Thick glue? That’s where you’ll need a little more elbow grease.
- Thin glue? Easy breezy—just glide on through.
- Heads up: steer clear of this spot! There’s a fingerprint sensor cable hiding underneath, so no poking or slicing there.
Step 3


When using an iOpener, be sure to follow the guidelines to keep it from overheating, or you might end up with a gel pack explosion!
Don’t stick the suction cup right on the curved edge—the seal will be as useless as a chocolate teapot. Aim for a flatter spot nearby.
If your phone’s back glass is more crack than glass, the suction cup might just give up. Try some tough tape, or if you’re feeling wild, use a tiny bit of superglue on the suction cup and let it dry completely before lifting.
This step might need some muscle, but you’re just looking to make a tiny gap—enough to sneak your tool in there. No need to Hulk out.
Stuck? Hit it with more heat to soften up that stubborn adhesive. It cools off quick, so you might need a few rounds of warming.
- Stick a suction cup onto the back cover, right near that freshly warmed edge.
- Give the suction cup a gentle pull to pop up the left side of the back cover, just enough to sneak a peek between the cover and the frame.
Tools Used
Step 4


Go easy on the rear glass—too much muscle or metal tools can turn it into a glitter party you didn’t want.
Once the pick is in place, feel free to add a few drops of isopropyl alcohol into the gap. It helps loosen up the adhesive, making the next steps a lot smoother. If you need a hand with anything, remember you can always schedule a repair.
- Slide a pick or a thin plastic opening tool into the gap to gently pry it open.
Step 5


- Glide your opening pick along the left side of the phone to cut through the sticky adhesive holding the back cover in place. Keep it smooth and steady!
Once you've started to loosen things up, it might be a good idea to leave that pick in place and grab a second one as you move to the next step. Keeping the pick inserted helps stop the glue you just separated from sneaking back together. If you need a hand, you can always schedule a repair.
Step 6


Warm up that back cover again if it starts to cool down – we don't want that glue getting cold and stiff on us!
Since the glued section is a bit more expansive here, make sure to slide your pick in deeper to completely separate the pieces.
- Keep slicing through the adhesive along the bottom edge of the phone, and don’t forget—leaving your opening pick in place might make things easier. Grab another pick for the next step to keep things smooth sailing. If you need a hand at any point, you can always schedule a repair.
Step 7


Heads up: the fingerprint sensor’s flex cable is lurking nearby. If your pick goes too deep, it might not be happy about it! Take it slow, and check out the step 2 diagram for a smooth move.
- Work your way through the rest of the sticky stuff on the top edge and right side—almost there!
Step 8


Hold off on removing that back cover all at once—take it slow and steady!
- Gently pry the back cover up from the left edge and give it a little wiggle to open it up just a bit.
Step 9


- Gently use the spudger's point to lift and detach the fingerprint sensor flex cable. Take it easy, and remember—it's all part of the repair journey!
Tools Used

Step 10


Take your time with this step—patience pays off. Don’t try to jam the connector in; let it ease into place.
If your fingers are nimble enough, you might be able to press the connector with just a gentle touch. Watch out for the cable—no tug-of-war needed.
- As you put things back together, get that back cover into position so the fingerprint sensor cable is ready to line up with its socket.
- Take your trusty spudger and press the connector straight down until it clicks in place—no wild moves needed, just a gentle snap!
Tools Used
Step 11

If you're feeling extra handy, you can try putting the back cover back on without new adhesive. Just make sure to scrape off any big chunks of old adhesive that might get in the way. Once it's on, give it a little heat and some pressure to secure it. Keep in mind it won't be waterproof anymore, but the remaining adhesive should still be strong enough to hold everything together.
Before you seal everything up with new adhesive, turn your phone on and give it a test run to make sure your repair was a success. If you need help, you can always schedule a repair
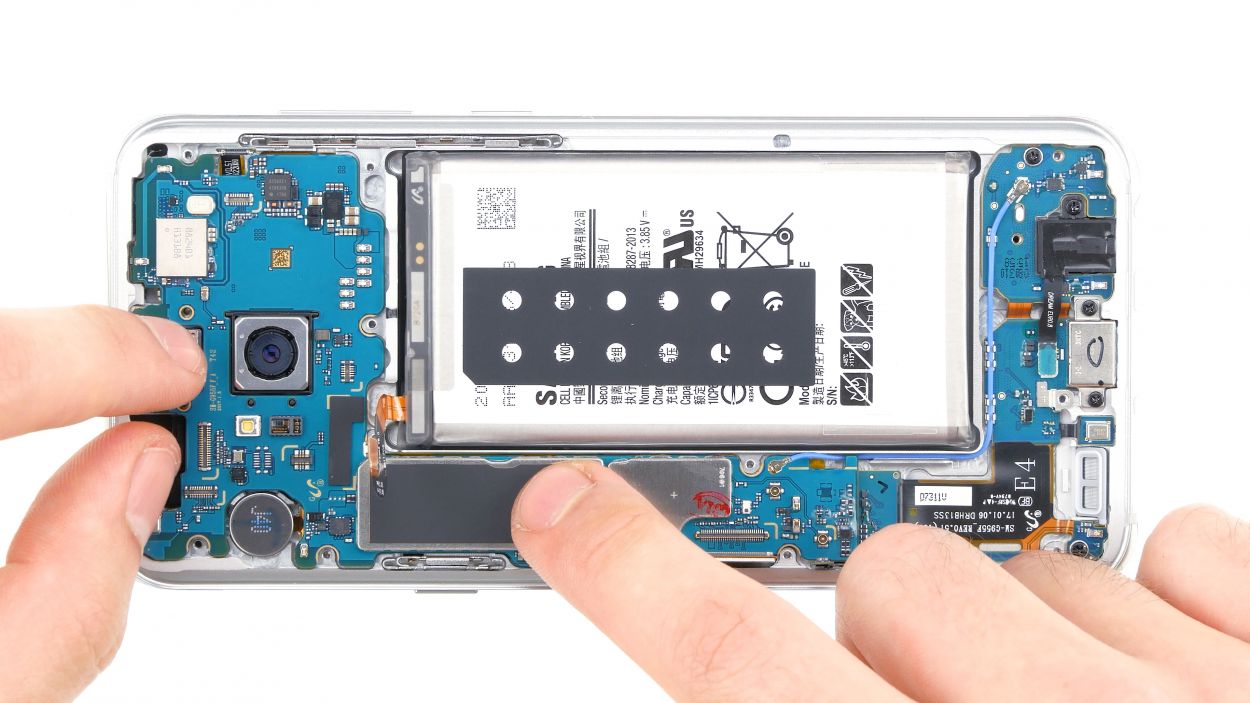
- First things first, let's get that back cover off! It's time to reveal the inner workings of your device.
- Ready to put on a shiny new back cover? Here’s how to do it:
- If you're reinstalling the back cover or using one without pre-installed adhesive, just follow this handy guide.
- Oh, and if you need to move the camera bezel to your new part, no worries! Just check out our camera bezel replacement guide.
- Grab some tweezers and gently peel away any leftover adhesive from the phone's chassis. Then, give those adhesion areas a good clean with high concentration isopropyl alcohol (at least 90%) and a lint-free cloth to get them ready for the new adhesive.
- Now, peel off the adhesive backing from the new rear glass, carefully align one edge with the phone chassis, and press it down firmly. You've got this!
Tools Used

Step 12

You can use a hair dryer, heat gun, or hot plate to loosen things up—just keep the temperature chill enough so the plastic doesn’t decide to go freestyle and melt.
- Grab your iOpener and give that rear camera bezel at the top of the back glass a cozy two-minute session. Let it soak in the warmth.
- If your phone’s playing hard to get, just reheat and reapply the iOpener until things get toasty. Make sure you follow the iOpener instructions so you don’t end up with a hot potato situation.
Tools Used
Step 13


- Slide an opening pick under the top edge of the rear camera bezel—like you’re sneaking a slice of cake out of the fridge.
- Glide the pick around the bezel’s edges to loosen the sticky adhesive holding it to the rear glass. Take it slow; no need for a wrestling match.
- Hands off the side next to the fingerprint sensor—give that spot some space!
Step 14


- Grab an opening pick and gently pry the camera bezel away from the rear glass—think of it as giving the phone a friendly nudge.
- Stuck on some stubborn adhesive? Use your pick to carefully cut through it, making the job smoother.
- Once the adhesive is loosened, lift off the camera bezel — easy does it.
- Watch out for the fingerprint cable — make sure you don’t catch it on the bezel as you lift it away. Nice and steady wins the race.
Step 15


- Grab those tweezers and lift away the leftover adhesive from the rear camera bezel—think of it as tidying up before a big event.
- Take a spudger and gently scrape off any stubborn bits of adhesive clinging to the rear glass where the camera bezel sits.
- Time for a cleaning session: use high-strength isopropyl alcohol (90% or more) and a lint-free cloth to wipe the adhesion area. Always swipe in one direction—it’s like brushing your hair, not a wild dance party. This gets the surface ready for fresh adhesive.
Step 16


If your part didn't come with pre-cut adhesive, no worries! Just grab some high-bond double-sided tape like Tesa 61395, or cut up a pre-made adhesive sheet, and stick that camera bezel down nice and tight. You've got this!
- Cut some tape to the right size so it fits perfectly along the edges of the camera bezel. If you're unsure, go with a narrower strip than you think you'll need – better safe than sorry!
- Use your tweezers to carefully place the tape onto the metal surface of the bezel, focusing on the side where the camera lens cover sticks out.
- Try to cover as much of the metal surface as you can with the tape. Just make sure to avoid getting any on the plastic or glass areas – keep it clean!
Tools Used
Step 17

- Grab your tweezers and carefully peel off all the adhesive backing from the rear camera bezel. Take it slow—think of it like unwrapping a tiny present for your phone.
Tools Used
Step 18


- Put your device back together by reversing the steps above.
- Once you’re done, check out our guide to make sure everything’s working as it should.
- If you’ve got old parts, drop them off at an R2 or e-Stewards certified recycler.
- Ran into a hiccup? Swing by our Answers community for some troubleshooting tips.
- If you need a hand, you can always schedule a repair with Salvation Repair.