Samsung Galaxy S8+ Teardown
Duration: 45 minutes
Steps: 17 Steps
Looking for the classic Galaxy S8 teardown? You’re on the right track, just not quite at that station yet!
Samsung is making waves again! Kicking off 2017, the tech giant introduces a powerhouse of a smartphone—the Galaxy S8+ with its massive 6.2-inch display that’s sure to impress. But how does it hold up under the teardown spotlight? Let’s dive into the details! And if you were on the hunt for our classic Galaxy S8 teardown, look no further. Want to stay ahead of the game for future teardowns? Keep up with us on Twitter, connect with us on Facebook, and check out our Instagram for all the latest updates!
Step 1


- Ready to dive beneath the shiny shell of the S8+? Let's check out what's packed inside this powerhouse:
- Big, beautiful 6.2-inch Super AMOLED display with curves for days and a crisp 2960 × 1440 resolution (529 ppi)
- Muscle under the hood: Qualcomm Snapdragon 835 or Samsung Exynos 8895, teamed up with 4 GB RAM
- Photo magic: 12-megapixel back camera with speedy dual pixel autofocus and 4K video skills; 8-megapixel front camera for your best selfie game
- Space for everything—64 GB built-in storage, plus room for a MicroSD card (up to 256 GB extra)
- Not afraid of a splash: IP68 water resistance rating
- Runs smooth on Android 7.0 Nougat
Step 2


The fingerprint sensor has been relocated to a less-than-glamorous spot on the back. Looks like Samsung decided an easier fix was better than trying to hide it behind an in-screen sensor like Apple’s rumored plans.
- At the bottom of your device, you'll find the usual suspects: a headphone jack, USB-C connector, microphone port, and speaker grille—all where you'd expect them to be.
- The front face is super sleek and smooth. There's no physical home button to fiddle with anymore; instead, it’s all tucked under the display, courtesy of a nifty pressure sensor. This makes the device feel totally seamless, like one solid piece.
- A quick heads-up for those of you who love to swap SIM cards like pros: there are two very similar openings on the top of the S8+. One is for the SIM eject tool, and the other holds a microphone. Trust us, you don’t want to mix those up, so keep your eye on which one is which!
Step 3


- Let's take a moment to compare a few things before diving into the nitty-gritty.
- When stacked up against last year's models, the standout changes are the new flash assembly and the repositioned fingerprint reader.
- In this trio, we've got the S7 Edge on the left, the S8+ in the middle, and the S8 on the right.
- Thanks to its sleeker bezels and unique 18.5:9 aspect ratio, the S8+ fits a 6.2" display into a form factor that's almost identical to the 5.5" S7 Edge.
Step 4


We've opened our fair share of Galaxy phones, so we're no strangers to this process.
We're making it look like a walk in the park—Samsung really made opening this phone the trickiest part of the whole repair. For the full scoop, check out our S7 repair video guide.
- Enough waiting—let’s get a look inside. By now, we know what’s coming.
- A generous round with the iOpener heats things up, loosening the adhesive so we can pry up the rear glass and start making some progress.
- Almost there...
Tools Used

Step 5


- This rear panel has a little twist—housing the fingerprint reader in the back with a short cable connecting it to the motherboard. Once the glass is out of the way and the cable is dispatched, you'll see that the S8+ and S8 moved to a glass back, saving Samsung some engineering effort on antenna placement, but making repair a bit trickier. The cable is designed to come free easily—pull the rear panel gently, and the tiny connector pops right out, reducing damage risk compared to more stubborn sensors. Keep in mind, the more cracks and a tricky opening, the more careful you’ll need to be when working through this part. If you need help, you can always schedule a repair.
Step 6


Starting off, we'd love to disconnect the battery, but its connector is hiding beneath the midframe, playing hard to get.
- Since the midframe is coming apart in chunks, this setup now looks pretty similar to the S7 and S7 Edge. This time around, the top antenna assembly is integrated with the NFC and wireless charging panel, just like on the Note7. Plus, the coil should also handle Samsung Pay functions by mimicking MST — probably using the coil as an electromagnet to act like a credit card strip on a reader. If you need a hand with any tricky parts, you can always schedule a repair.
Step 7


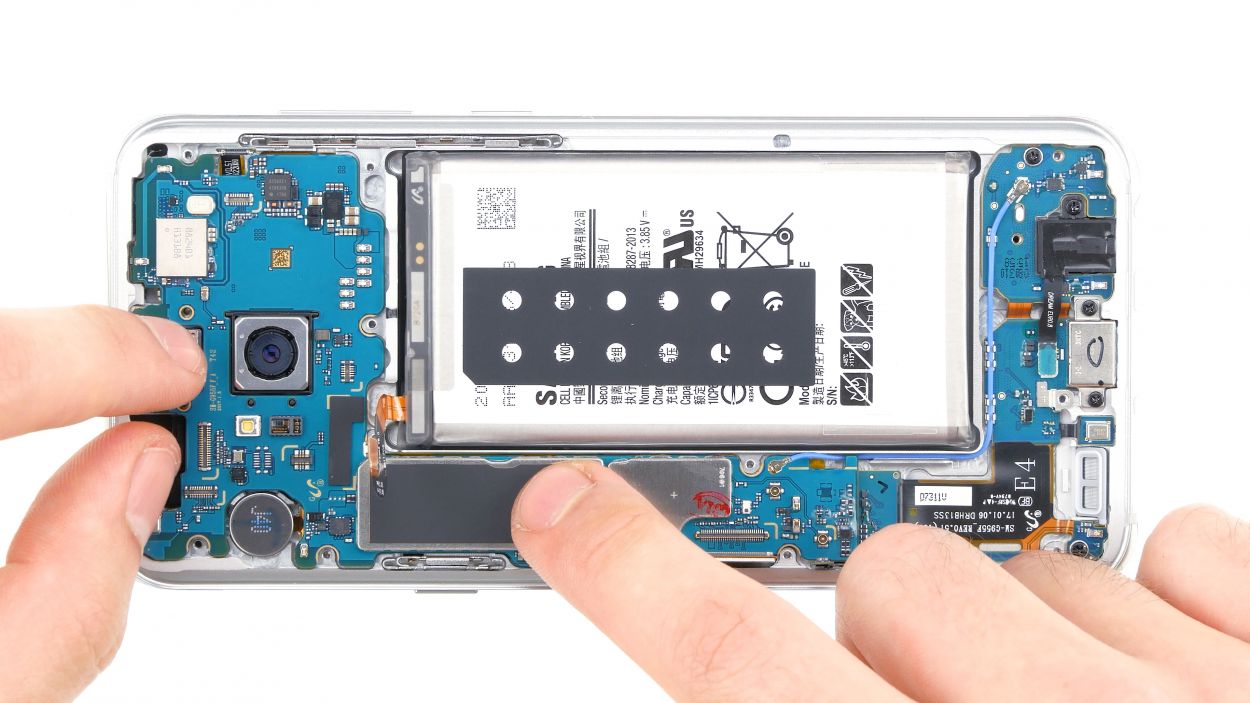
Surprisingly, despite its smaller battery, the iPhone can hang in there longer than the S8+ during real-world use. Sometimes, size isn’t everything!
- Fingers crossed that Samsung's updated testing methods are the missing piece for the Note7, because this design feels pretty familiar to us.
- The S8+ packs a 13.48 Wh (3500 mAh at 3.85 V) battery—exactly the same size as the Note7, and just a tad smaller than the S7 Edge's 13.86 Wh.
- Samsung is still ahead of Apple in the battery showdown, with the iPhone 7+ coming in at 11.1 Wh (2900 mAh at 3.82 V).
- And boy, is that adhesive a tough cookie to crack. Even after you've removed the battery, that glue can be a stubborn friend.
Step 8


- Let's carefully remove the action-packed motherboard and start taking off those cameras!
- The legendary 'Hero' Sony has made way for the sleek 'Dream1' Sony in the rear-facing/main camera. Despite the name change, it's still rocking the same camera hardware as the S7/S7 Edge—just with some snazzy software updates from Samsung.
- Now, let's move on to the front-facing camera and the fancy iris scanning camera, which you might remember from the Note7.
Step 9

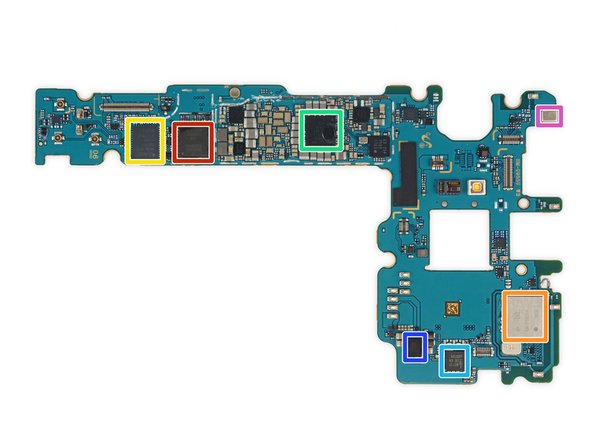
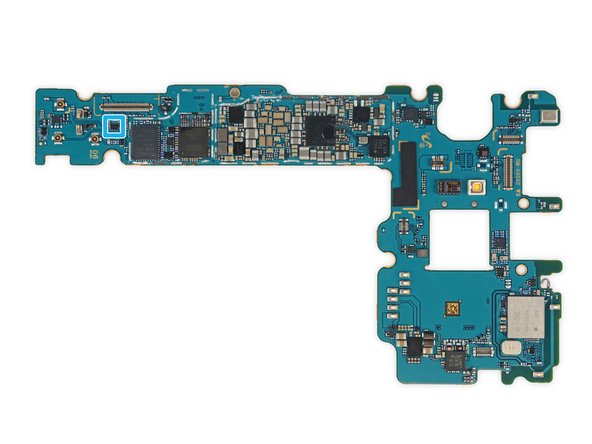
- Let's take a peek at this motherboard's silicon by pushing the cameras aside. Here's what we found lurking underneath: the Samsung K3UH5H50MM-NGCJ 4 GB LPDDR4 RAM sitting right on top of the MSM8998 Snapdragon 835 processor, a Toshiba THGAF4G9N4LBAIR 64 GB UFS storage (that's NAND flash plus a controller), and a Qualcomm Aqstic WCD9341 audio codec keeping the sound in check. We've also got a Skyworks SKY78160-11 front-end module with an LNA for signal boost, an Avago AFEM-9066 front-end module, a Qualcomm QET4100 envelope tracker for power management, and a Silicon Mitus SM5720 Interface PMIC to keep everything running smoothly. If you need help with this process, you can always schedule a repair.
Step 10
- Flip it over and check out these cool parts:
- Qualcomm WTR5975 RF transceiver – handling all your radio signals.
- Murata KM7118064 Wi-Fi module – keeping you online.
- Avago AFEM-9053 front-end module – making sure your connections are crisp.
- Qualcomm PM8998 (similar to PMM8920) power management – keeping the power flowing just right.
- NXP PN80T NFC controller with a secure element – for those tap-to-pay moments.
- Renesas (formerly IDT) P9320S wireless charging receiver – powering up without the cables.
- Probably a Knowles MEMS microphone – so your voice comes through loud and clear.
Step 11


- Let's spot some key chips, round two:
- Qualcomm D5320—probably your high-band diversity IC
- MAX98506 from Maxim Integrated—pumping up the audio as your amplifier
- Qualcomm PM8005—working hard behind the scenes in power management
- MAX77838—another Maxim Integrated chip on power duty
- Samsung S2MPB02—making sure the camera gets its juice
- Samsung S2MM005X02—likely wrangling that USB power delivery
- Samsung S5475S2—probably the brains behind camera processing
Step 12

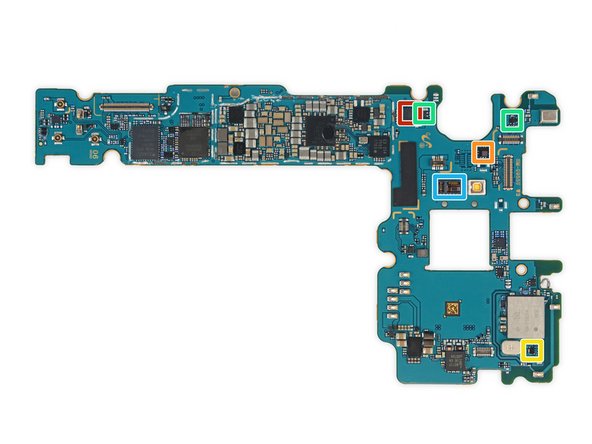
- IC Identifications, pt. 3:
- Meet the NXP Semiconductor PCAL6524—your 24-bit I/O expander buddy.
- There's probably an ON Semiconductor FPF3688UCX load switch hanging out here (odds are good).
- ON Semiconductor FAN48630UC35X 1.5 A synchronous regulator—keeping things powered up smoothly.
- Vishay DG2730: a 2-port, 480 Mbps DPDT USB 2.0 analog switch, ready for some speedy data moves.
- NXP Semiconductor NCX2200 comparator, always keeping an eye on those voltage levels.
- ON Semiconductor FXLA0104QFX 4-bit voltage translator, bridging voltages like a pro.
- Likely a few low/mid-band front-end modules making wireless magic happen.
Step 13

- IC Identifications, pt. 4 (sensor squad):
- STMicroelectronics LSM6DSL—your go-to 3-axis accelerometer/gyroscope (probably!) for detecting flips, shakes, and spins.
- STMicroelectronics LPS22HB Pressure Sensor—keeping track of the air vibes.
- AKM Semiconductor AK09916C—handles the compass action with its 3-axis wizardry.
- Ablic (formerly Seiko Instruments) S-5712CCDL1-I4T1U Hall Effect Sensor (likely)—magnet sensing magic.
- Analog Devices (model mystery)—heart rate sensor, because your device cares about your pulse as much as you do!
Step 14


- Out comes the I/O daughterboard! Check out all the clever waterproofing around here—the speaker grille is wrapped up snug, and there are little seals on the USB Type-C port and headphone jack, all working hard for that IP68 badge.
- The headphone jack is still keeping things modular, which is a win for repairs since it's a part that sees a lot of action.
- You’ll also spot some antenna tuners on this daughterboard, plus what’s likely a Semtech SX9320 proximity sensor hanging out here.
Step 15


- Take a quick look at the heat pipe and button cables—time to pull a few more pieces out of the chassis.
- Next up, out comes the trusty old vibrator motor.
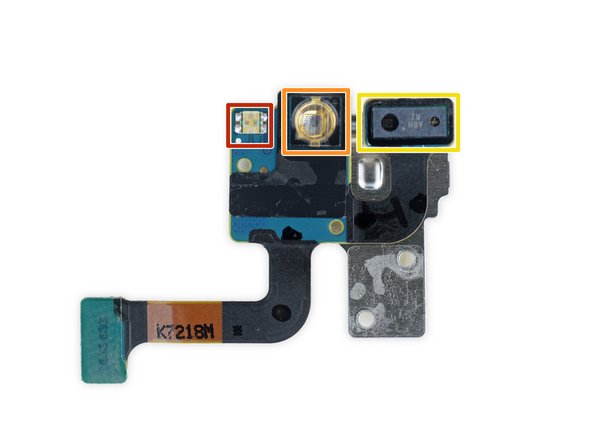
- Don't forget the sensor array (yep, that one with the moisture indicator)!
- Could be the RGB LED (most likely).
- That IR emitter—probably for the iris scanning camera.
- And last but not least, we’ve got the AMS TMD4906 rangefinder/color sensor module, possibly for dimming the screen during calls.
Step 16


Turns out, we've uncovered some chips! Looks like those tiny components decided to make their presence known. No worries—this is a normal part of the process, and with a little patience, we’ll have everything back in shape in no time.
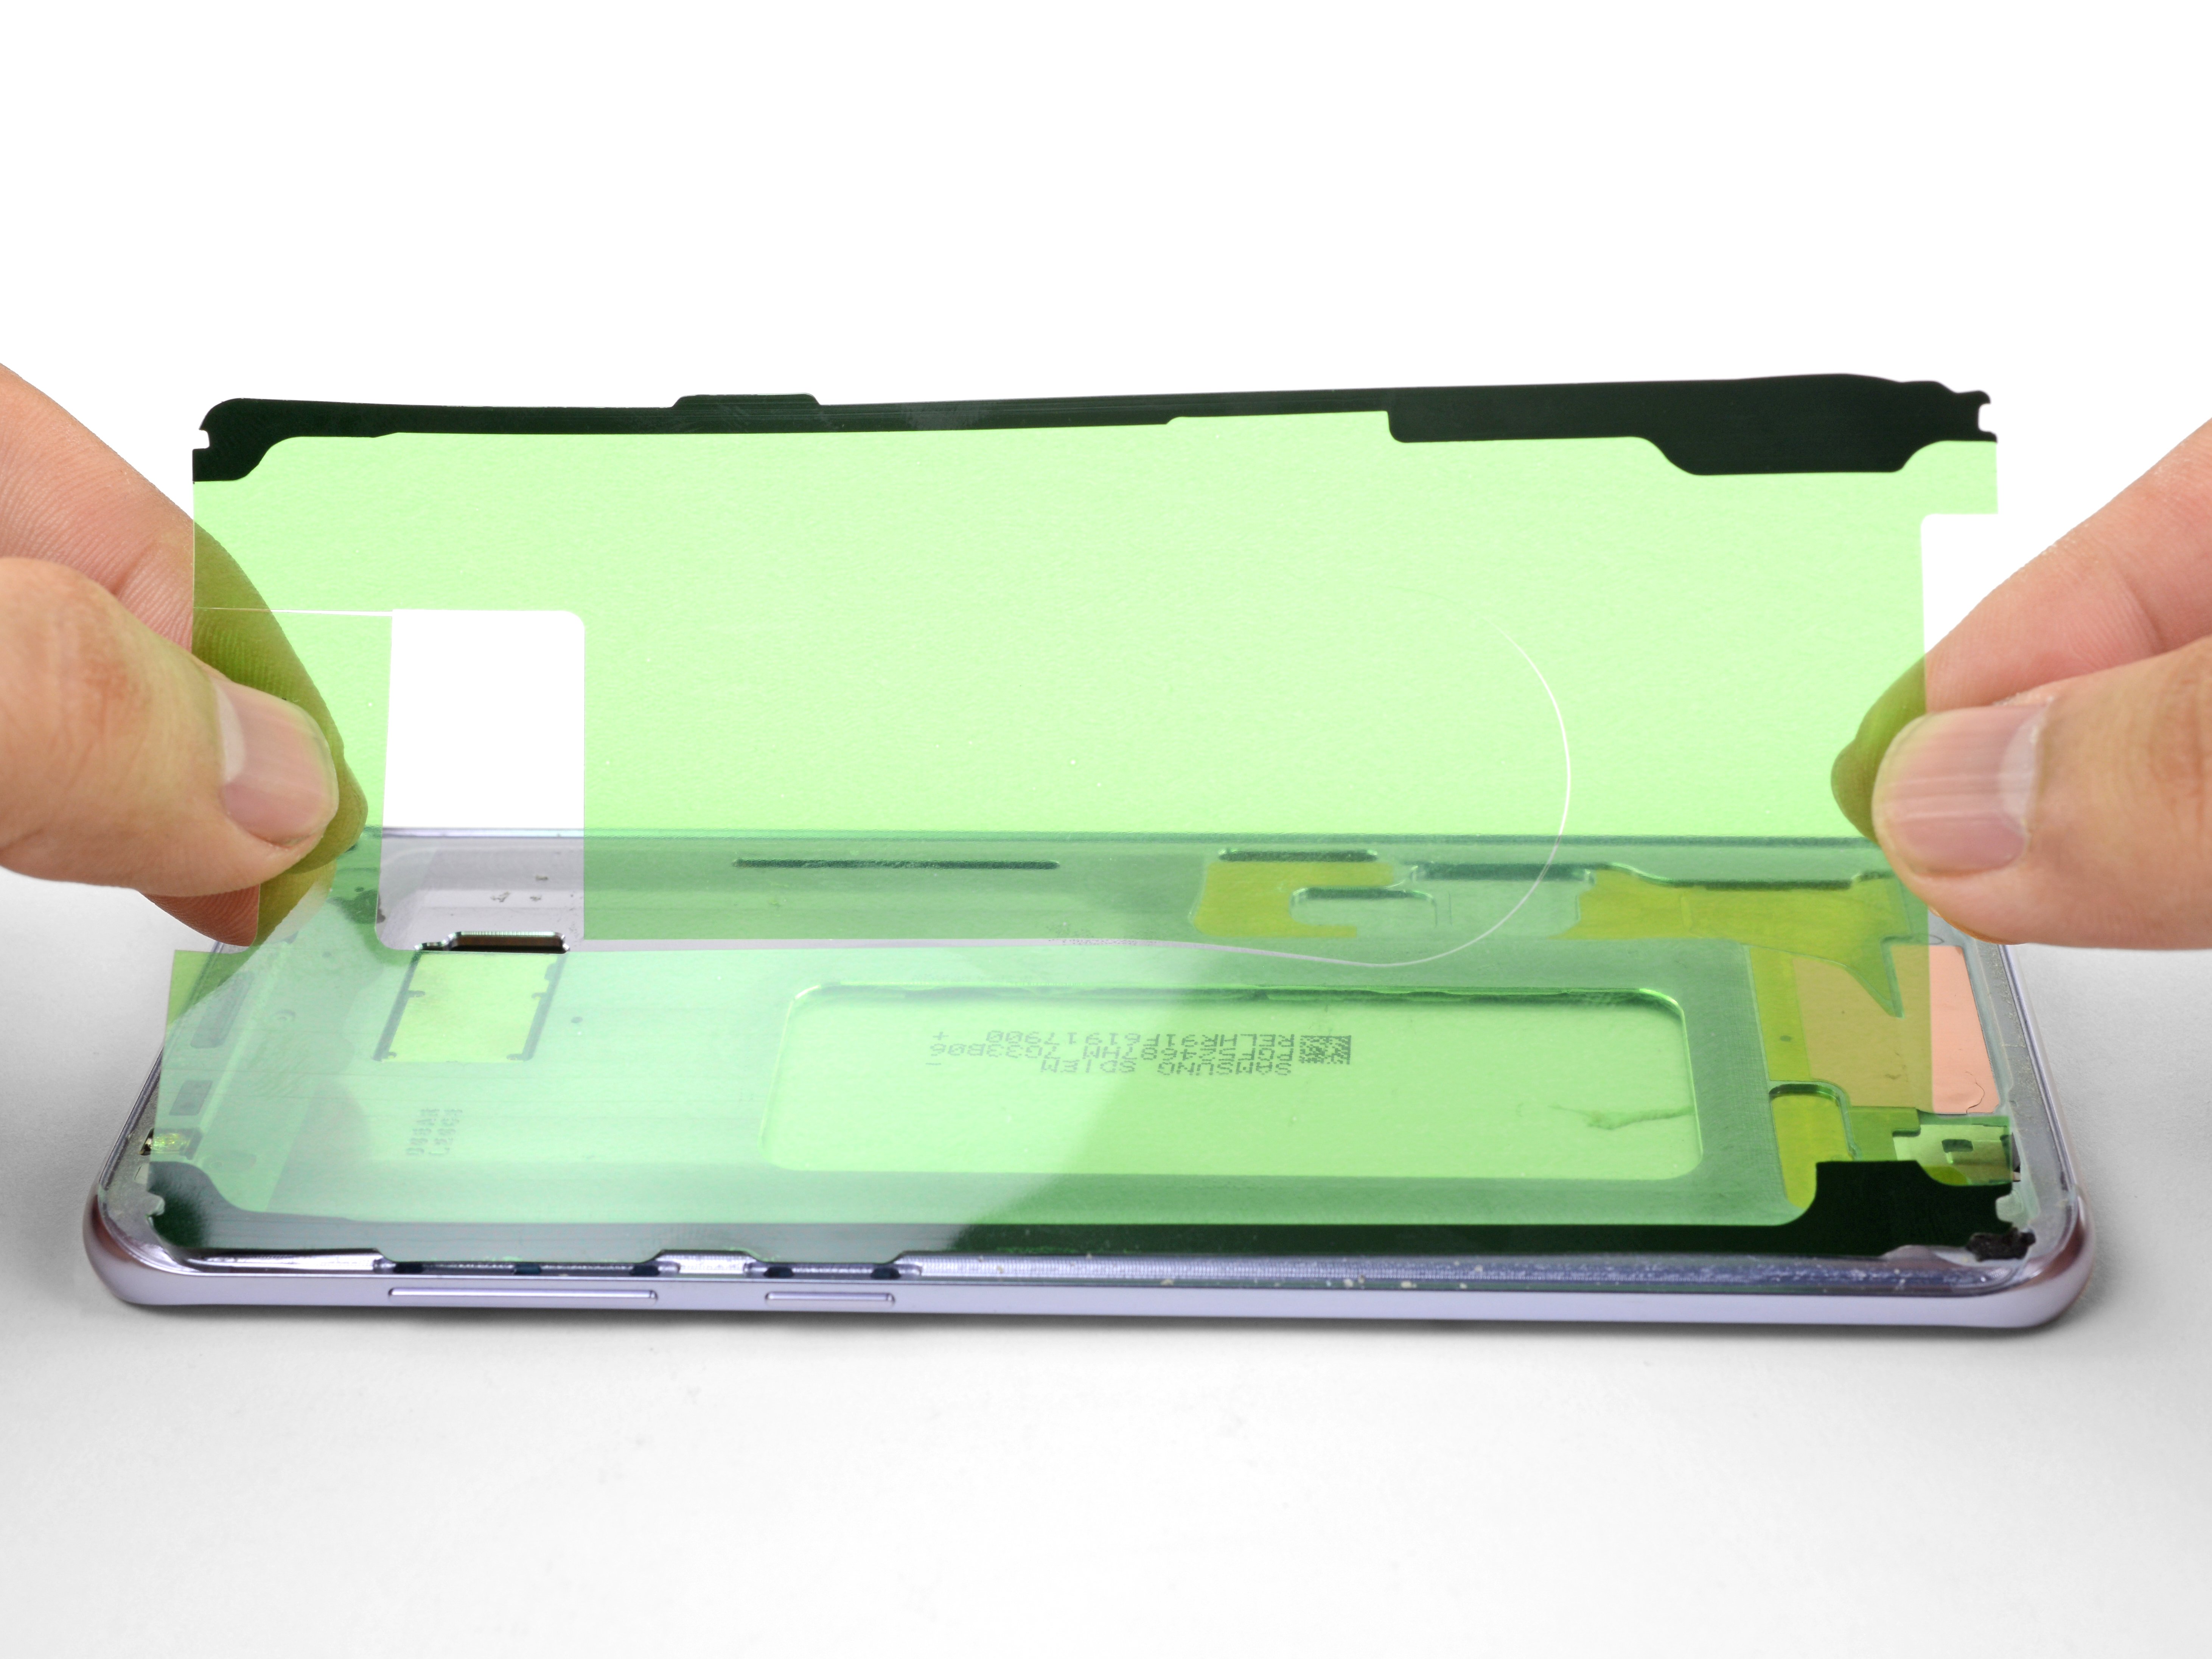
- We're on the quest for the elusive home not-button, so let's get into the display—even if it's been a bit dramatic before.
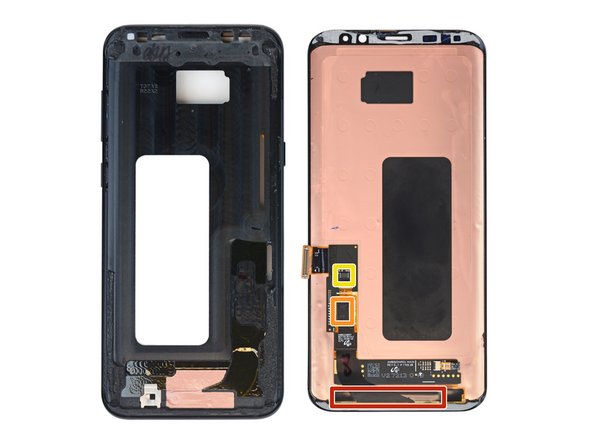
- The fused display and digitizer actually come up from the frame with a solid amount of effort, but hey, no broken parts here.
- Hoping for some secret sauce beneath the display cables, we peel them back and... nothing. No model numbers, no hidden sensors. Maybe next time!
- Samsung S6E3HA6 display driver spotted.
- STMicroelectronics fingertip touchscreen controller found.
- Winbond W25Q80EWUXIE 8Mb serial NOR flash memory hanging out here too.
Step 17

- That wraps up the S8+ teardown! If you’re curious about the regular Galaxy S8, check out our breakdown of that one.
- And now, let’s hand out a score for this phone.