Samsung Galaxy S9 Display Replacement Guide: Step-by-Step DIY Tutorial
Duration: 45 minutes
Steps: 21 Steps
Before you get down to business with your device, make sure to party with your battery a bit – drain it down to 25%. This way, you’re lowering the risk of any fiery surprises. Just a little precaution dance before the teardown!
Note
damage the waterproof seals
function normally
lose its water protection
If the frame is damaged or bent
Ready to tackle that cracked or broken display on your Samsung Galaxy S9? Awesome! Before you dive in, make sure to discharge your battery to below 25%. We want to avoid any fiery surprises, and a little prep goes a long way! Just a heads up: this guide is all about swapping out the display while keeping the original frame, motherboard, and battery intact. If you happen to have a replacement screen that comes with a new frame (or chassis), you’ll be in for a different adventure—transplanting your phone’s insides and possibly installing a new battery. So, double-check that you have the right part before you get started! You’ll be removing the rear glass cover, so grab some replacement adhesive to stick that back on when you’re done. If your new display doesn’t come with adhesive, a strong double-sided tape like Tesa 61395 will do the trick. Just a little warning: opening up your Samsung Galaxy S9 will mess with its waterproof seals. If you don’t replace those seals, your phone will still work like a champ, but it might not handle water as well anymore. And if the frame is looking a bit worse for wear, it’s best to replace it; otherwise, the new screen might not fit right and could get damaged from uneven pressure. Remember, separating the display from the frame usually means the display is going to meet its end, so only follow this guide if you’re ready to replace that display!
Step 1

The adhesive on the Samsung Galaxy S9 is super strong, so be ready for a little heat action! If the iOpener isn’t doing the trick, you can give a hair dryer, heat gun, or hot plate a shot. Just remember, we don’t want to turn your phone into a melted snack – the AMOLED display and internal battery can get a bit cranky with too much heat. Keep it cool and happy repairing!
– First things first, let’s power down that phone of yours. Safety first, right?
– Now, grab your trusty heated iOpener and apply it to one of the longer edges of the phone. This will help loosen up the adhesive holding that rear glass in place. Give it a solid two minutes to work its magic!
Tools Used

Step 2

The adhesive on the inside of the back cover is arranged just like you see in the image.
– Get ready to dive into the exciting world of repairs! In the next steps, you’ll be snipping away at the sticky stuff holding the back cover in place.
– You’ll be gently slicing through the adhesive in the highlighted areas:
Step 3


If the rear glass of your phone is cracked, the suction cup might not have the best grip. No worries! You can give it a go with some strong tape, or if you’re feeling crafty, superglue that suction cup in place and let it set. Once it’s ready, you’re all set to move forward!
– Pop a suction cup onto the back cover.
– Lift the back cover’s bottom edge with your suction cup, opening a little gap between the back cover and the frame.
– Slide an opening pick into the gap you made and glide it to the bottom right corner.
– Pop a second opening pick and slide it to the bottom left corner.
– Slip in a third opening pick to keep the adhesive from sealing back up while you finish the removal. If you need help, you can always schedule a repair.
Step 4


– Gently slide just the tip of your opening pick into the bottom left corner and glide it along the side up to the top. Easy peasy!
– Once you reach the top corner, keep that pick there to stop the adhesive from sticking back down. You got this!
Step 5


Hold up! Don’t fling open the phone just yet. The delicate fingerprint sensor cable is still linking the back cover to the motherboard. If you need help, you can always schedule a repair.
– Gently slide the opening pick from the bottom right corner all the way up along the side.
– Continue sliding the opening pick around the corner and trim away any leftover adhesive at the top of the phone.
Step 6


– Gently lift up the part of the back glass near the volume button.
– Grab a spudger and carefully disconnect the fingerprint sensor flex cable.
Tools Used

Step 7

– Pop off the rear glass.
– When putting it all back together, follow this guide to swap out the adhesive and reattach the rear glass.
– If you’re swapping out your rear glass, use this guide to transfer the rear camera bezel, including the fingerprint scanner.
Step 8

– Let’s kick things off by removing those eight 4 mm Phillips #00 screws. You’re on the right track!
Step 9


– Slide in an opening pick under the right side of the plastic cover that houses the NFC antenna and charging coil.
– Gently twist or pry to unfasten the plastic clips holding the cover in place.
Step 10


– Slide an opening pick underneath the left edge of the plastic cover.
– Gently twist or pry to pop free the plastic clips holding the cover in place.
Step 11

– Gently take off the plastic cover that houses the NFC antenna and charging coil. You’ve got this!
Step 12

– Get your trusty spudger and gently lift up to unplug the battery flex cable. We’re on our way to smooth sailing!
Tools Used
Step 13

– Unscrew those two 4 mm Phillips #00 screws that are keeping the plastic cover snug as a bug. You’ve got this!
Step 14

– Take off the plastic cover from the motherboard like a pro! It’s time to see what’s underneath and get that device back in top shape.
Step 15


– Grab that trusty spudger and gently use the flat end to detach the display flex cable. You’ve got this!
Tools Used
Step 16

If your display is cracked, cover it with tape to keep the pieces in place and protect yourself during the fix. Need help? You can always schedule a repair!
– Grab your iOpener and give the display some love for a minimum of two minutes to loosen up that adhesive underneath.
Tools Used
Step 17

If your phone’s screen is sporting a crack, the suction cup might not have the best grip. No worries! You can give it a go with some sturdy tape, or if you’re feeling adventurous, glue that suction cup down and let it set before you move on. You’ve got this!
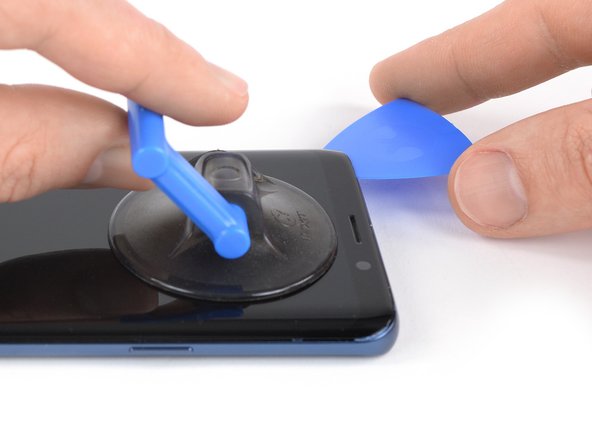
– When your screen feels warm and cozy, grab a suction cup and stick it on the upper edge of your phone.
– Now, slip an opening pick into the tiny gap and glide it up to the top left corner to slice through that stubborn adhesive.
Step 18

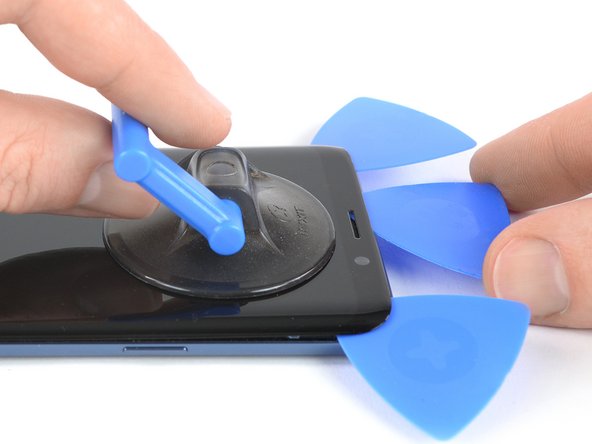
– Slide in another opening pick and glide it over to the top right corner of your phone like a pro.
– Pop in a third opening pick to keep that pesky adhesive from sticking back together while you work on removing the display.
Step 19


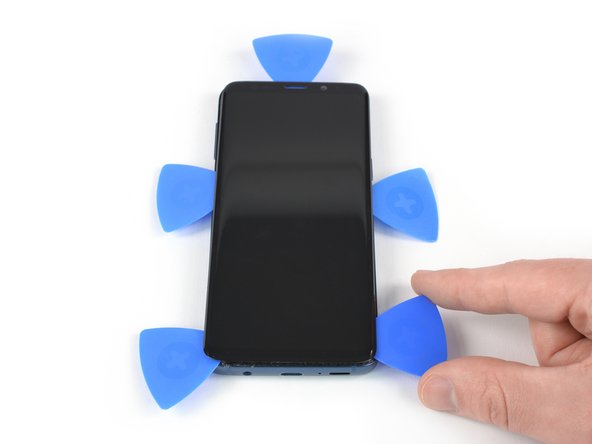
– Begin by gently sliding the right opening pick halfway down the frame to break that adhesive seal. You’ve got this!
– If it feels like a struggle, don’t sweat it! Just give it a little heat and let the iOpener work its magic again.
– Next up, slide the left opening pick down the frame halfway and leave it there like a trusty sidekick.
Tools Used
Step 20


Watch out! The screen’s flex cable is hanging out just below the midpoint near the power button, and it might get in the way of your cutting tool. Stay sharp and be careful!
– Slip a fourth pick into the left side of the frame and glide it down to the bottom left corner to slice the adhesive.
– Slide a fifth pick in on the right side and finish cutting the remaining adhesive. If you need help, you can always schedule a repair.
Step 21
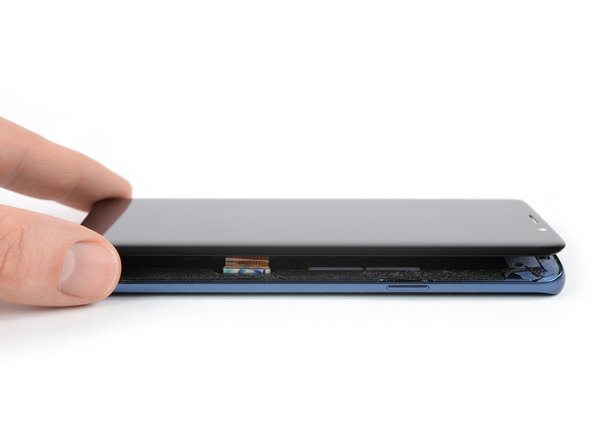

– Go ahead and slice through the adhesive holding the phone captive. Then, give that display a gentle lift up into freedom!
– When prepping for the new display, make sure to bid farewell to any lingering adhesive on the frame. Get those sticky spots squeaky clean with some isopropyl alcohol (>90%) and a lint-free cloth.
Tools Used


