
Samsung Galaxy S9 Plus Fingerprint Sensor and Camera Lens Cover Replacement
Duration: 45 minutes
Steps: 12 Steps
Keep in mind, damaging the waterproof seal can turn your device into a water feature you didn't plan. Loosening that seal might just invite some uninvited water buddies. Handle carefully to keep your device dry and happy. If you need help, you can always schedule a repair.
Ready to give your Samsung Galaxy S9+ a little TLC? Here’s how to remove the fingerprint sensor and camera lens cover. Just a heads up—cracking open your phone will break its waterproof seal, so unless you swap out those adhesive seals, your phone won’t be winning any swimming contests. You’ll want fresh adhesive to stick things back together when you’re done. Take your time and keep it chill—your phone will thank you for it!
Step 1

The Samsung Galaxy S9 Plus is held together with some seriously tough adhesive. If the iOpener isn’t quite cutting it, a hair dryer, heat gun, or hot plate can help loosen things up. Just go easy with the heat—too much can mess with the AMOLED screen and the battery.
- Power down your device to start things off. Then, grab an iOpener and gently warm up the adhesive under the back glass. Keep the iOpener in place for at least two minutes to soften things up. You might find it helpful to repeat this step a few times as you carefully lift off the rear cover. If you need a hand, you can always schedule a repair.
Tools Used

Step 2

Check out the adhesive layout inside the back cover—just like in the picture.
- Time to tackle the adhesive holding the back cover in place. Get ready to slice and dice in style.
- You'll be running your tool through the sticky zones shown here:
- Extra-thick strips of adhesive—these require some muscle.
- Slimmer adhesive areas—these come up easier.
- Steer clear of this spot so you don’t mess with the fingerprint sensor cable hiding underneath.
Step 3


Cracked rear glass? Suction cup not sticking? Grab some strong tape and lift it up, or go MacGyver mode and superglue the suction cup—just give it a moment to set before moving on.
You might need to use a bit of muscle here, but just a tiny gap for your tool is all you need. If it’s stubborn, hit it with some more heat to loosen things up. Adhesive cools off fast, so don’t be shy about reheating if you need to.
- Stick a suction cup onto the back cover and give it a gentle tug to start loosening things up.
- Pull up on the suction cup at the bottom edge of the back cover, creating a small gap between the cover and the frame—think of it as a tiny opening for your next move.
- Slide an opening pick into that gap and carefully work it toward the bottom right corner, easing the cover away without any drama.
Step 4


- Pop in a second opening pick and gently slide it to the bottom left corner. Take your time, it's all about precision!
- Now, grab a third opening pick and wedge it at the bottom of the phone. Leave it there during the rear glass removal to keep that pesky adhesive from sealing up again. It’s like holding the door open while you work your magic.
Step 5


- Begin by gently sliding the tip of your opening pick from the bottom left corner, making your way up the side of the S9 Plus.
- Once you've sliced through the adhesive halfway up the left side, leave that pick in place like a trusty sidekick.
- Next, glide the opening pick from the bottom right corner, traveling halfway up the frame, and let it chill there for a bit.
Step 6


Hold up—don’t swing the phone open just yet! The fingerprint reader’s flex cable is still hanging on to the motherboard.
- Pop a fourth opening pick into the right side of the frame and gently slide it to the top right corner.
- Now grab a fifth opening pick and slide it along the left side, making your way up to the top left corner.
- Use the pick to carefully slice through any remaining adhesive under the upper part of the rear glass.
Step 7


- Gently lift the edge of the rear glass where the volume button hangs out. It's like giving it a little nudge!
- Grab your trusty spudger and use its edge to carefully pry up and disconnect that sneaky fingerprint sensor flex cable.
Tools Used

Step 8

- Start by gently removing the rear glass—don't rush, a careful touch goes a long way!
- When you're putting everything back together, follow this guide to reapply the adhesive and get that rear glass sitting pretty again.
- If you're swapping out the rear glass, no worries—just follow this guide to safely transfer the rear camera bezel and fingerprint sensor.
Step 9

The adhesive holding down the rear camera bezel is no joke—it's tough! If the iOpener isn’t cutting it, you can try a hair dryer, heat gun, or hot plate to help loosen things up. Just keep an eye on the temperature—your phone likes it warm, not roasted.
- Warm up the rear camera lens cover with a heated iOpener—let it sit for at least two minutes to loosen things up.
Tools Used
Step 10


If you're having trouble slipping an opening pick between the rear glass and the camera bezel, no worries—try using a playing card to carefully cut through the adhesive instead. It’s a friendly way to get things started without forcing it. Need a hand? You can always schedule a repair.
- Slide an opening pick carefully between the top edge of the bezel and the rear glass to get things started.
- Use the pick to gently cut through the adhesive underneath the upper part of the bezel, easing it away with a steady hand.
Step 11
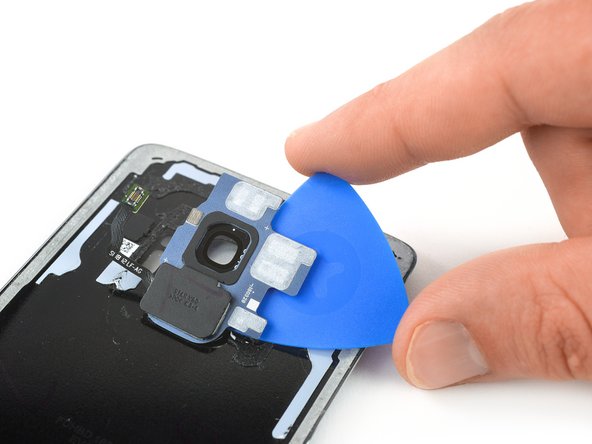

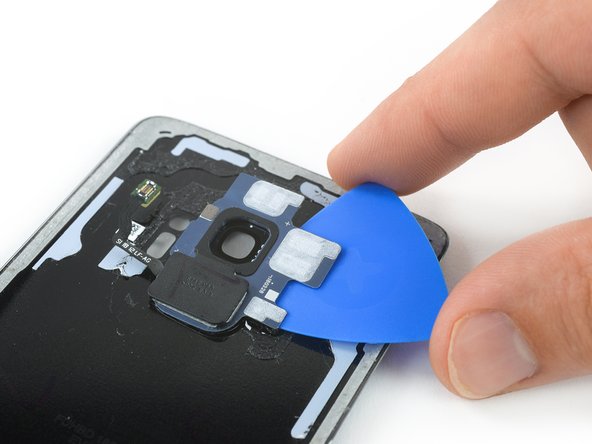
- Slip the opening pick under the right side of the rear camera bezel like a pro.
- Gently slide the pick along the bezel to break that adhesive seal.
- Twist the pick to carefully lift the rear camera bezel along with the fingerprint sensor. Easy does it!
Step 12


- Stick that new back cover on with some trusty adhesive or double-sided tape.
- Ready to put things back together? Just follow these steps in reverse.
- Once the rear cover is in place, press firmly for a few minutes—maybe stack a couple of books on top for good measure—so everything bonds nicely.
- When you’re done, take a moment to run through the guide and make sure your device is working as it should. If you hit any snags, you can always schedule a repair.


