
Samsung Galaxy S9 Plus Headphone Jack Replacement
Duration: 45 minutes
Steps: 20 Steps
Follow this straightforward guide to remove the headphone jack from your Samsung Galaxy S9+. Keep in mind, you'll want some fresh adhesive on hand to stick the fingerprint sensor back in place during reassembly. If you need help along the way, you can always schedule a repair.
Step 1

The Samsung Galaxy S9 Plus sticks together like it's holding onto its last slice of pizza. If the iOpener isn’t making progress, you can try a hair dryer, heat gun, or hot plate for a bit of warmth. Just keep it moderate—too much heat can make the AMOLED display and battery cranky.
- Power down your phone—let it take a little nap before we dive in.
- Grab an iOpener and let it work its magic on the adhesive under the back glass. Keep it on for about two minutes. Don’t worry if you need to repeat it a couple of times to get the back cover off—sometimes the glue just likes to stick around!
Tools Used

Step 2

Check out the adhesive pattern on the inside of the back cover—laid out just like you see in the photo.
- Get ready to tackle that back cover! In the next steps, we’ll be cutting through the adhesive that’s holding it in place.
- Here’s where you’ll want to focus your slicing:
- The thick adhesive spots
- The thinner adhesive areas
- Just a friendly reminder: steer clear of prying or slicing in this zone to keep the fingerprint sensor flex cable safe and sound!
Step 3


- Stick a suction cup onto the back cover – it's like giving your device a little hug!
- Gently lift the bottom edge of the back cover with your trusty suction cup, creating a tiny gap between the cover and the frame. You're doing great!
- Slide an opening pick into that gap and glide it over to the bottom right corner. Keep it smooth and steady!
Got a cracked rear glass? The suction cup might not stick, but no worries—try sticking it with some strong tape or even superglue the suction cup in place and give it time to set. When it’s time to open up, a little force goes a long way—you only need a tiny gap with the suction cup to slide your tool in. If resistance is stubborn, a bit of extra heat can soften the adhesive, making it easier to get in there. Just keep in mind, the glue cools quickly, so you might need to warm it up a few times to get it just right.
Step 4


- Pop in a second opening pick and slide it toward the bottom left corner. It’s like creating a little path for the next step.
- Now, grab a third opening pick and insert it at the bottom end of the phone. This pick stays in place during the rear glass removal to keep that sticky adhesive from making things harder than they need to be.
Step 5


- Begin by gently sliding the tip of the opening pick from the bottom left corner along the side of your S9 Plus. Take your time, it's like giving your phone a little massage!
- Once you've cut through the adhesive halfway up the left side, leave that opening pick right where it is. It's doing a great job holding the fort!
- Now, slide the opening pick from the bottom right corner halfway up the frame and let it chill there. You're making great progress!
Step 6


Hold up! Don’t swing the phone open just yet—the fingerprint reader flex cable is still hanging out with the motherboard.
- Place the fourth opening pick on the right side of the frame, and gently slide it towards the top right corner. Take your time, you got this!
- Now grab your fifth opening pick and slide it along the left side of the phone, making your way to the top left corner. Easy does it!
- Use the opening pick to carefully cut through the remaining adhesive near the upper part of the rear glass. Keep it steady and smooth for a clean break.
Step 7


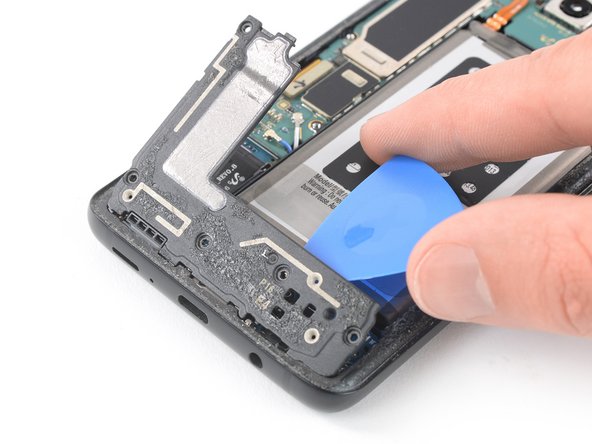
- Gently lift up the side of the rear glass where the volume button hangs out—no need for brute force, just a little finesse.
- Grab your trusty spudger and slide the edge under to pop up and disconnect the fingerprint sensor flex cable, nice and easy.
Tools Used

Step 8

- Start by carefully removing the rear glass panel. When it’s time to put everything back together, follow this guide to apply new adhesive and reattach the rear glass smoothly. If you’re thinking about swapping out the rear glass, this guide will also walk you through transferring the rear camera bezel and the fingerprint sensor. For tricky parts, remember, if you need help, you can always schedule a repair.
Step 9

- Start by removing the nine 4 mm Phillips #00 screws to get the show on the road. Keep those screws safe—you’ll need them later. If you need extra hands, just schedule a repair with Salvation Repair to make things smooth sailing.
Step 10


- Slide an opening pick under the right side of the plastic cover that holds the NFC antenna and charging coil.
- Turn the pick sideways to gently lift the cover out of its plastic clips.
- Carefully work your way around the cover, prying up to release all remaining clips and free the part.
Step 11

- Pop off that plastic cover that's hiding the NFC antenna and charging coil. It’s like unveiling the secret layer in your phone—just lift it off and you’re one step closer to victory!
Step 12

- Take the flat end of your spudger and gently pop up the battery flex cable—like giving your phone a little wake-up nudge!
Tools Used
Step 13

- Start by unscrewing the two 4 mm Phillips #00 screws. Keep them safe—they'll need to go back in later. If you run into any snags, remember you can always schedule a repair with us to get it done right.
Step 14

- Gently pop off that plastic cover from the motherboard—no need to wrestle with it, just a smooth move and you're good to go.
Step 15

- Time to get those five 3.5 mm Phillips #00 screws out of there! Grab your trusty screwdriver and let's make them disappear.
Step 16

- Slide your opening pick under the top edge of the loudspeaker assembly—think of it as giving the speaker a gentle nudge.
- Carefully lift up the loudspeaker assembly with the pick, like you’re opening a stubborn snack bag. Take it slow; you’ve got this!
Step 17

- Take out the loudspeaker assembly—just ease it out, like you’re pulling the plug on a quiet party.
Step 18

- Unscrew the 3.5 mm Phillips #00 screw and keep it safe—you'll need it later!
Step 19


- Gently use the flat end of a spudger to lift and disconnect the headphone jack flex cable. You've got this!
Tools Used
Step 20


- Time to put your device back together! Just follow these steps in reverse. Don't forget to add some fresh adhesive where needed after giving those areas a good clean with isopropyl alcohol (>90%).
- When you're reassembling, make sure to secure that fingerprint sensor with some pre-cut adhesive or double-sided tape. It's a small step that makes a big difference!
- Got some e-waste? Be a hero and take it to an R2 or e-Stewards certified recycler.
- Once you've wrapped up the repair, check out this guide to test your handiwork.
- If things didn’t go quite as planned, no worries! Try some basic troubleshooting, or feel free to reach out to our Answers community for a helping hand.


