Samsung Galaxy Watch3 Teardown Guide: How to Replace Watches
Duration: 45 minutes
Steps: 10 Steps
The Galaxy Watch3 just made its debut in Samsung’s lineup of wearable devices—joining the Galaxy Buds Live, affectionately known as ‘Galaxy Beans.’ Today, we’re diving into a teardown of this particular model. Curious why Samsung jumped straight from the Galaxy Watch to the Watch3, with only a quick pit stop at the Active Watch 2? Well, let’s find out. The universe of tech repair keeps expanding! If you’re interested in more updates, consider scheduling a repair or following us on social media. Ready to take your Galaxy Watch3 apart? Let’s get started.
Step 1


All packed into a device that’s reportedly 14% slimmer and 15% lighter than the previous model. Check out this X-ray from Creative Electron to get a full view, then keep reading to see it come apart step by step.
– Dive into the techy details (and some cool X-ray views) of our 45 mm teardown model:
– Features a vibrant 1.4-inch (34 mm) circular super AMOLED display rocking a sharp 360 × 360 resolution.
– Powered by the Exynos 9110 dual-core processor, clocked at 1.15 GHz with Cortex-A53 magic.
– Comes with 1 GB RAM and 8 GB storage—upgraded from the last version’s 1.5 GB RAM and 4 GB storage.
– Wireless charging for cable-free convenience.
– Packed with sensors: ECG, optical heart rate, accelerometer, barometer, gyroscope—your wrist’s own science lab.
– IP68 rating means it’s ready for a swim, handling water depths up to 50 meters (5 ATM) without breaking a sweat.
Step 2


Looks like one of the buttons might have received a little upgrade, now capable of pulse reading—so keep an eye out for that sneaky feature! If you need help with this or any other step, you can always schedule a repair.
– Let’s kick things off by noticing that the rotating bezel makes a cool comeback—perfect for those who love to fidget. Around the back, you’ll see a pattern of holes for the mic, altimeter, and speaker, along with a fresh new layout for the heart rate sensors and ECG features. Hey, doesn’t that ECG design look familiar? Yep, it’s pretty similar to what we saw on the Apple Watch Series 4. Ready to get started? If you need help at any point, you can always schedule a repair.
Step 3

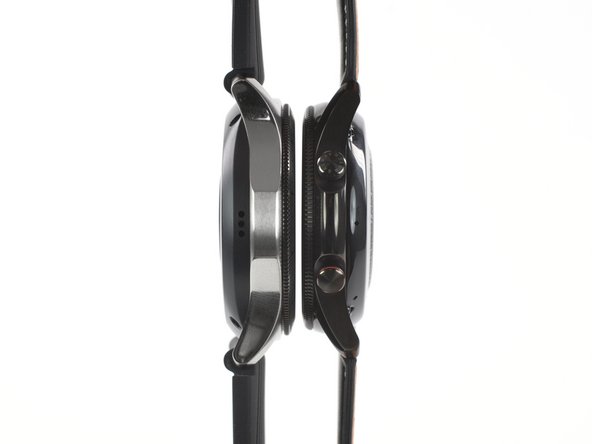
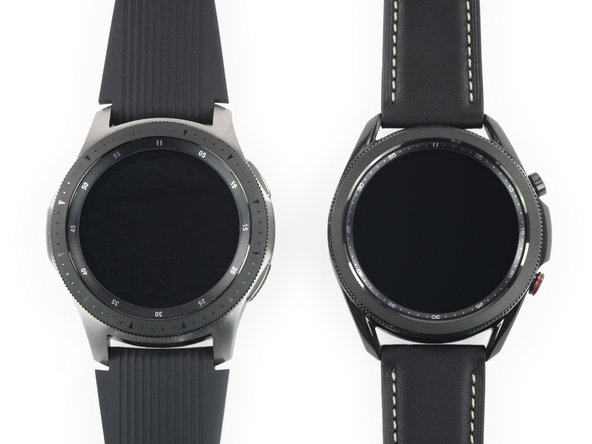
– Let’s play a classic round of ‘spot the differences’ with the original Galaxy Watch (left).
– Now, let’s peek inside. The Watch3 is packing eight optical sensors and adds ECG smarts. In this X-ray view, the standout feature is that wireless charging coil.
– Although the Watch3’s body is slimmer, it sports a larger display—though the resolution stays the same. The new buttons have that timeless watch vibe.
– There are plenty of layers in here, so let’s start peeling them back one at a time.
Step 4


These tiny tri-points might be small, but they’re securely held in place—hard to lose and easy to reseal when needed. Keep an eye on them as you work, and if you need a hand, you can always schedule a repair.
– Opening the Watch3? Easy peasy. Just a few tri-point screws and a rubber gasket to remove—nothing too tricky here!
– The back cover has a sensor cable, but no worries—it’s long enough that you won’t accidentally trigger any surprises. No traps were triggered in this teardown.
– Inside the back case, you’ll find the ECG sensor, heart rate sensors, and wireless charging coil snugly packed together. But the speaker? It’s got its own little space with a nice gasket keeping it in place.
– Modularity is pretty cool! We’re definitely on board with the speaker. As for the rest of the components, we’ll hold off on full approval until we figure out the safest way to get them out.
– The optical biosensing? It’s taken care of by the Texas Instruments AFE49I30.
– For the operational amplifier, we’ve got the Texas Instruments TLV9002 1 MHz handling the job.
Step 5


The SiP FO-PLP, which stands for System-in-Package Fan-Out Panel Level Packaging, is Samsung’s way of packing as much tech as possible into a tiny space — a concept they’ve already used in the original Galaxy Watch. It’s all about smartly stacking components to keep things compact and efficient.
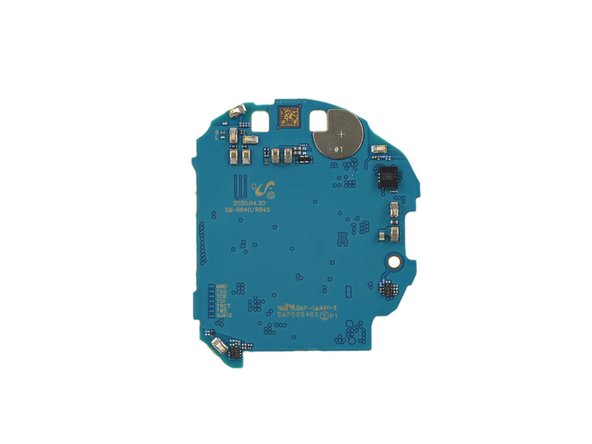
– Time to gently lift out the somewhat round motherboard and take a look at what’s hiding under its shields:
– Here’s a Samsung SiP FO-PLP packing an Exynos 9110 dual-core Cortex-A53 running at 1.15 GHz, Samsung’s own 1 GB DRAM, and a Power Management IC.
– A Samsung Shannon 915 Intermediate Frequency IC is hanging out here too.
– Check out the NXP PN80T NFC controller with Secure Element onboard.
– You’ll also spot a Broadcom BCM430132 handling WiFi and Bluetooth, plus a Broadcom GNSS Location Hub for GPS, GLONASS, and the rest of the satellite gang.
– There’s a Qualcomm Atheros QPA5580 Power Amplifier (we’re pretty sure on this one).
– And last but not least, an IDT P9222S wireless power receiver is in the mix.
Step 6

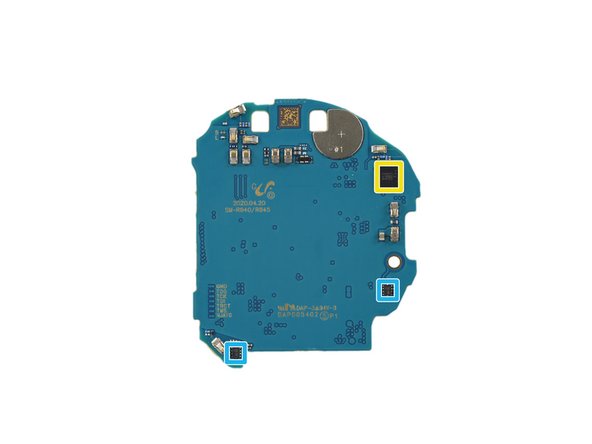
– Let’s take a closer look at some of the key chips in your device. First up is the STMicroelectronics ST33G1M2 Secure Element—think of it as the security guard of your phone. Next, we have the LPS22HB Pressure Sensor from STMicroelectronics, which keeps tabs on the pressure environment inside. The LSM6DSOP from the same manufacturer is your 3-Axis Accelerometer and Gyroscope, helping detect movement and orientation. Kinetic Technologies’ KTS1681 OVP Switch acts as a safeguard against voltage spikes, while the Infineon BGSA14GN10 SP4T Antenna Tuning Switch fine-tunes your antenna signals for better connectivity. Finally, the NXP Semiconductor BGU8309 is your low noise amplifier for GPS/GLONASS/Galileo/Compass signals, ensuring your location services stay precise. If you’re feeling overwhelmed or need expert help, don’t hesitate to schedule a repair with Salvation Repair.
Step 7

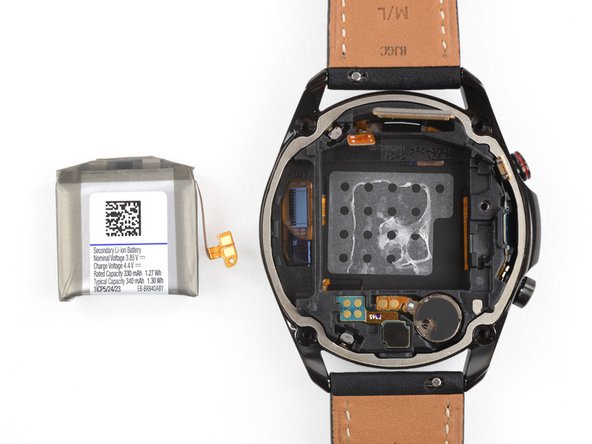
The battery here doesn’t quite top the original Galaxy Watch (1.81 Wh) or the Huawei Watch GT (1.56 Wh), but it’s still got more juice than the 44 mm Apple Watch Series 5 (1.129 Wh).
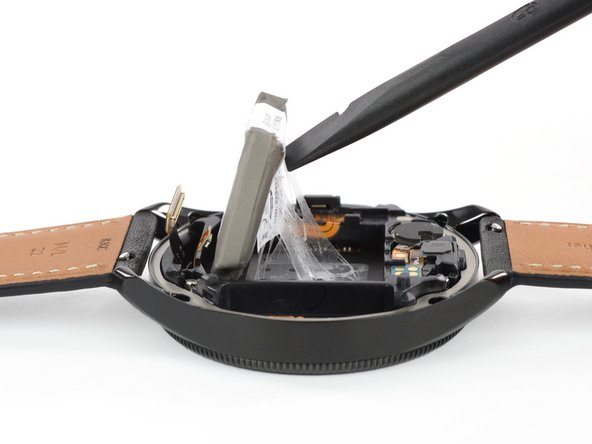
– The battery pack is held in place with just a bit of gentle adhesive, so you can pop it out pretty easily—no heat gun needed. (Though, the 90°F / 32°C weather probably gave us a boost.)
– This little power cell is rated at a modest 1.3 Wh (340 mAh @ 3.85 V). With Samsung promising up to 2 days of battery life, it looks like they’re not too worried about outlasting the competition in the smartwatch battery marathon.
– We thought we might see a creative battery design here, maybe with a metal pouch, but nope—looks like Apple’s still the only one trying out that experiment.
Step 8


One of these switches includes a bracket to activate the ECG feature by completing the circuit between your finger and wrist. Just attach it properly, and you’re good to go. If you need help, you can always schedule a repair.
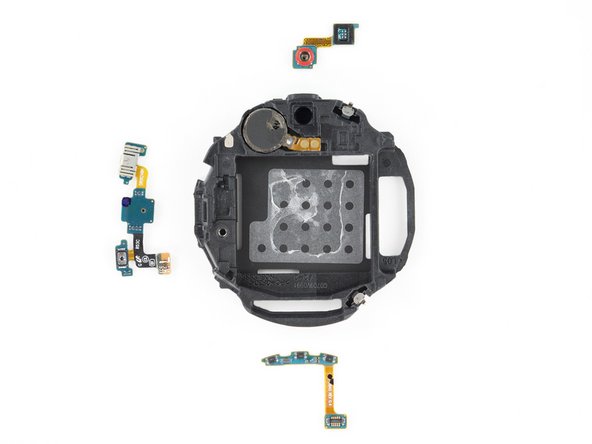
– Our trusty carbon fiber spudger is probably more than you need for this midframe, which surprisingly comes apart pretty easily as you pry it out. Once open, you’ll find: a rubber-coated altimeter and barometric sensor tucked inside, a modular cable assembly with two switches and a mic, hall effect sensors that monitor the rotation of the outer bezel, and a tiny vibration motor glued just enough to the frame to keep it in place. Take your time and handle each component with care—if you need extra help, you can always schedule a repair.
Tools Used

Step 9


– Now that we’ve taken apart the watch, we can finally see the circular AMOLED always-on display. It’s not on right now, but no worries, we’ll get to that.
– It may have taken a little work to get here, but the final step in removing the display is a breeze – just one finger to lift it right out of its frame.
– Not a surprise here – the display was made by Samsung Display. It’s always nice when you make your own parts!
– And just like that, we’re out of time! Looks like this step is done.
– Samsung was quick to jump on the AMOLED trend in its devices, but with Apple rumored to be switching to microLED soon, it’ll be interesting to see where things go from here.
Step 10

– A disorganized galaxy of components: bands, tiny circuits, disks, and energy swirling all around. The repairability score will help us determine how straightforward it is to restore order to this chaos. Follow these steps carefully to bring clarity back to the device. If you need help at any point, you can always schedule a repair.
Success!
