Sony PlayStation 4 Repair Guide
Duration: 45 minutes
Steps: 25 Steps
After seven years, the Sony PlayStation finally gets a number 4 on the box. We’re diving in to see what’s new, what changed, and whether it’s worth the wait. We got our hands on one of the first North American consoles and teamed up for a teardown. Stay up to date on all the latest repair and teardown news by following us on Instagram, Facebook, and Twitter.
Step 1

– Alright, let’s dive in and take apart the PlayStation 4. Here’s what we’re expecting to uncover inside:
– A powerful 8-core AMD ‘Jaguar’ x86-64 CPU
– A graphics beast: 1.84 TFLOPS AMD Radeon Graphics Core Next Engine GPU
– A speedy 8 GB GDDR5 RAM
– 500 GB of hard drive storage that’s removable and upgradeable
– Wireless connectivity with 802.11 b/g/n and Bluetooth 2.1
– USB 3.0 ports plus 10/100/1000 Ethernet support
– And, just for dreams’ sake, a 1.21 Gigawatt Flux Capacitor (yeah, we know it’s more of a wish than reality, but hey, we can dream!)
Step 2


– Let’s get this unboxing party started! What’s inside the box that’s been waiting for 7 years to be opened?
– Surprise, surprise! There’s another box inside. Let’s keep going!
– Your brand new PS4 console should be right here. If it’s missing, please reach out to your Sony Computer Entertainment representative for help.
– Next up, you should find your DualShock 4 controller – the perfect companion for your gaming adventures.
– Now, let’s talk cables. You should see a power cable, an HDMI cable, and a Micro-USB cable. These will help you get connected and ready to play.
– Last but not least, there’s a mono headset with a mic, switch, and shirt clip. You’re all set for online gaming sessions with friends.
Step 3


Let’s face it, the PS4 is one stylish black box.
– At Salvation Repair, we believe that the inner workings of your gadgets shouldn’t be a puzzling enigma. Understanding what’s happening inside your devices is key to keeping them in tip-top shape!
– With seven years of design brilliance, the PS4 sports a sleek, geometric design, a snazzy indicator light bar, and a more refined logo than ever before.
– And guess what else we discovered:
– A slot-loading Blu-ray/DVD disc drive for your viewing pleasure.
– Two powered USB 3.0 ports to keep your devices connected.
– Plus, some cool details highlighting the PlayStation’s buddies—HDMI, DTS, Dolby, and Blu-ray.
Step 4

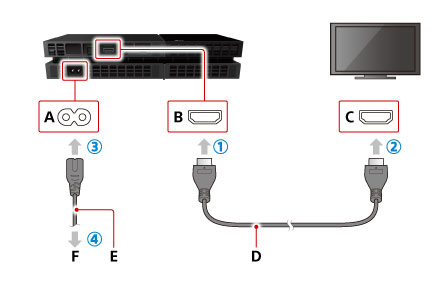
– You’ve unboxed your sleek new tech marvel, and it’s time to get it connected. Here’s what you’ll find at the back:
– Power inlet
– Digital optical audio out
– HDMI
– Ethernet
– Proprietary auxiliary port for external devices like the PlayStation Camera
Step 5

Quick Fix—If your PS4 isn’t showing video, check if the HDMI port is bent or damaged.
– We’ve been hearing some whispers online about certain PlayStation 4s experiencing a bit of a hiccup.
– One of these pesky hardware issues, as reported, is that the PS4 just won’t send a video signal to your screen.
– It looks like a little piece of metal in the HDMI port was meant to sit snugly at the bottom, but instead, it decided to bend upwards, causing a blockage for some of the pins.
– This sneaky piece of metal has even managed to dislodge some of the ‘teeth’ from the HDMI cable that came with your PS4.
Step 6


– It’s fantastic to see Sony empowering users with the PS4’s hard drive: you can swap it out yourself!
– Stay tuned for our comprehensive guide coming soon for those daring gamers looking to upgrade to a larger drive or a speedy SSD—but for now, take comfort in knowing that the only thing standing between you and hard drive bliss is a simple plastic cover and a few screws.
Step 7


This is a mixed bag of news; while the PS4 gets a nice little boost with expansion, it sadly won’t play nice with external USB storage. This really puts a damper on its potential as a media hub.
– Here’s the 5400 RPM, 500 GB, SATA II mechanical hard drive from HGST (a Western Digital subsidiary).
– With only one screw holding the caddy, swapping out this drive is a walk in the park.
– This hard drive is not just replaceable, it’s a standard 2.5″ (laptop-sized) SATA drive, meaning you can easily upgrade your storage with any compatible drive. Just ensure it’s no thicker than 9.5 mm and no smaller than 160 GB. Happy upgrading!
Step 8


– Going deeper means we have to get rid of some annoying stickers. Ignoring their silly anti-repair warnings, we quickly toss them aside with our trusty tweezers…
– …only to find some mildly sneaky Security Torx screws.
– No worries, specialty screws are no problem, because we have our awesome Pro Tech Screwdriver Set.
– While we’re relieved this isn’t held together with adhesive, this little trick won’t be missed when we give a repairability score.
Tools Used

Step 9


– Hold on, we’re interrupting this guide to bring you some important news:
– The notorious anti-repair forces are spreading misinformation about your right to take apart, modify, enhance, personalize, and do whatever you want with your device. Don’t fall for it!
– They’re trying to convince you that it’s all about being ‘green,’ but we have some serious doubts about how recyclable this thing really is.
– It’s time to take a stand! Repair is the way forward, and it’s your right. So grab your tools, raise your voice, and join the Repair Alliance!
– Now, let’s get back to fixing your device…
Step 10


– Disregarding the user manual, because who needs those, we proceed…
– …to extract the four T9 Security Torx screws. This will let us open up this fourth-generation Sony PlayStation. We’re eager to get a peek at the inner workings of this device.
– What we’re seeing is a compact arrangement that evokes a sense of the past. Observe the evolution of technology.
Step 11
– In Sony’s self-made PlayStation 4 teardown, Director of Engineering Yasuhiro Ootori gives us a peek at the custom-designed, 85 mm diameter, centrifugal fan:
– In this exclusive video, our Chief Information Architect, Miroslav Djuric, shares his unique perspective on this engineering wonder.
– “The airflow volume, pressure generated, and direction of airflow are all key elements of the exclusive PS4 design.”
Step 12


– Our savvy teardown engineer is on the case, carefully unscrewing and popping out some clever retaining brackets…
– …while enjoying a well-deserved, distinctly Canadian snack. Who said repairs can’t be fun?
Step 13


– With the brackets and donuts all set, let’s focus on liberating that power supply!
– No need to worry about tripping over a power cable—this power supply is cozily tucked away inside the case.
– The power supply boasts an AC Input rating of 100-240 volts. That means you can take your gaming adventures worldwide with your trusty PS4 in tow; just don’t forget to grab your power socket adapters!
Step 14


With an internal power supply, your PS4 needs to stay cool—so keeping that fan clean is crucial!
– Looks like the teardown adventure isn’t over yet, power supply! Time to spill the beans on those hidden treasures.
– Once we pop the power supply out of its shell, we find exactly what we anticipated: some hefty capacitors, but sadly, none of them are giving us the spark we hoped for.
– With the power supply out of the way, it’s your chance to give that fan a good cleaning!
– It seems this power supply is stuck in a time loop. (sigh) Keep pushing forward!
Step 15

– Next up: the Blu-ray/DVD drive! It’s held in place by just a couple of screws.
– Heads up! The PS4 won’t play your PS3, PS2, or PS1 games. This drive will spin your old discs, but it won’t play them.
– But who needs an optical drive nowadays with the power of the cloud?
– Sony plans to launch a game-streaming service powered by Gaikai tech in 2014. This will let you play PS3 games on a PS4 with all processing done in the cloud by Sony’s servers, while your console receives the video.
– Let’s get to what really matters: Can we play Crash Bandicoot?
– Oddly enough, it won’t play music CDs either. But don’t worry, this seems to be a software limitation that Sony plans to fix in a future update.
Step 16
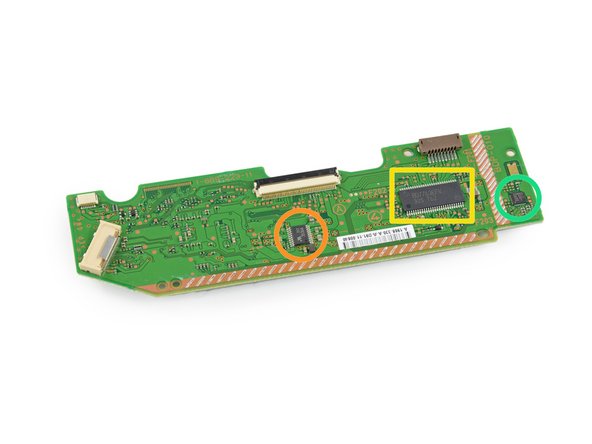


– Gather ’round for the tale of an optical drive and its trusty board… Come along as we dive deep to uncover the mystery of their components!
– Let’s check out some cool ICs we’ve spotted on the optical drive board:
– Renesas SCEI RJ832841FP1
– Mitsumi 312 3536A
– ROHM BD7763EFV 325 T62 Motor Driver IC
– STM8ED 9H A07 VG MYS 331Z
Step 17


We’re nearly there; we’re so close to getting this thing fixed—and crossing our fingers those chips aren’t gonna let us down!
– Let’s dive into the motherboard adventure by unscrewing a few screws that are holding the PS4’s body together.
– We’re removing panels like we’re giving a stylish makeover to a classic 1960s lounge.
– Hang tight, motherboard, we’re almost there!
Step 18


– The time has come to unlock the device’s inner case and access its vital components.
– Unlike those found in handheld devices, the motherboard presents a clean, open layout with an abundance of space to work with.
Step 19


– Explore the vibrant world of fresh ICs just waiting for your touch!
– Get to know the SCEI (Sony Computer Entertainment, Inc.) CXD90026G SoC, featuring the powerful AMD ‘Jaguar’ Cores and a sleek AMD Radeon GPU.
– Check out the Samsung K4G41325FC-HC03, a 4 Gb (512 MB) GDDR5 RAM superstar, combining 8 x 512 MB for a total of 4 GB of awesomeness!
– Meet the SCEI CXD90025G, your go-to Secondary/Low Power Processor for all those network tasks.
– Say hello to the Samsung K4B2G1646E-BCK0, a 2Gb DDR3 SDRAM that’s ready to roll.
– Discover the Macronix MX25L25635FMI, a 256Mb Serial Flash Memory that’s just waiting to store your data.
– Don’t forget the Marvell 88EC060-NN82 Ethernet Controller, keeping you connected.
– And last but not least, the SCEI 1327KM44S, a little gem in your repair toolkit.
Step 20


– They say the ICs are always more tempting on the other side…
– Genesys Logic GL3520 USB 3.0 Hub Controller
– Samsung K4G41325FC-HC03 4 Gb (512 MB) GDDR5 RAM (total of 8 x 512 MB = 4 GB)
– International Rectifier 35858 N326P IC2X
– Macronix 25L1006E CMOS Serial Flash Memory
– 39A207 1328 E1 3FU
Step 21

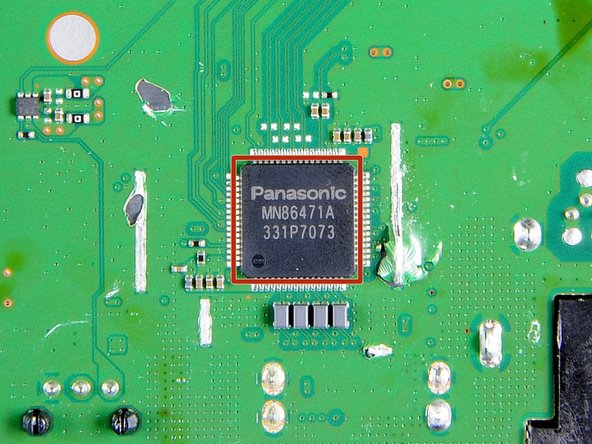
Big thanks to Chipworks for these awesome images!
– Curious about what’s hiding behind door number one? Let’s find out!
– And what surprises await us behind door number two?
– Meet the Panasonic MN86471A HDMI Communication LSI – your new best friend for seamless connections!
– Say hello to the Marvell Wireless Avastar 88W8797 7 Integrated 2×2 WLAN/Bluetooth/FM Single-Chip SoC – the multitasker of the tech world!
– And last but not least, the Skyworks 2614B 315BB – a little powerhouse ready to help you out!
Step 22


– The case is starting to look pretty bare as we carefully remove the EMI shielding.
– The heat sink wasn’t ready to say goodbye to the EMI shielding and held on fiercely. No matter how we approached it, it simply refused to budge!
– Trust us, we gave it our all. It definitely put up a solid fight.
– Bandages might not win us style points in teardown photos, but they’re badges of honor from the repair battlefield!
– One of our team members joked, ‘This EMI shield works great… as a cheese grater!’
Step 23


Alright, let’s get started! That fan is definitely a standout feature – check out those sleek curves!
Step 24
– Every proud new device deserves its very own scandalgate moment! As we wrap up our PS4 disassembly, let’s take a quick pit stop to discuss our own little wobblegate situation.
– So, what’s the verdict? Yep, it does wobble if you give it a nudge.
– The fix? Just avoid pushing on it!
Step 25


Hey there, Mom!
– Teardown complete! We toss all the pieces onto the table like champs.
– Then we tidy up the mess a bit—because, hey, neatness counts!
Success!


