Sony Xperia Z Headphone Jack Replacement
Duration: 45 minutes
Steps: 18 Steps
Get ready to breathe new life into your phone with this step-by-step guide to replacing the headphone jack. We'll walk you through the process, making it easy to follow and complete. If you're not feeling confident, don't worry - our guide is designed to be clear and concise, and if you need help, you can always schedule a repair.
Step 1


- Set your hair dryer to a cozy medium heat.
- Gently glide the hair dryer along the seams on the back of your phone, keeping it a few inches away from the case.
- Give it a full minute of warm air action to loosen up that sticky adhesive holding your phone together.
Step 2

Carefully nudge it back just a tad to make a tiny opening.
- After you've loosened that sticky adhesive, grab your trusty suction cup and place it right in the center top of your phone's back. Now, give it a gentle pull back and watch the magic happen!
Step 3


- Once you've created a tiny gap with the back cover, gently slide the plastic opening tool into the edge of the phone.
- Glide the tool along the edge to help loosen that stubborn adhesive.
Step 4

Heads up: If you pull on that suction cup too hard or too fast, you might end up giving the back of your phone a dramatic exit. Take it easy, and you'll be just fine!
- After you've gently loosened that sticky adhesive, take a deep breath and slowly pull back on the suction cup to lift off the back panel of your phone. You've got this!
- The leftover adhesive should be tough enough to keep your phone snug and secure when you put it back together. Just a heads up, though: once you've opened it up, the water resistance might not be as strong as it was before.
Step 5


- Now that the back cover is off, the battery is sitting right there—giving you full access to the battery and its connectors.
- Gently pry the connector off the motherboard using your plastic opening tool—no need to go all Hulk, just a gentle lift.
- Use your fingers to carefully peel away the remaining adhesive holding the battery in place—slow and steady wins the race.
Step 6


- Grab your trusty plastic opening tool and gently lift that white adhesive tape from the bottom of the battery. Take it slow, we've got this!
- Now, with a little finesse, use your fingers to peel away the remaining adhesive tape from the battery. You're doing great!
Step 7


Hey there! Just a heads up: those flex cables are sneaky little guys running straight down under the battery. They can get a bit cranky if you're not careful! So, make sure to keep your spudger in the right spot while you work your magic.
- Gently glide that spudger along the right edge of the battery, breaking free the adhesive that’s holding everything together. You're doing awesome!
- Next, pop that spudger into the bottom-center to give that adhesive a little extra coaxing. With a bit of finesse, slide the spudger up under the battery and lift it out from the phone. It might take a little elbow grease since the adhesive is quite clingy, but you’ve got this!
Tools Used

Step 8

- Unscrew the single 3 mm screw sitting pretty at the top right corner of the motherboard with your trusty Phillips #000 screwdriver. That motherboard is the green/silver superstar circuit board right at the top of the phone, ready to help you out!
Tools Used

Step 9


Removing the black housing from your phone can be a bit of a puzzle. Just keep prying and lifting on that housing, and it should pop right off!
- Using your plastic opening tool, gently pry up the black housing at the top right corner of the phone—start from the bottom and top edges. Then, find the charging cover on the right side at the top and give it a little lift—this should cause the housing piece to pop out smoothly. Need a hand? You can always schedule a repair.
Step 10


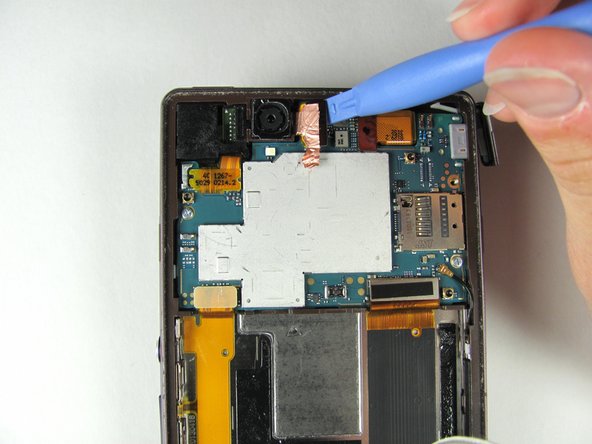
Keep the copper tape party limited—only peel away the tape stuck to the silver part of the motherboard. Don't go all out and remove it from everywhere, just the designated area to keep things neat and safe.
- Gently pry up the copper tape at the top center of the phone using a plastic opening tool—don't worry if it takes a bit of muscle, the adhesive's pretty sticky. Next, use the same tool to lift the pop connector—just lift it up to release it, and it should stay attached to the copper tape. Finally, carefully pull up on both the copper tape and the pop connector to pop out the back camera—should come out smoothly without much fuss. If you need help, you can always schedule a repair.
Step 11


- Grab your trusty plastic opening tool and gently nudge that red tape away from the motherboard. You'll find the pop connector hanging out at the top right corner of the phone, just waiting for some attention.
- Now, using your fingers, give a gentle tug on the pop connector to free the front camera. It should pop right out without any fuss!
Step 12


Some images in this guide feature the back cover of the phone taken off. If you're just popping out the SIM card, there's no need to hassle with the case!
- Hey there! The SIM card for your Xperia Z is hiding in the sneaky little slot right above the power button—easy to spot once you know where to look!
- Now, let's get that cover off! Give it a gentle nudge to the left, and it should pop open without a fuss.
Step 13


Handle that SIM card like it's a delicate little treasure—be gentle when you're removing and dealing with it to keep it safe and sound.
- Gently remove the SIM card and its tray from the phone, taking care not to rush this step.
Step 14

- Unscrew the two 3mm Phillips #000 screws snugly positioned at the middle left and lower right corners of the motherboard. Time to get your tiny screwdriver out and give those screws a little twist!
Step 15


Keep those three flex cable flaps lifted and out of the way of the motherboard! Just a friendly reminder to be gentle with those cables; we don't want any accidental tears!
- Carefully pop the three flex cables off the motherboard. You'll find them hanging out in the bottom right, bottom left, and top left corners of the motherboard, just waiting for a little love!
Step 16


Keep that antenna lifted and clear of the motherboard, just like a happy little bird!
- Grab your trusty plastic opening tool and gently nudge up that antenna at the bottom right corner of the motherboard. You're doing great!
Step 17


The motherboard is snugly glued in place, so it might take a little muscle to get it out.
- Grab your trusty plastic opening tool and gently nudge the motherboard out of its cozy home in the phone case. Start from the right side where the back camera used to hang out.
- Now, with a steady hand, lift up the section where the shiny part of the motherboard meets the edge of the green base board. You got this!
Step 18


- Gently slide the plastic opening tool under the bottom edge of the orange pop connector, then lift it upward toward the center of the headphone jack. This connector is tucked at the top left corner of the device. Carefully lift the tool to pop the connector free—if needed, grab the sensor cable to lift the component out smoothly. If you need help, you can always schedule a repair.
