Sony Xperia Z Ultra Headphone Jack Replacement
Duration: 45 minutes
Steps: 17 Steps
If your device is not recognizing any headset you plug in, and performing a software repair did not fix this problem, replacing the headphone jack may solve this problem.
Step 1

– Grab your trusty little suction cup and let’s lift that back panel, shall we?
– Stick the suction cup right in the center of the back panel and give it a gentle press.
Step 2

– Hold that Sony Xperia Z Ultra steady with your left hand—like you’re cradling a shiny tech treasure. Grip the small suction cup and give it a gentle upward pull to sneak a small gap between the back panel and front panel.
– Keep the suction cup pulling upward (you’re doing great!) and slide that spudger into the newly opened spot. Don’t rush it; you got this!
– Now, here’s the magic. Use the spudger to nudge the front panel downward while you’re still giving the suction cup a friendly upward tug. Keep it steady, and you’re one step closer to repair glory!
Tools Used

Step 3

– Gently lift the back panel by pulling the tiny suction cup upwards. You’ve got this!
Step 4

– Grab your Phillips #000 screwdriver and get ready to work some magic—remove these six screws:
– five snazzy silver 2.1 mm screws
– one bold gold 3.1 mm screw
Tools Used

Step 5

– Gently pop the plastic motherboard shield open by sliding the spudger under the edges and cruising it along like you’re tracing a smooth line. Take your time and let the spudger do the work!
Tools Used
Step 6

Handle the motherboard shield with some TLC—it’s super thin and can snap if you’re not careful.
– Gently pop off the motherboard shield by lifting the bottom edge upward first—like opening a secret hatch to tech treasure.
Step 7


– Use your spudger to gently pop the battery connection cable loose—just a little lift, and you’re good to go!
Tools Used
Step 8

– Gently nudge the top part of the antenna upwards with the spudger—easy does it, like coaxing a tiny wing into flight.
Tools Used
Step 9

– Lift the top end of the antenna gently and swing it outwards to free it up.
Step 10

– Slide the spudger under the battery and gently wiggle it back and forth to loosen up that stubborn adhesive.
Tools Used
Step 11

– Pop that battery out of your phone like a pro!
Step 12

Use care to remove the headphone jack connection, as it may snap if excessive force is used. The headphone jack connection is extremely thin.
– Pop off the headphone jack connection by gently lifting it up with your trusty spudger. Easy peasy!
Tools Used
Step 13

Handle the earphone jack connection gently—it’s as fragile as your favorite pair of shades! Too much force might snap it, so keep it chill and steady while removing.
– Pop off that earphone jack connection with a smooth pry upwards using your trusty spudger—easy peasy!
Tools Used
Step 14

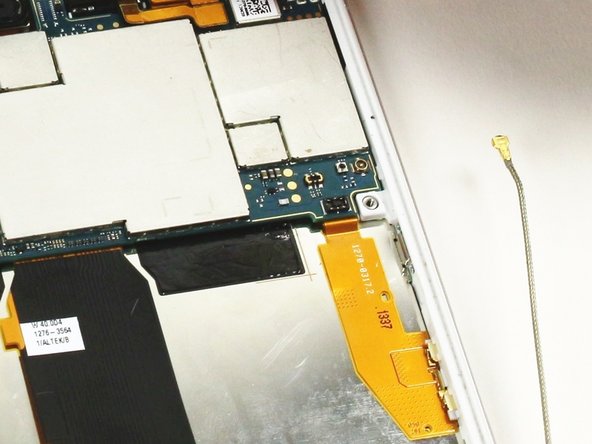
– Let’s get started! Carefully disconnect the ribbon cable located at the bottom right of the motherboard. Note that in the photo, it’s tucked under the motherboard, but don’t follow that example – we want to do it the right way!
Step 15

– Lift the upper edge of the motherboard by gently tugging it upwards with a confident upward motion.
Step 16


The motherboard is still in the mix, just taking a little sidestep outside the frame to make it easier for you to see the components we’re focusing on.
– Let’s get started! Use a pair of tweezers to carefully remove the yellow clip that’s holding the headphone jack slot in place.
Tools Used

Step 17


Handle the headphone jack connection like a delicate piece of art as it navigates through the plastic tunnel. A little too much force or a sudden jerk could lead to deformation or breakage. Remember, the headphone jack is made of super slim plastic, so let’s treat it gently!
– Nudge the red stopper of the headphone jack connection through the plastic tunnel using the spudger. A little push goes a long way!
– While keeping a steady grip on the back end of the headphone jack connection, use a pair of tweezers to grab hold of the connection and guide it smoothly through the plastic tunnel. Take it nice and easy—you’re almost there!
– Carefully pull out the headphone jack connection from the device. Victory is in sight!
Success!