
Step-by-Step MacBook Pro 15 Right Clutch Hinge Replacement Guide
Duration: 45 minutes
Steps: 36 Steps
Heads up! Make sure you have all the tools ready. If you get stuck, remember, you can always schedule a repair with us!
Swap out that pesky broken clutch hinge to make your display flip open like a dream again!
Step 2

– Unscrew the trio of identical Phillips screws securing the memory door. Let’s get those screws out and move one step closer to victory!
Step 3

– Gently hoist the memory door just enough to get a good grip on it, then slide it toward yourself and whisk it away from the casing like a magic trick.
Step 4

– Whip out your screwdriver and unscrew the two 2.8 mm Phillips screws chilling in the battery compartment near the latch.
Step 5

– Alright, it’s time to unscrew the following 6 screws:
Step 6

– Unscrew the four 3.2 mm Phillips dazzlers keeping your computer’s port side together.
Step 7

– Twist your computer by a cool 90 degrees and unscrew the two 3.2 mm Phillips screws chilling at the back. Easy peasy!
Step 8

– Give that computer a twirl! Spin it 90 degrees and unscrew the four 3.2 mm Phillips screws from the side. You’re doing great!
Step 9

Hold your horses! Don’t just rip the upper case away in excitement. It’s still connected to the logic board by a ribbon cable, so let’s keep it chill and careful.
– Start lifting from the back of the case, wiggling your fingers along the edges to loosen it. Once the sides are free, give the case a little shimmy up and down to detach the front (watch out for those sneaky hidden plastic clips that need unclicking).
Step 10

– Unplug the trackpad and keyboard ribbon cable from the logic board, peeling off any tape that’s in the way.
– Now, take off the upper case.
Step 11

– Unplug the trio of antenna cables from the Airport Extreme card. It’s like disconnecting spaghetti, but way less messy!
– Luckily, Apple’s got our backs with a handy label showing where each colorful cable should go. Peep at that label when you plug them back in to avoid a mix-up!
Step 12

– Gently guide the Airport antenna cables out of their cozy little channel in the left speaker. They’ll appreciate the freedom!
Step 13

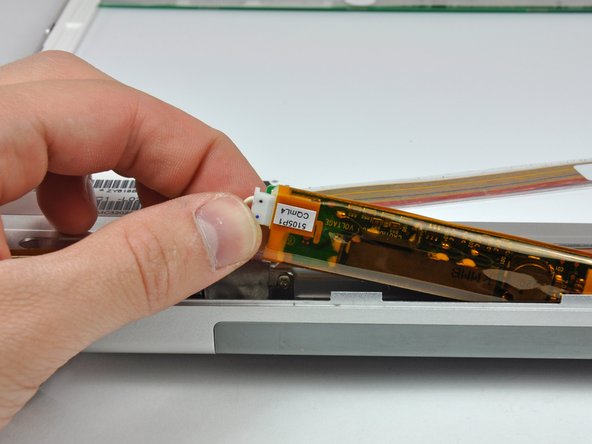
– Slide the iSight cable to the left and gently wiggle it out of its connector on the logic board. It’s like coaxing a shy turtle out of its shell!
Step 14

– Unplug the inverter cable from the logic board by sliding a spudger underneath the cable and giving it a gentle lift. Easy peasy!
Tools Used

Step 15

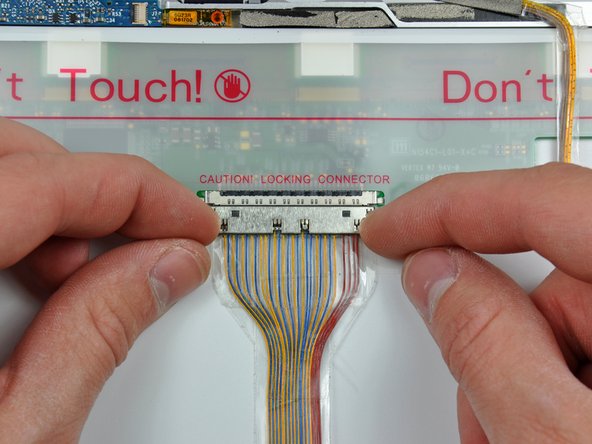
– Gently slide the display data cable away from the logic board like a pro. You’ve got this!
Step 16

– Unscrew the shiny silver T6 Torx to free the ground loop from the display data cable on the casing. It’s like unlocking your gadget’s secret door!

Step 18

– Get a grip on the display assembly from both sides and gently lift it up and away from the computer. It’s like lifting the lid off a treasure chest, but here, the treasure is your success in repair!
Step 19


– Unscrew the two 5 mm Phillips screws chilling on the lower left and right corners of the display. Just two screws, easy peasy!
Step 20


– Pop in the flat end of a spudger right where the plastic strip on the back bezel meets the front bezel. Make sure it’s perpendicular to the display face for a smooth entry.
– While keeping the spudger in place, give it a little twist away from the display. This is your move to gently persuade the front and rear bezels to part ways.
– Saunter down the left edge of the display with your spudger, easing the rear bezel away until it’s uniformly separated from the front bezel. Keep it cool and steady.
Tools Used
Step 21


– Pop the flat end of your spudger in like you’re a doctor performing surgery, right between that sneaky plastic strip clinging to the rear bezel and the front bezel of your device.
– Keep that spudger wedged in and give it a twist away from the display, like you’re revving a motorcycle. This slick move starts to part the front and rear bezels—like magic!
– Cruise down the right edge of the display with your tool, and keep going until the rear bezel breaks up with the front bezel all smooth and even.
Tools Used
Step 22


– Wedge the flat end of a spudger between the front bezel and the plastic strip clinging to the rear bezel right by the screw holes at the display’s lower corners.
– Twist your spudger toward the rear bezel to pop it away from the front bezel like a pro.
– If needed, gently widen the gap between the lower edge of the rear bezel and the clutch cover until they’re totally free from each other.
Tools Used

Step 24
Handle the display inverter with care—it’s super slim and oh-so fragile, like a delicate tech pancake! Be gentle and keep those repair vibes positive!
– Gently hoist the inverter board from its cozy spot in the clutch cover.
Step 25

– Gently pull the connector to detach the LCD backlight from the inverter board. It’s like unplugging a tiny, delicate cable – easy peasy!
Step 26

Watch out! Make sure not to stress the inverter cable ground loop—it’s super thin and can break easily!
– Unplug the inverter cable by gently tugging its connector away from the socket on the inverter. Just like unplugging a refrigerator for a snack raid—easy peasy!
Step 27


– Whisk away the yellow kapton tape from the display’s bottom left corner with a flourish.
– Gently coax the three green antenna ground straps off the copper tape along the LCD’s lower rim.
– Liberate the piece of tape that’s holding the camera cable hostage to the LCD.
Step 28


– Let’s get those sneaky pieces of tape off the display data cable and camera cable connectors!
– Next, gently unstick the camera cable from the foam tape along the top edge of the LCD like a pro!
Step 29

– Carefully ease the camera cable out of its snug home on the camera board like you’re coaxing a cat out from under the bed.
– Give the display data cable connector a gentle tug away from its socket on the LCD—think of it like pulling a card out of a deck.
– Slide both cables parallel to the face of the logic board as smoothly as you’d spread peanut butter on toast.
Step 30

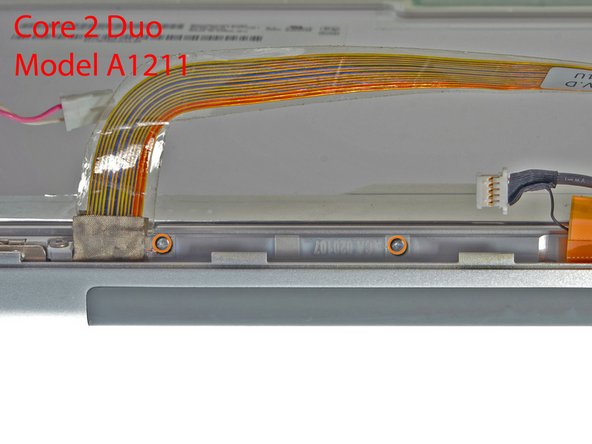
– Rocking a Core Duo? Cool! Check out picture 1 and unscrew those three Phillips screws that hold the clutch assembly to the front display bezel’s bottom edge, right by the display data cable.
– If you’re sporting a Core 2 Duo Model A1211, peek at picture 2. You’ll only need to remove two Phillips screws from the same spot. Easy peasy!
Step 31

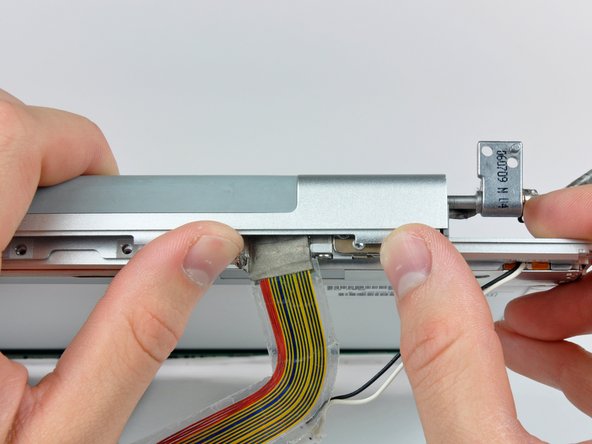
– Whisk away that tiny Phillips screw hiding behind the display data cable. Sneaky little fellow!
– Slide away the small rectangular steel bracket from the right clutch hinge like a pro. Smooth moves!

Step 33

If you need to, feel free to repeat this step on the right side of the clutch assembly. Keep rocking those repairs!


