Step-by-Step Nintendo Switch Speaker Replacement Guide
Duration: 45 minutes
Steps: 19 Steps
Ready to tackle that silent Nintendo Switch? This guide will walk you through swapping out those nonfunctioning or funky speakers in your console. It covers both the left and right sides, so you’re set for an even soundstage. If you’re replacing speakers due to wear and tear, consider doing both for a harmonious audio experience. The Switch hardware features JIS screws, but a Phillips screwdriver can pinch-hit if needed—just be careful not to strip them. Salvation Repair’s tools are made to play nice with JIS-style screws. Heads up: when you take off the shield plate, you’ll need to replace the thermal compound between it and the heatsink. Regular thermal paste won’t cut it for big gaps; K5 Pro viscous thermal paste is the way to go. Oh, and this guide applies to the OG 2017 Nintendo Switch model and its fresher 2019 sibling (models HAC-001 and HAC-001(-01)). Now, let’s get that Switch sounding sweet again!
Step 1


Before diving in, make sure your device is totally powered down. Let’s get started with this repair!
– Grab the small round button on the back of the Joy Con controller and give it a good press and hold.
– While you’re holding it down, gently slide the controller upwards to separate it.
Step 2


Give the other Joy Con some love by repeating this same process!
– Keep sliding that Joy Con upwards until it’s totally free from the console!
Step 3

Keep tabs on those sneaky screws—every single one needs to go right back where it came from. Trust us, your device will thank you!
– Grab a Y00 screwdriver and unscrew the four 6.3mm-long screws that are holding the rear panel in place. Easy does it!
Step 4


To keep those stubborn screws from stripping, press down firmly, take your time, and try swapping to a JIS 000 or PH 000 driver if they’re giving you trouble.
– Grab your JIS 000 driver or an official PH 000 driver and let’s get to those screws holding the rear panel in place:
– One 2.5 mm-long screw on the top edge of your device
– Two 2.5 mm-long screws on the bottom edge of your device
Step 5


– Grab a JIS 000 screwdriver or a PH 000 driver, and unscrew the two 3.8 mm screws holding down the sides of the device—one on each side. Let’s get those screws out of the way!
Step 6


Got a microSD card chillin’ in the slot? Go ahead and pop it out now so we can keep things rolling to the next step.
– Give the kickstand a gentle nudge with your finger to pop it up—like opening a tiny secret door on the back of the device.
Step 7

– Grab a JIS 000 screwdriver or a cool Salvation Repair PH 000 driver to unscrew the 1.6 mm screw chilling in the kickstand well.
– Snap that kickstand shut.
Step 8


The game card cartridge flap hooks onto the other half of the plastic shell, stopping you from fully lifting up the rear panel if it’s shut.
– Flip open the game card cartridge flap like it’s a little secret waiting to be revealed.
– Now, give that rear panel a gentle lift from the bottom – it’s like giving your device a little hug as you remove it!
Step 9

– Grab yourself a JIS 000 screwdriver or a PH 000 driver, and unscrew that little 3.1 mm fastener holding the microSD card reader in place. Easy peasy!
Step 10


– Time to get that microSD card reader out! Use your fingers or a trusty pair of tweezers to carefully lift it straight up from the device. Easy does it – you’re just disconnecting and removing it.
– Now it’s time to put everything back together. When you’re reinstalling the card reader, make sure the press connector under the foam pad is securely connected to the motherboard. If you need to, go ahead and remove the foam pad to make things easier. That way, you can be sure everything is connected just right.
Tools Used

Step 11

– Grab a JIS 000 screwdriver or an official PH 000 driver from iFixit, and let’s tackle those six 3 mm screws holding the shield plate in place. You’ve got this!
Step 12


Got some stubborn foam that doesn’t want to budge? Don’t sweat it—forcing it might rip it apart. Try peeling gently from different spots, and you’ll have it off in no time!
– Let’s get started! Use your fingers or a trusty pair of tweezers to carefully peel back the foam piece on the top edge of your device, located near the fan exhaust port. It’s an easy step to get you rolling on this repair!
Tools Used
Step 13


There’s a chunky pink thermal paste party going on between the shield plate and the copper heat sink below—it’s there to keep your Switch cool and collected.
You might notice a little pushback when lifting the shield plate. Totally normal! That thermal paste is holding onto the heat sink like they’re best friends.
– Time to get started! Insert a spudger under the shield plate, right along the edge of your device.
– Gently pry up to lift the shield plate, and then carefully remove it from the device.
– If you’re feeling thrifty, you can reuse the pink thermal compound – just be sure to keep it clean and ensure it’s making solid contact between the heat sink and shield when you put everything back together.
– If you need to replace it, check out our thermal paste guide for tips on removing the old compound and applying a new one, like K5 Pro, during reassembly.
Tools Used

Step 14


– Gently use the tip of a spudger to pop the battery connector straight up and out of its cozy little socket on the motherboard.
Tools Used
Step 15


Handle the connector gently—don’t tug on those delicate speaker wires! They’re super thin and could snap off the connector like a twig.
– If you’re only swapping out the left speaker, you can skip the next two steps. No drama, just move on ahead!
– Grab your fingers or a trusty pair of tweezers and gently unplug the speaker connector—it’s like pulling out a tiny plug from its cozy spot on the motherboard.
Tools Used
Step 16
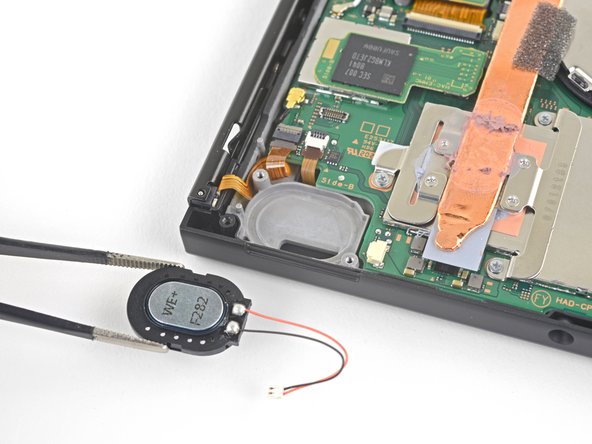


The speaker is lightly stuck in place with some adhesive, so you’ll need to give it a gentle but confident nudge to pop it out.
– Grab a spudger and use its pointy end to gently pop the speaker out of place.
– With steady fingers or some trusty tweezers, carefully lift out the right speaker.
Step 17


Be careful not to yank on the connector by the speaker wires. They’re super delicate and can snap off in a second.
Now it’s time to tackle the left speaker – follow the next three steps to get it done!
– Gently tug the speaker connector out of its socket on the motherboard using your fingers or a pair of tweezers.
Tools Used
Step 18


The speaker is gently stuck in place with some light adhesive, so you’ll need a bit of oomph to pop it out.
– Gently use the spudger’s tip to lift the speaker out of its cozy little home in the speaker well. You’ve got this!
Tools Used
Step 19


– Double-check your new part against the old one—sometimes you’ll need to move leftover components or peel off adhesives before putting it in place.
– To put your device back together, just retrace these steps, but in reverse. Easy peasy!
– Got some old tech leftovers? Take them to an R2 or e-Stewards certified recycler and give the planet a high five.
– Not quite the result you were expecting? Don’t sweat it! Try some quick troubleshooting, or ask for tips from our Nintendo Switch Answers community.
– Need a helping hand? You can always schedule a repair!
Tools Used
Success!
