Step-by-Step Xbox Series X Teardown Guide
Duration: 45 minutes
Steps: 13 Steps
Hey there, tech enthusiasts! The next wave of gaming consoles is hitting the scene this week, kicking off with the Xbox Series X. Amidst all the exciting jargon like ‘teraflops,’ ‘true 4K,’ and ‘ray tracing,’ we have a brand-new device that represents Microsoft’s vision for gaming in the coming years. Let’s dive in and see what makes this beauty tick. It’s teardown time! Don’t forget to check out our YouTube channel, follow us on Instagram and Twitter, and subscribe to our newsletter to be the first to catch the latest in consumer tech as it lands on our teardown table. If you need help, you can always schedule a repair.
Step 1


– The name might sound familiar, but trust us, there’s a lot more going on under the hood. Check out these specs:
– AMD custom 8-core 3.8 GHz (3.66 GHz with SMT) Zen 2 CPU
– AMD custom RDNA 2 GPU (1825 MHz with 52 compute units)
– 16 GB GDDR6 RAM
– 1 TB of SSD storage (with an optional 1 TB expansion card for those who love extra space)
– HDMI 2.1 connectivity that lets you enjoy stunning 8K video at 60 Hz, or 4K at a blazing 120 Hz
– 4K UHD Blu-ray drive for all your high-definition movie nights
– Next-gen Velocity Architecture to keep things running smoothly
Step 2


We’re not cracking open the Series S today, but we’ve got some awesome X-rays of that sibling console on the way! Stay tuned!
– Slim is out, and the new Xbox flagship is here with a bold, chonky vibe. That colossal grille up front? It’s ready to keep things chill, literally.
– Spin it around and you’ll find even more grilles, your standard array of ports, and a nifty new storage expansion slot to keep your gaming future-proof.
– Standing tall or laying low, the Series X has a sleeker footprint than the One X, but don’t let that fool you—it’s got 60% more volume. Better make sure your entertainment setup is ready for the upgrade.
– In a thoughtful move for accessibility, the ports come with tiny raised dots to help you feel your way around. No matter if you’re sight impaired or just wrangling cables behind the TV, this touch makes plugging in a breeze.
Step 3


That may seem disappointing for Xbox fans, but at least these controllers are cross-compatible with Microsoft’s previous-gen consoles.
– The latest Xbox controller looks almost like its older sibling but comes with a few cool upgrades: a handy share button, a snazzy D-pad, and a USB-C charging port for all your modern charging needs.
– Hold your horses—we’re not cracking this bad boy open just yet. Instead, let’s take a peek inside with some X-ray magic courtesy of Creative Electron.
– Now, compare this familiar vibe to Sony’s new DualSense controller, which has taken a bold leap away from its previous design in nearly every aspect.
– With those X-ray specs on, you can spot the four vibration motors (two in the handles, two near the triggers), the robust metal joystick mechanisms, and an intricate network of cables and circuits pulling all the strings.
– And funnily enough, despite its jazzy makeover, the DualSense now shares some common ground with Xbox controllers. Could this be the beginning of the ultimate controller design? Fingers crossed!
Step 4


– Two bright green T8 screws are your official Xbox invitation to dive into the machine, but hold on—those screws are cleverly concealed under stickers and a trap door. Microsoft, are you playing hard to get?
– We’ve got our sights set on the main target: the robust 130 mm fan. It’s pretty easy to access for a good cleaning—definitely a win! If your Xbox is standing tall, this is upward exhaust, so hopefully, it won’t be a cozy home for dust bunnies.
– But fear not! With our trusty Mako driver kit in hand, you’ll be spinning that driver, popping a few clips, and getting right in. It’s user-friendly, but not exactly a walk in the park.
– And speaking of hidden gems, Microsoft has tucked away a little surprise—Master Chief is hiding in here! What a fun Easter egg!
Step 5


We were hoping we could skip this part, but unfortunately, getting it out involved some tricky internal unclipping.
Exciting? Well, kind of—if you’re into challenges. But mostly, no. Our testing shows the optical drive’s internal circuit board is connected to your console’s motherboard. So, if the drive fails, don’t expect a quick fix or easy replacement.
– You could toss that cool Seattle Frisbee from the bottom just for fun, but let’s keep it focused. There’s actually a few more screws hiding underneath waiting to be uncovered.
– Next up, the optical drive. And surprise, surprise—it’s the same one we saw in the Xbox One S and One X. Same model number too!
– If you can manage to de-solder the board from your original optical drive and transfer it into a new one, you’re good to go, just like the One S and One X.
– One of these chips might just be behind the close-knit relationship between the motherboard and optical board:
– Microsoft MS0DDDSP03 ARM—likely the optical drive controller
– Texas Instruments TPIC2050 9-channel motor/laser driver
Step 6


You’ll notice some super helpful labels in this area, like ‘center chassis,’ ‘PSU,’ and ‘AC cable routing.’ While they’re not a full repair guide, they’ll definitely come in handy when it’s time to put everything back together.
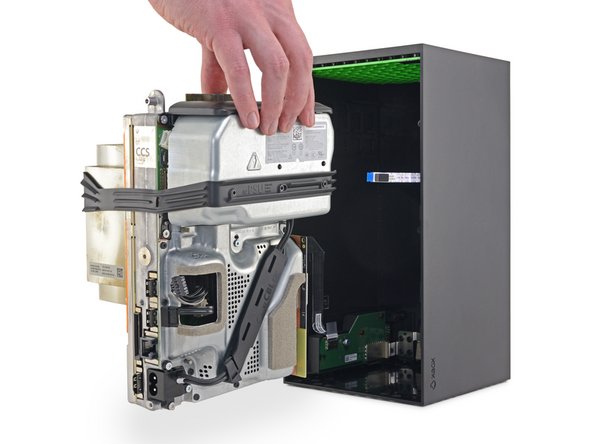
– Now that you’ve removed the disc drive, take a look at the remaining components housed within the large assembly. Most of this is focused on managing heat, which is strapped to some boards.
– As you can see, Microsoft made the most of the available space inside this console – the heatsink takes up a lot of room. Thermal design is crucial in creating a console, and it’s clear the Series X is designed to run smoothly and quietly.
– Up front, you’ll find one of the two antenna boards in the tower. The extra board may help ensure a stable connection, whether the console is in its tower or horizontal orientation.
– The black rubber strap serves to reduce vibrations and noise. This extra cushioning helps prevent any harshness from disturbing your gaming experience. If a step is proving tricky, don’t hesitate to schedule a repair. Let’s keep going!
Step 7


Tack on the extra 60W from the peripheral output, and you’re rocking a total of 315 watts. That’s a decent jump from the One X’s 245-watt power supply, but still shy of the PS5’s beefy 350-watt unit with its optical drive.
Heads up! It does suggest keeping things below 2,000m altitude—so maybe skip that trip to Santa Fe, NM with this setup.
– Next up, let’s gently lift the power supply out of its cozy spot in the main assembly.
– This little powerhouse can deliver a whopping 21.25 amps at 12 volts, which translates to a solid 255 watts of energy!
– Curious how this power brick compares to others on the market? We’ve got the scoop from a power adapter whiz!
– Ever wonder why the PS5 sports a more robust power supply? Stay tuned for our upcoming PS5 teardown to uncover the mystery!
– All in all, this power supply is compact and top-notch. No corners are being cut here! However, it doesn’t quite match Apple’s impressive density and complexity.
– Instead of the usual electrolytic capacitors, this power supply opts for more expensive but longer-lasting polymer capacitors to keep that 12V output nice and smooth.
Step 8


– The Series X is like a tech sandwich, but don’t take a bite! It’s not about saving space like those fancy iPhones, it’s all about power. That aluminum block? It’s a cool air director for these hot components. Check out the first board’s lineup:
– Microsoft M1139994-001 T6WD5XBG-0004 Southbridge I/O controller
– Texas Instruments LM339A quad differential comparator
– Realtek RTL8111HM gigabit ethernet controller
– CT08E 2020F1—possibly a Challenge Electronics sound transducer
– ON Semiconductor NCP186AMN080TBG 1 A / adj. low dropout linear regulator
– Nuvoton ISD8104SYI 2W Class AB audio amplifier
– Richtek RT6256BHGQUF and RT6256CHGQUF synchronous step-down converter w/ LDO
Step 9

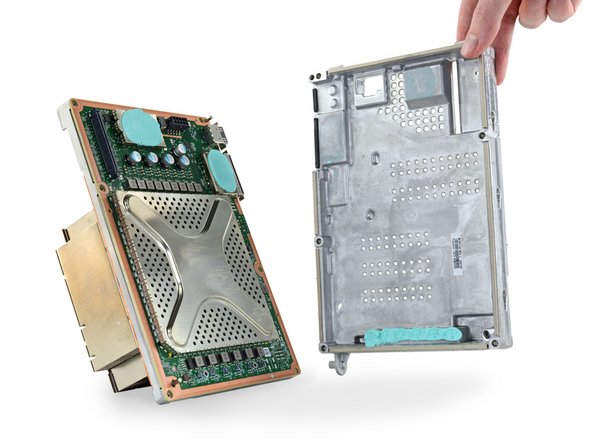

– Next up, we’re diving into the heart of this board sandwich—the aluminum center chassis.
– Now, let’s talk storage: the Series X is rocking an m.2 2230 NVMe SSD, specifically a custom 1 TB SN530 from Western Digital. And guess what? It’s super-fast with PCIe Gen 4.0—talk about high-end performance!
– Let’s zoom in on the components that give this SSD its power (we’ll skip the rather dull backside):
– Its main job? To handle all that High-Performance Gaming Heat™ (hence the bright minty thermal compound for the SSD and storage expansion slot).
– It’s great to see Microsoft opting for a replaceable drive here, even if there are some software hurdles keeping you from swapping it out yourself.
– SanDisk 60662 1T00 1TB NAND Flash Memory
– SanDisk 20-82-10048-A1 NVMe SSD Controller
– Qorvo (formerly Active-Semi) 90430VM330 Power Management IC
Step 10

Replacing the SSD might seem like a breeze, but trust us, it’s not for the faint of heart. If you’re planning to upgrade or swap it out in the future, be prepared for a potentially wild ride. Will it work seamlessly? Our instincts say it’s a solid maybe. But don’t worry, with the right guidance, you’ll be navigating this process like a pro!
– Since this SSD comes in a classic m.2 form factor, we popped it into our desktop workstation to take a quick look at what’s inside.
– If you thought it might be partitioned like the hard drives in older Xbox models, you’re probably a bit ahead of us.
– Update: If you want more insights, check out our detailed writeup on this little SSD: Can DIY Storage Save You Money on the Series X? Probably Not.
– It’s actually quite similar to drives we’ve seen in some other recent Microsoft devices.
Step 11


Time to roll up those sleeves and get to work like a tech-savvy hero! Follow these step-by-step instructions to bring your device back to life.
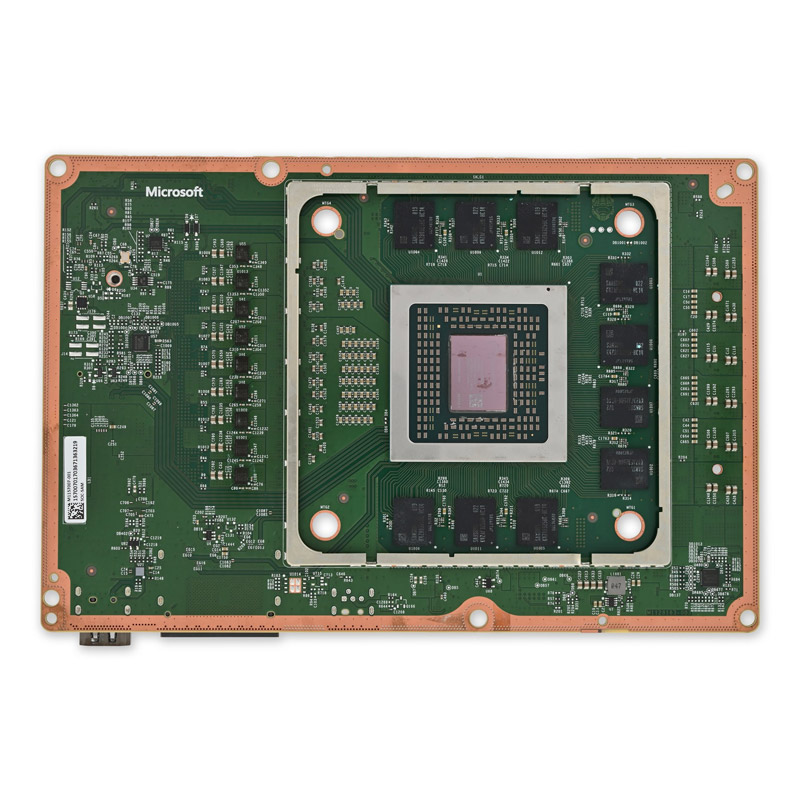
– As we peel away the last delightful layers of this thermal masterpiece, we liberate the final board from its cozy heat sink assembly, uncovering more of that trusty thermal compound and a few more chips along the way:
– “Project Scarlett” 100-000000388 SoC (packed with an 8-core AMD Zen 2 CPU and an AMD RDNA 2 GPU)
– Micron D9WCW 1GB and Micron D9WZX 2GB, adding up to a grand total of 16 GB of GDDR6 SGRAM (that’s Super-Great Synchronous Graphics RAM for those keeping score)
– Monolithic Power Systems MP86965 Power Phase Modules with MOSFET goodness
– Monolithic Power Systems MP2926 Multi-Phase Controller featuring a PMBus Interface
– ON Semiconductor NB7NQ621M 12 Gbps HDMI/DisplayPort Level Shifter/Linear Redriver
– Texas Instruments TPS568230 Synchronous Step-Down Regulator
Step 12

The mint green cream filling is actually a thermal compound that helps keep that Gaming Heat™ in check. It’s there to keep things cool and running smoothly!
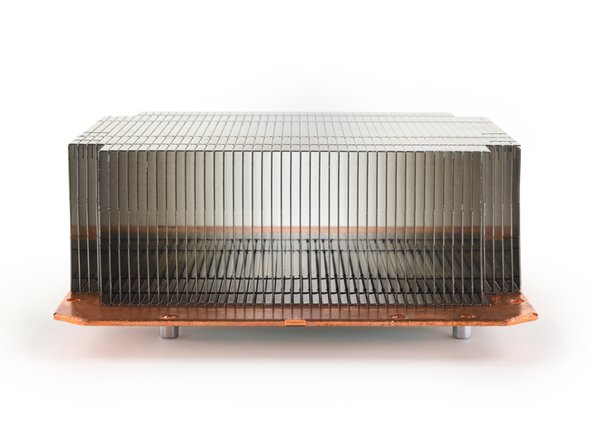
– With the motherboards out of the way, let’s take a moment to appreciate the impressive cooling system. It’s like a cool cookie sandwich!
– On the left side, the fins are hard at work pulling heat from the copper vapor chamber, which is whisked away by the cool air that the fan draws in from the bottom of the console.
– Next up, along with the copper plate, this sturdy metal frame serves as an electromagnetic shield. It also helps transfer heat away from the feisty voltage regulator modules using a thermal pad.
– The ‘CCS’ (that’s ‘Center Chassis’) adds some serious rigidity, helps with shielding, sinks heat, and maximizes cooling for the board.
– And finally, on the far right, we have a Faraday-cage-like EM shield that protects the other motherboard while letting air flow through like a breeze.
Step 13

– While this may be the ultimate gaming beast from Microsoft, its size makes it feel more like an air conditioner with a graphics card. Pretty cool stuff, right?
– The design is fairly modular and repair-friendly, although there are some software hurdles to jump over. Our tests show that tackling repairs on the optical drive and SSD could be tricky, which might pose a problem if you’re looking to game hard or boot up smoothly.
– We’re super thrilled to have two Master Chiefs living inside our Halo machine, but how does this gaming tower hold up in the repair department? Keep scrolling for the verdict!
Success!