
Toshiba Encore WT8-A Tablet Audio Jack Replacement
Duration: 45 minutes
Steps: 12 Steps
Step 1

Be gentle with the metal spudger—it’s your tool for precision, not a hammer! We want to avoid any accidental damage to that casing.
– Grab your trusty metal spudger and gently wiggle it between the back cover and your device. This will create a nice little gap to get things started.
Tools Used

Step 2


– Grab your trusty nylon spudger and gently work it to fully separate the back panel of your device.
– Slide that spudger all the way around the edges of the device cover until it pops off nice and easy.
Step 3


– Grab your Phillips head PH0 screwdriver and get ready to remove the 7 battery screws. You’re almost there!
– The 5 screws on the sides? They’re 3.5mm – no need to measure them twice, just unscrew them and keep going!
– For the screws on the top and bottom, they’re 4.5mm each. Just make sure to get them all and you’re one step closer to success!
Step 4


Make sure you’re gently lifting the hinged retaining flap, not the connector itself. You’ve got this!
The zero insertion force (ZIF) connector is your best buddy for holding those fragile ribbon cables in place, like this trackpad cable. Keep it safe and sound!
– Grab those fine tweezers and gently flip up the little retaining flap. Once you’ve done that, you can smoothly slide the ribbon cable out without a hitch!
Tools Used

Step 5

Handle those colored wires with the care of a bomb squad—gently pry them from the motherboard so everything stays intact. Nobody wants a surprise ‘oops’ moment!
– Gently unplug the colorful power cable from its connector.
– For a safe disconnect, grab a spudger with a pointed tip and carefully nudge each side of the connector.
– Take your time, alternating from side to side, and softly wiggle the connector out of its socket like you’re gently guiding it out of bed.
Step 6

– The battery should slide right out of the device—easy does it!
Step 7

– Unscrew the 4–4.5 mm screws from the motherboard assembly—you’re just four screws away from greatness!
Step 8

– Unscrew the 2 – 3.5 mm screws holding the motherboard assembly in place.
Step 9

– At this stage, the motherboard should pop right out for you!
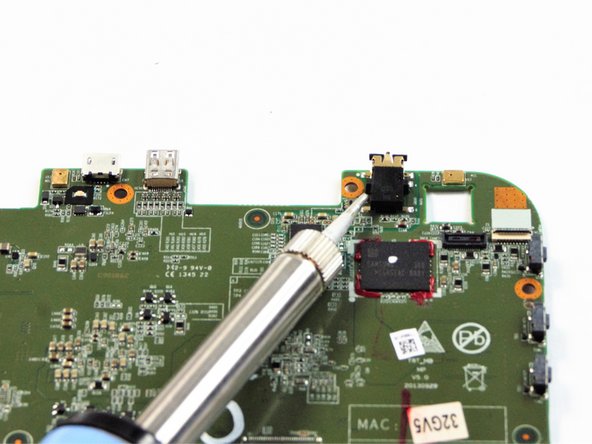
Step 10

Soldering irons are scorching hot—handle with care! You definitely don’t want to turn your repair session into a ‘why does my finger feel crispy?’ moment. Stay sharp and keep that motherboard safe!
– Get your soldering iron ready to warm up those connections on the motherboard!
Step 11
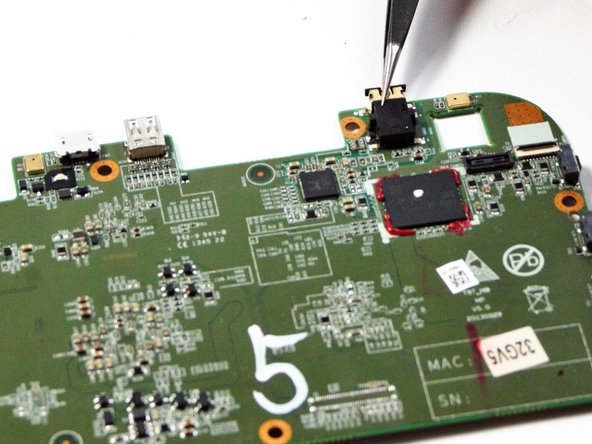

Heads up! That melted metal around the audio jack? Yeah, it’s scorching. Keep your hands clear unless you enjoy surprise heat tests!
The solder sets in a flash, so get ready to move fast and nail those details!
– Grab your soldering iron and gently heat up that metal connection linking the motherboard to the audio jack. You got this!
– Now, with your fine pointed tweezers, carefully wiggle and pull the audio jack away from the motherboard. Easy peasy!
Tools Used
Step 12

– Put your device back together by following these steps in reverse — easy as that!
– If you hit a snag, don’t hesitate to schedule a repair for a helping hand.
Success!