
Upgrade iPhone 12 64GB Storage to 256GB
Duration: 45 minutes
Steps: 8 Steps
Step 1


This iPhone comes with a solid 64GB of storage to hold all your apps, photos, and tunes.
- First up, let's carefully remove the display. Gently does it—no need to rush!
- Now, let's disconnect the battery. Unplugging it is key, so take your time to avoid any accidental shorts.
- Last but not least, the motherboard comes out. Keep track of any screws or parts, and don't forget to breathe through it. If you hit a snag or feel unsure, no worries—just schedule a repair.
Step 2


- First, let's get that motherboard snugly into the holder and secure it with some high-temperature tape. We want it to stay put!
- Next up, grab your Hot Air Gun and set it to a cozy 280℃ with airflow at 45. Time to warm up the side of the NAND gently.
Step 3


- Carefully peel away the black adhesive on the side of the NAND using a Side Glue Cleaner Blade.
- Warm up the NAND with a Hot Air Gun set to 385℃ and airflow at 45. Then, gently lift the NAND off with a Pry Knife.
- Spread medium temperature solder paste on the bonding pad using a Soldering Iron heated to 365℃.
Step 4


- Smear a tiny dab of Paste Flux like a pro.
- Zap away the old tin from the bonding pad using your Soldering Iron and Solder Wick.
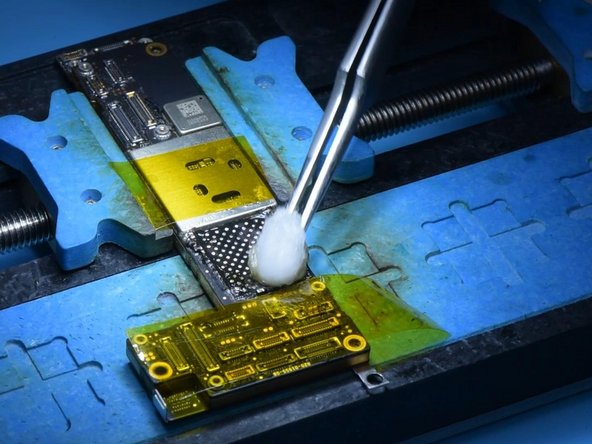
- Give the bonding pad a good clean-up with some PCB Cleaner to make it sparkle.
Step 5


- Warm up the bonding pad using a Hot Air Gun set to 280℃ to melt away that stubborn black adhesive.
- Apply some rosin with your Soldering Iron, then use Solder Wick to gently lift off the tin from the bonding pad.
- Finish off by cleaning the bonding pad with PCB Cleaner to keep everything neat and ready for the next step.
Step 6


- Grab that Paste Flux and dab a little onto the bonding pad. Next, set your iPhone 12 256G NAND right where it belongs.
- Time to get your Hot Air Gun fired up to 365℃ with an airflow of 45—solder that NAND into place like a boss.
Step 7


- Time to get that motherboard and display in place! Connect the data cable and hook up your iPhone to the computer. Fire up 3uTools to give your iPhone a fresh flash.
- Heads up! Your phone won't show a progress bar during the flashing process, so just hang tight until it's all done.
- Once the flashing is finished, activate your phone on 3uTools and get ready to roll!
Step 8


- Power up your phone and check if WiFi can be detected without a hitch.
- Head over to Settings > About to confirm the phone has a spacious 256GB capacity.
- The serial number, WiFi address, and Bluetooth address are all set in stone – no changes here!


