Xbox 360 Kinect Teardown
Duration: 45 minutes
Steps: 23 Steps
The Kinect is a sleek bar of sensors sitting on a small motorized base, built to chill lengthwise beneath your screen. We snagged one and cracked it open the same day it dropped—November 4, 2010.
Step 1

– Introducing Microsoft’s exciting venture into the world of motion gaming: the Kinect! Originally known as Project Natal, this device is a game-changer.
– But hold on, this isn’t just another Wiimote clone. Kinect is the result of a massive investment from Microsoft, pouring hundreds of millions into perfecting speech and motion recognition technology.
– Unlike handheld controllers like the Wiimote or the PlayStation Move, the Kinect is a high-tech sensor suite that tracks your position and movements in 3D space. Pretty cool, right?
– There are plenty of fantastic articles out there that dive into how Kinect detects motion. We won’t rehash all the basics here, but if you’re curious, feel free to check out those resources!
Step 2

– The evolution of controllers, gaming console edition.
– From top to bottom:
– We’re living in a world where we’re not swapping out computers all the time. Instead, we’re upgrading sensors to help our devices understand us better—how cool is that?
– Adding Kinect to an Xbox is like giving sonar to a submarine. Sure, it worked before, but now it knows where it’s headed. (Okay, that’s a bit of a stretch, but you get the vibe.)
– Original Xbox Controller S, Kinect
– Nintendo Virtual Boy, Wiimote
– Original Sony PlayStation controller, PlayStation Move.
Step 3

– We’ve got a squishy rubber pad standing between us and the inner magic of the Kinect. Let’s give that some love and attention…
– The motorized base is like a dance partner that can swivel the top sensor bar to keep an eye on your moves around the room. Sounds super handy, but let’s be a bit cautious about those mechanical bits that might not always play nice.
Step 4

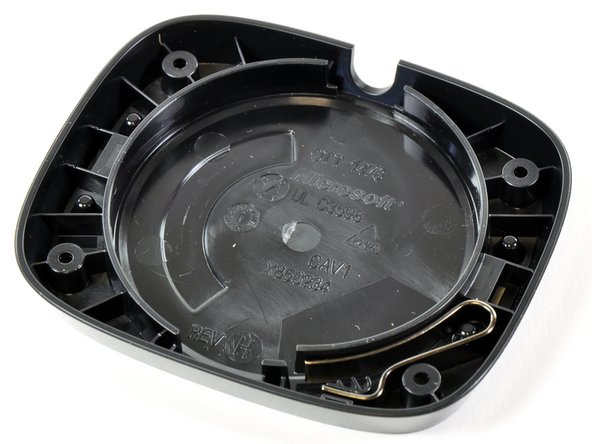

Hey, have you noticed that Microsoft is already on revision H? That’s a pretty big jump from the starting line – what’s the story behind revisions A through G?
– The plastic base is held in place by four T6 Torx screws. Let’s tackle those first!
– Once you’ve popped off the plastic base, you’ll find another four Phillips #0 screws waiting for you. Time to keep going!
Step 5
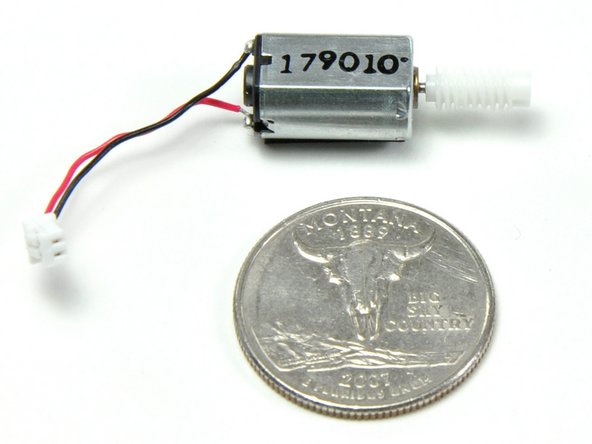

– The Kinect’s motor and gears aren’t exactly built like a tank—think delicate and precise, not rugged and tough.
– About the size of a quarter, the base houses a tiny motor with three lightweight plastic gears. If the top unit doesn’t overheat, this motor setup could be the Kinect’s Achilles’ heel.
– Let the Kinect do its thing and auto-calibrate its aim—don’t try to manually muscle it into position. Be gentle!
Step 6

– Get ready to dig in – removing the bottom grille takes some elbow grease and a metal spudger. Be careful, though, since Microsoft didn’t hold back on the adhesive.
– The Kinect’s brain is based on PrimeSense’s Reference Design, which is pretty cool. But what’s even cooler is how Microsoft’s software brings it all together, turning the sensor bar’s data into a 3D map of your space.
– Even though Microsoft hasn’t acquired Primesense just yet, their hardware is still pretty impressive. But let’s be real, it’s the software that’s doing the heavy lifting here, making that sensor bar’s data into a 3D mesh of your surroundings.
Tools Used


Step 7

That unassuming Xbox 360 sticker is actually hiding the third screw on each side of the Kinect. Sneaky, right?
– Microsoft went with T10 Torx security screws here—pretty sneaky, huh? That’s already three different types of screws, and we haven’t even cracked this open yet. But no worries, we’ve got this!
Step 8

– Awesome! Now the real adventure kicks off!
– The Xbox is all about gaming, so the Kinect does some cool prep work on the image before sending it over. It takes all the info it gathers about your space and boils it down to two key things: a vibrant color image and a depth map.
Step 9


– Microsoft gave Kinect a sleek, slim design by breaking up the main board into three separate layers, stacked vertically like a mini high-rise.
– At the far end of the Kinect, there’s a fan working hard to keep things cool. It pulls air in from one side and pushes it out the other, keeping the airflow smooth and steady.
Step 10

This image shows the device flipped over, so the labels are reversed from what you’d see when looking at the Kinect.
– We’ve uncovered the Kinect’s vision system—exciting stuff!
– Here we have two cameras and an infrared (IR) projector.
– These aren’t your tiny phone cameras—they’re more like the beefy camera you’d find in a webcam, complete with big lenses and autofocus.
– While we can’t fully verify the resolutions just yet, Microsoft tells us that the infrared cam runs at 320×240 and the RGB cam delivers 640×480.
– Left: (IR CMOS) Microsoft / X853750001 / VCA379C7130
– Center: (Color CMOS) VNA38209015
– Right: (IR Projector) OG12 / 0956 / D306 / JG05A
Step 11


– Let’s break down the Prime Sense diagram and see how their reference platform works. The Kinect is the first device to use this platform, and it’s pretty cool.
– You’ve got one camera and an IR transmitter working together to create a depth map – think of it like a 3D picture. The resolution is rumored to be 320×240, which is pretty decent. Then there’s another camera that captures the human visual spectrum at 640×480 resolution, giving you a clear view of what’s going on.
– We’ve heard that this system can measure distance with an accuracy of about 1cm at two meters, which sounds amazing. However, real-world tests have shown that it’s not quite there yet. But don’t worry, with a little practice, you’ll be a pro at using it in no time. If you need help, you can always schedule a repair
Step 12

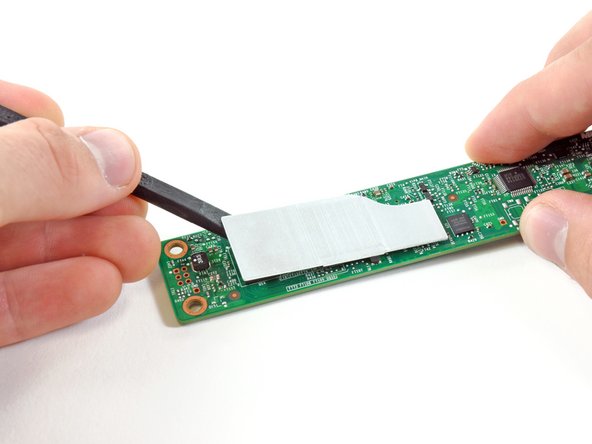
– Each of the four microphones connects to the motherboard with a single cable connector. So nifty, right?
– With three connectors popped and seven T10 Torx screws out, the top board is free to part ways with the other two boards. Nice and easy!


Step 14

– Here’s the brain of the Kinect – packed with chips! We’ve got a high-res scan of this board for you to take a closer look at here.
– Wolfson Microelectronics WM8737G – It’s a stereo ADC with a built-in microphone preamp. Great for those clean audio signals.
– Fairchild Semiconductor FDS8984 – This N-Channel PowerTrench MOSFET is in charge of managing power flow, keeping things running smoothly.
– NEC uPD720114 – The USB 2.0 hub controller, making sure your USB connections stay in check.
– H1026567 XBOX1001 X851716-005 GEPP – Help us out! We think this 6 mm x 4.9 mm SAP package might be SPI flash (possibly Atmel?). Let us know if you’ve got the info!
– Marvell AP102 – The SoC (System on a Chip) that’s handling the camera interface. Smooth visuals ahead.
– Hynix H5PS5162FF – 512 megabit DDR2 SDRAM. It’s helping your device manage data like a champ.
Step 15

– Analog Devices AD8694 – This little quad-channel gem brings you smooth and quiet signal amplification on a budget. Say hello to clean, low-noise performance and wave goodbye to static drama.
– TI ADS7830I – Dive into this 8-bit, 8-channel sampling wizard with an I2C interface that’s as friendly as your neighborhood barista. It’s all about precise analog-to-digital conversions with ease.
– Allegro Microsystems A3906 – A multitasking marvel for all your motor-driving needs. Whether it’s stepping, spinning, or juggling DC motors, this driver’s got your back at low voltages.
– ST Microelectronics M29W800DB – 8 megabits of non-volatile flash memory goodness! Think of it as the reliable notebook in your digital toolkit, ready for big data storage adventures.
– PrimeSense PS1080-A2 – The SoC image sensor processor that sees the world in all its pixelated glory. Perfect for those techy projects that need a sharp set of eyes.
Step 16


– Right at the heart of this board, you’ll find the TI TAS1020B USB audio controller, ready to bring your audio to life.
– Chances are, a Kionix MEMS KXSD9 accelerometer is hanging out here, keeping tabs on inclination and tilt, and maybe even helping with image stabilization. It’s like having a little sensor buddy that knows when things get a bit wobbly!
Step 17


– The deeper we dive into Kinect, the more connected we feel to its inner workings.
– Feeling like Johnny 5 yet?
Step 18

– We’ve uncovered three out of the four microphones nestled inside the Kinect. Pretty neat, right?
– Altogether, there are four microphones that are facing downward: three are on the right side and one is on the left. It’s like a little microphone family!
– Microsoft figured out that the best way to catch all the sounds is by having those mics face down. Smart move!
– To make sure it picks up your voice commands just right, the Kinect needs to do a little audio calibration dance in the room. Just a heads up, if you decide to rearrange your furniture, you’ll need to recalibrate. No biggie!
Step 19


– This board is secured with four standoffs. While we used needle-nosed pliers, a 5 mm nut driver would really be the ideal tool for the task.
– Our pals at Adafruit have thrown down a $2,000 challenge for the first team to whip up an open-source driver for Kinect. The Wiimote has been a game-changer for our hobby robotics projects, and the advanced sensors of the Kinect could supercharge robotics research!
Step 20


– Finally! We’re able to remove the power/data cord from the shell of the Kinect.
– In the midst of an array of complex sensors and transducers, we remove the status indicator LED.
– Microsoft is using a USB-like connector for the Kinect. The Kinect uses 12 watts, which is quite a bit more than 2.5 watts of power provided by a standard USB port.
Step 21


– Once you’ve tackled a few more screws, the two cameras and the IR transmitter will pop right off the metal backing bar like magic!
– Nestled snugly between the IR Projector and the metal backing bar is another little gem. It’s probably a Peltier Device, working hard to keep that IR projector cool!
Step 22


– The two cameras and the IR Projector, sitting next to each other, ready to work their magic.
– With voice commands and gestures being the only way to interact, the Kinect’s sensor system is key to making it all happen, packed with microphones and cameras.
– By positioning the depth-of-field camera and the RGB camera at a specific distance apart, the Kinect works its 3D magic, instantly blending real-world objects into your screen action.
Step 23


– Our Kinect is now fully taken apart, and we’re excited to share the process with you!
– Need help with other console repairs? Check out our repair services for Xbox and PlayStation at Salvation Repair.
– Microsoft Kinect gets a repairability score of 5 out of 10 – it’s not the easiest, but we’ve got you covered.
– The design is super modular, making it relatively easy to swap out faulty parts like the motor when they give out.
– No soldering required to disassemble – a big plus!
– Be warned: taking apart one of these can be tricky due to all the tiny bits and pieces. Stay organized!
– Microsoft used a variety of screws, including some pesky security bits: T6, T10, T10 security, and Phillips #0. Don’t worry, we’ll guide you through it.
– Without an official service manual, things can get tough. But don’t worry, we’re here to help. If you need help, you can always schedule a repair.