Xbox 360 Repair Guide: Fix Red Ring of Death
Duration: 45 minutes
Steps: 55 Steps
Get ready to dive into your Red Ring of Death Fix Kit installation! By reflowing the motherboard after you wrap up Step 48 and before you pop in the RROD fix kit, you’re not just increasing your chances of troubleshooting that pesky red ring issue, but you’re also giving yourself a little insurance against any future hiccups. Let’s get this sorted!
Step 1


– Get a good grip on the hard drive assembly and give that release button a push while you gently lift up the front edge.
– Slide that hard drive assembly right out through the top vent – you got this!
Step 2

If you’re feeling fancy, you can swap out the spudger for the finger of an Xbox 360 opening tool. It’s like using a fancy tool for an everyday task! You’re a pro.
– Let’s get this console standing tall with the bottom edge pointing up!
– Now, grab your trusty spudger or an Xbox 360 opening tool and gently slide the flat end into the tiny gap at the front edge of the bottom vent.
– With a little finesse, pry the front edge of the bottom vent away from the faceplate. You’re doing great!
Step 3


Alright, let’s get those clips on the left and right sides of the bottom vent released! Grab your trusty spudger or the finger of an Xbox 360 opening tool and gently work your magic. The spots you need to focus on are marked in red, so you can’t miss them!
Now, slide that tool into the handy holes molded into the white plastic side case pieces. You’re doing great!
Step 4


– Start by tackling those clips from the front edge of the bottom vent—it’s like a little dance! Just gently lift the front edge of the bottom vent and give those clips a nudge with the tip of your spudger, pushing them towards the inside of the console. You’ve got this!
Step 5


– Give those two center clips on the bottom vent a little love and repeat the same process to set them free!
Step 6


– Gently nudge the clips on the bottom vent closest to the back of the Xbox using the tip of your spudger. You’ve got this!
Step 7

– Go ahead and pop off the bottom vent from the 360!
Step 8


Want to try a different approach? You can also use the edge of the Xbox 360 opening tool to get the job done, just be careful not to scratch that plastic case.
Or, go old school and use your hands to gently pry the faceplate away from the Xbox – it’s easier than you think!
– Start by carefully inserting the flat edge of a spudger between the faceplate and the outer casing, right near the power button – it’s time to get this repair started!
– Now, gently run your spudger along the edge of the faceplate to release the clips that are holding it in place on the front of the console. Take your time and work your way around.
Step 9

– Use the same technique as before to gently free the left side of the faceplate. You’ve got this!
Step 10

– Gently pop off the faceplate from the front of the console. You’ve got this!
Step 11


– Alright, let’s get this party started! Stand your console up tall, with the top edge pointing to the heavens.
– Now, check out those top vents! They’re held in place by some sneaky clips. The first two are hiding under the top vent, near the faceplate. You’ll see them in the pictures – no need to play hide and seek!
Step 12


You can also use the long finger of an Xbox 360 opening tool to get this done – it’s a great alternative to make this step a breeze!
– Gently slide the flat end of a spudger into those tiny gaps we talked about earlier to pop those clips loose. You’ve got this!
Step 13


In the upcoming steps, grab the tip of a spudger or the finger of an Xbox 360 opening tool to gently pop those clips along the left and right sides of the top vent. We’ve highlighted their spots in red for you, so you can’t miss them!
Step 14


– To free those clips, start from the center of the top vent and work your way out. It’s like giving them a gentle nudge!
– While giving a little lift to the front edge of the top vent, grab your trusty spudger and nudge those clips near the center of the top vent inward, toward the console. You’re doing great!
Step 15

– Grab your trusty spudger and gently nudge the clip on the top vent that’s closest to the back of the Xbox’s upper case. You’re doing great—just take your time!
Step 16


The final clip is cleverly tucked away beneath the rubber foot that’s closest to the back of the console. Keep an eye out for it!
– Time to get started! Use the tip of your trusty spudger to gently release the clip on the top vent nearest the back of the Xbox – it’s easier than you think!
– Now, carefully remove the top vent from the 360. You’re making great progress!
Step 17

– Position the console upright with the top edge pointing downwards.
– Gently remove the warranty sticker from the console.
Step 18


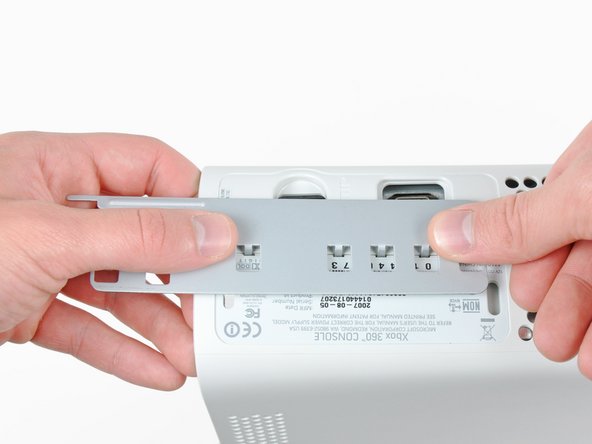
The upper and lower cases are hooked together with several sneaky latches at the front and back of the console. To set them free, you’ll need to release these latches and gently separate the upper case from the rest of the device. If you’re not sure, don’t worry – it’s easier than it sounds!
– Alright, let’s use our trusty spudger to pop open some latches! Give these spots a gentle nudge:
– Above where those front USB ports hang out.
– Below the front USB ports (got to get ’em all!).
– Above the Memory Unit slots.
Step 19

– Take your trusty spudger and gently slide the flat end underneath, giving it a little wiggle to pop up that last latch just above the eject button. You’re almost there!
Step 20

– Gently pry up the front part of the lower case to make sure those sneaky latches in the front are fully released.
Step 21


The upper and lower cases are snugly held together by seven clever little release latches on the back of the console. You can spot their locations highlighted in a cheerful red!
Step 22


– Gently slide the Xbox 360 opening tool into the clips holding the lower case to the upper case near those I/O ports. It’s like opening a secret door!
– While keeping a nice steady press on the tool, give a little push to the lower and upper cases to pop those retaining clips apart. You’ve got this!
Step 23


– As you gently pry apart the upper and lower cases, grab your trusty spudger or the finger-friendly Xbox 360 opening tool and give that long clip (you know, the one we highlighted in red) a little nudge towards the center of the 360.
– Once you’ve done that, the clip should pop free, leaving just the clips near the power connector to keep the two halves snugly together!
Step 24

– Time to get your groove on! Slide that Xbox 360 opening tool down into the two remaining clips by the power connector.
– Now, gently nudge the upper and lower cases apart to set those retaining clips free and let them bask in the glory of release!
Step 25

Watch out for bending the lower case near the power plug too much, as it has a tendency to crack like a bad joke!
– Flip the console around so the front is looking down at the floor. It’s like giving it a little hug from behind!
– Grab the lower case’s back section and lift it up gently to release it from the console. Think of it as helping it take a little leap!
Step 26


You can also get the job done with an Xbox 360 opening tool!
– Grab your spudger and use the pointy end to release the clip that’s holding the eject button to the metal casing.
– Slide the flat end of your spudger between the eject button and the optical drive.
– Gently pry the eject button off its posts and set it free from the 360.
Step 27

– Let’s get started by removing the six silver 64 mm T10 Torx screws that hold the upper case in place. Grab your trusty screwdriver and carefully take out these screws to begin the process of freeing the upper case from the metal casing.
Step 28

– Turn the console around so the upper case is looking up at you with a friendly smile.
– Carefully lift the upper case straight up and gently set it aside, releasing it from the console’s embrace.
Step 29

– Time to get peelin’! Carefully remove the silver tape holding the optical drive to the metal casing. You got this!
Step 30

Hold your horses! That optical drive is still hanging on by a couple of cables connected to the motherboard.
– Give that optical drive a little nudge upwards – just enough to peek behind it! You’ll find the SATA and power connectors hanging out back there, waiting to be disconnected.
Step 31


– Ready to unplug? Awesome! Grip the power connector by its cables and gently pull it out from the optical drive.
– Now, let’s detach the SATA data connector. Just pull it straight away from its socket on the optical drive.
Step 32

– Alright, time to give that optical drive assembly a little air! Gently lift it up and out of its metal home. You got this!
Step 33


– Slip the flat end of your spudger into the little rectangular slot on top of the cooling fan duct.
– Give that fan duct retaining clip a gentle nudge to release it, then free the fan duct from the Xbox.
– No spudger? No problem! You can also use the metal finger of an Xbox 360 opening tool to release the clip.
Step 34


Don’t pull the dual fan assembly all the way out just yet – its cable is still connected to the motherboard, so let’s take it one step at a time.
– As you gently lift the metal chassis strip above the dual fans, give those fans a little nudge toward the center of the motherboard. You’ve got this!
Step 35

Hey, some of those fan connectors have a little lock on ’em! Just press down on that lock while you gently pull the fan off the motherboard. No need to get rough, just a little love tap is all it needs.
– Time to get this repair started! Carefully lift the dual fan connector straight up from its socket on the motherboard – it’s like freeing a tiny captive.
– Now, gently remove the dual fan assembly from the console. You’re making great progress!
Step 36


A little tip: your fingernail is a great tool for popping those clips off the RF module. You got this!
– Grab your trusty spudger and gently slide the flat end under the clips holding the RF module shield in place along the top and left edge. Give those clips a little nudge to free them up!
– Time to say goodbye to the RF module shield! Carefully lift it off and set it aside.
Step 37

– Unscrew those three 5.6 mm T8 Torx screws holding the RF module snugly to the metal chassis. You’ve got this!
Step 38


– Grab that RF module and give it a gentle lift straight up to free it from its cozy spot on the motherboard.
– Now, go ahead and take the RF module out of the console. You’re doing great!
Step 39
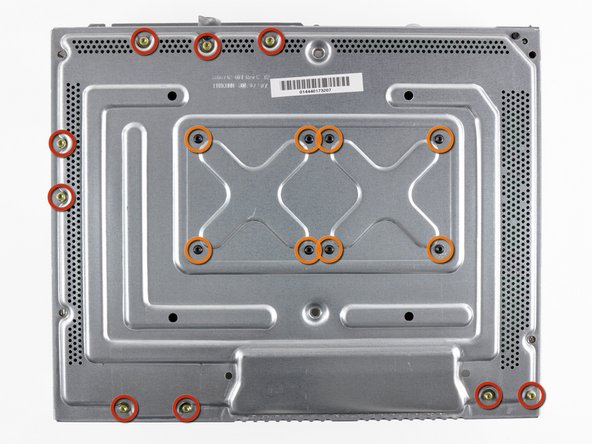
– Let’s get started by removing the screws that hold the motherboard in place inside the metal casing:
– If you’re putting your Xbox 360 back together after a repair, don’t worry about the eight T8 Torx screws highlighted in orange – they won’t be needed again.
– Next, you’ll need to remove the nine gold 11 mm T10 Torx screws.
– Then, take out the eight black 5.6 mm T8 Torx screws.
Step 40

Those sockets are delicate little things, so try not to rough ’em up too much as you swing that motherboard away from the metal casing.
Gently flip the Xbox over, making sure the motherboard stays snug in its cozy home inside the chassis.
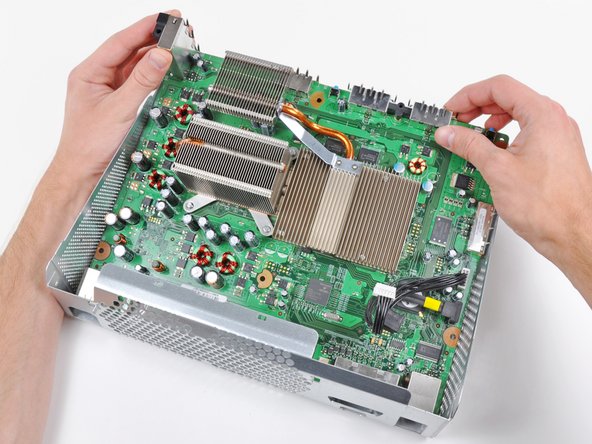
– Gently lift the motherboard assembly by its front edge, like you’re unveiling a surprise.
– Carefully detach the motherboard assembly from the metal casing, as if you’re removing a cherished photo from its frame.
Step 41
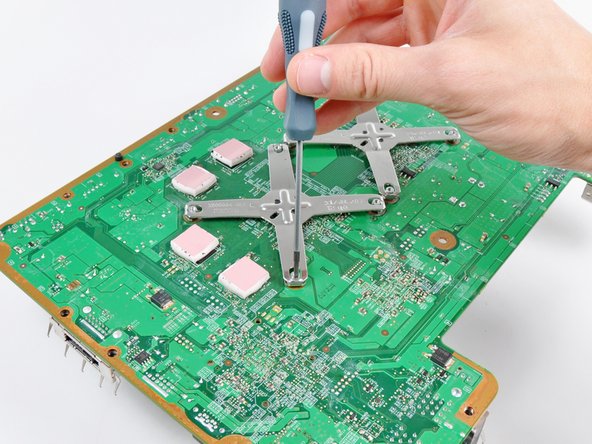
– Gently slide the tip of a small flathead screwdriver between the X clamp and its trusty retaining post on the heat sink.
– Carefully pry the X clamp away from its post until it pops up above the little groove that’s been cut into the retaining post.
Step 42


As you gently lift the last corner of the X clamp with the motherboard flipped upside down, make sure to catch that GPU heat sink! We wouldn’t want it taking an unexpected tumble and getting hurt. You’ve got this!
Now, let’s give those corners some love! Repeat this process for each corner of the X clamp.
– Slide your screwdriver in smoothly, right between the X clamp and its trusty retaining post, just like a pro.
– Give that screwdriver a little twist to set the X clamp free from its post. You’re doing great!
Step 43

And that’s it for the fourth arm of the X-clamp! We’re almost there! You’re doing great!
– Let’s get that X clamp back on! Start by hooking two of its corners onto the heat sink posts.
– Now, hold the third arm down against its post. Grab a small flathead screwdriver and gently pry the X clamp away from the post.
– Keep pressing down on the arm as you pry. You’re aiming to “walk” it down into that groove on the post. Nice work!
Step 44

Alright, before you slap that GPU heat sink back on, let’s give it a fresh coat of thermal paste for optimal coolness!
Need to reattach the heat sink to the motherboard? No worries! Check out our super helpful thermal paste guide for a smooth and simple way to swap out that thermal compound.
Step 45


When you’re removing the last corner of the X clamp, don’t forget to hold onto the motherboard with the underside facing up and catch that CPU heat sink – we don’t want it to take a tumble and get damaged!
If you find yourself in need, gently slide your screwdriver in parallel to the motherboard, right between the X clamp and its trusty retaining post. Give it a little twist to set the X clamp free from its post.
Now, just repeat this for all four corners of the X clamp, and you’ll be on your way!
– Let’s get that CPU heat sink off! Gently slip the tip of a small flathead screwdriver between the X clamp and its retaining post on the heat sink.
– Time to give that X clamp a little nudge! Carefully pry it away from the retaining post until it’s lifted up and over the little groove in the post.
– Now it’s time to say goodbye to that heat sink! Remove it from the motherboard and get ready for the next step!
Step 46

Take your time removing that old glue! Those processors are super sensitive, so be careful not to damage them. If you accidentally break something, you might need to get a whole new motherboard. But don’t worry, we’ve got you covered! You can always schedule a repair if you run into any trouble.
When installing the red ring of death fix kit, don’t even think about reusing those X-clamps – they’re one-time wonders.
To get rid of old thermal paste, use a trusty solvent like ArctiClean. It’s like a magic eraser for your device’s thermal mess. Alternatively, high-purity rubbing alcohol will do the trick.
Or, if you’re feeling old-school, grab a classic dry-deoxidating spray. Spray, rub, and voilà – the old paste is gone, leaving no residue behind.
Now’s the perfect time to give those heat sinks some TLC. Clean out any dust that’s accumulated between the fins, and get ready for a smoother, cooler ride.
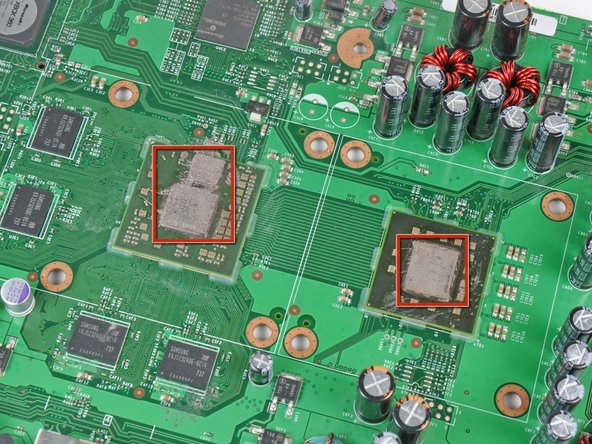
– With the heat sinks liberated from both processors, grab a trusty plastic spudger and gently wipe away all that old thermal paste gunk from the processors and the inner surfaces of the heat sinks. Give them a good clean for that fresh start!
Step 47

Before diving deeper into the repair journey, let’s take a moment to reflow the solder on the motherboard. This little trick boosts your chances of fixing those pesky red ring failures and it’s easier than you might think! All you need is a heat gun, and we’ve got a guide that will walk you through it effortlessly.
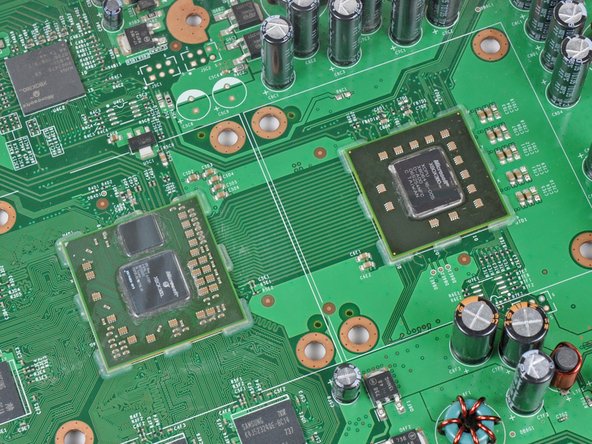
– Once you’ve given everything a good clean, the surfaces of the heat sinks and processors should be looking sharp and ready to go, just like in the picture!
Step 48

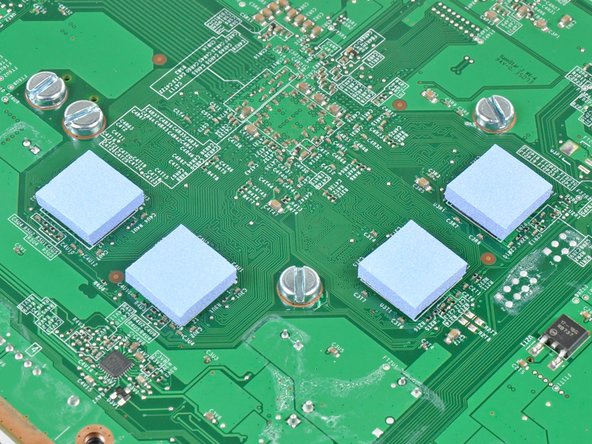
If your motherboard doesn’t have RAM chips on the bottom, like the one shown, you can skip ahead to the next step – you’re one step closer to getting your device up and running!
– Alright, let’s flip that motherboard over! Get ready to take off those four silicone thermal pads clinging to the RAM chips on the underside. Those pads are just holding the RAM chips snug, so don’t worry about messing anything up.
Step 49

– Alright, champ, time to get those X-clamp posts outta there! Grab the included screwdriver and use the 1/4″ socket drive end (no bit needed). Give those four posts on both the CPU and GPU heatsinks a gentle twist, and they’ll come right off. Easy peasy, right?
Step 50

Never used thermal paste before? No worries, we’ve got you covered! Our guide makes it super easy to apply.
– Let’s give those red-hot areas a little taste of that sweet, sweet thermal paste. Nice and thin, just like how we like our pizzas!
– Now that our processors are feeling nice and pasty, let’s reunite them with their heat sinks. One by one, just like in those heartwarming reunion videos. We started with the CPU heat sink, you know, gotta show the CPU some love.
Step 51


When you’re attaching that CPU heat sink, make sure the fins are lined up with the air flow from the fans (just like in the third picture). If the flat side of the fins is perpendicular to the air flow, your Xbox 360 is gonna get way too toasty!
The order of the washers is super important, so don’t put that metal washer on first.
Hey, this step is done with the motherboard out of the main case. No worries, this is pretty standard.
Go ahead and give those screws a good tightening. We want to get those heat sinks snug against the processors – think of it like a friendly hug for your tech! If you need help, you can always schedule a repair.
– Start by sliding a machine screw through each of the four little holes surrounding the CPU heat sink, making sure the heads are on the back side of the board – that’s where the magic happens!
– Now, while keeping a firm grip on those screw heads, add a nylon washer followed by a metal washer on top of the threads. It’s like giving your screws a fashionable outfit!
– Grab your large flathead screwdriver bit and get to work tightening those screws into the CPU heat sink. First, give the four screws a light snug in an X-shaped pattern, just like a dance routine. Then go back and give them a solid torque in the same X-shaped sequence. You’ve got this!
– No need to stop there! Do the same fun routine for attaching your GPU heat sink. Let’s keep that momentum going!
Step 52


Don’t worry about wrinkling or peeling up the adhesive, just take your time and be gentle.
– Time to get started! Use the edge of your trusty small flathead screwdriver or another thin, sharp object to gently pry up a corner of the blue or white plastic sheet covering the adhesive on the bottom of both heat sinks.
– Now, carefully peel the protective sheets off the adhesive on both heat sinks. You’re making great progress!
Step 53

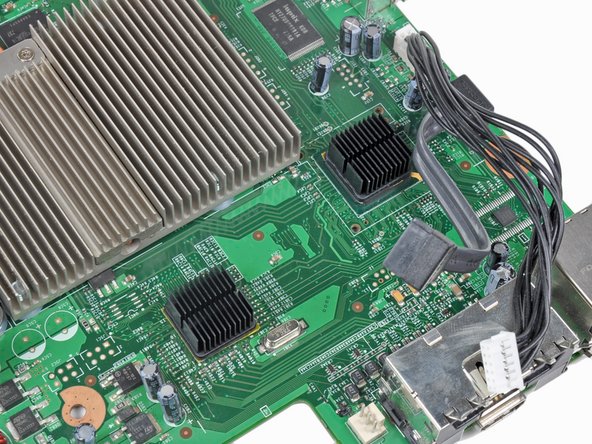
– Give those two red chips a little wipe-down with a clean cloth. We’re just sprucing things up!
– Now let’s stick those heat sinks on top of the two red chips. Make sure the fins are lined up just like the second picture. Nice and neat!
– When you’re putting the optical drive back in, keep an eye on those power and SATA cables. We don’t want them bumping into the heat sink near their sockets on the motherboard. No need for a party crasher!
Step 54


Chill out! If you see that your motherboard has RAM chips hanging out on the bottom, you can skip applying thermal pads. You’re a rockstar!
– Let’s get started by removing the clear and colored plastic backing material from all four thermal pads. This is a great opportunity to get familiar with the internals of your device.
Step 55


Heads up! The thermal pads in your kit might be rockin’ some slightly different colors than the ones in the pics, but no worries, they’ll still do the job just fine.
– Time to put your device back together! Just retrace your steps from Step 42 and you’ll be golden.
– If you hit a snag, don’t hesitate to schedule a repair for some expert help.
– You’ve got this!
Success!