Xbox One Elite Controller Repair Guide
Duration: 45 minutes
Steps: 16 Steps
Having trouble with your triggers not vibrating? It’s possible that your trigger rumble motors are on the fritz. Luckily, replacing your trigger assembly – including the triggers and rumble motors – is a doable task. To get started, take a look at our Soldering Iron Guide for tips on how to safely detach and reattach the wires of the rumble motors to the motherboard. If you need help, you can always schedule a repair.
Step 1

Handle the cover delicately to avoid snapping those tiny plastic tabs that are keeping it snug to the controller!
– Flip that controller over so the buttons are chilling face down.
– Now, gently slide that battery cover up in the direction of the arrow. We don’t want to scratch anything, so be careful!
Step 2


– Let’s get started by removing the two AA batteries. Simply lift one end and gently pull them out.
Step 3


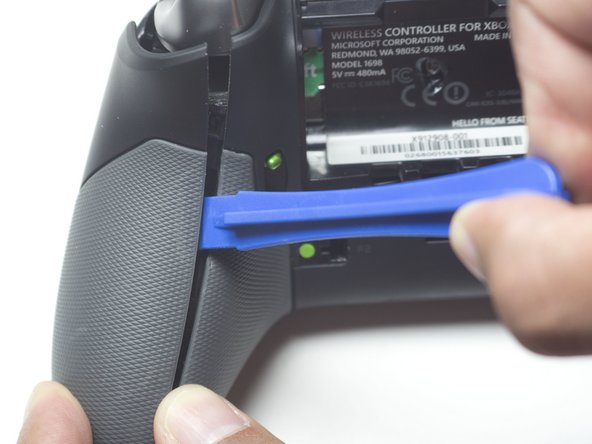
Be gentle when handling the plastic tabs that keep each grip cover securely attached to the back of the controller, we want to keep everything intact.
– Let’s get started by removing each grip – simply insert the plastic opening tool near the top of the controller and gently work your way around.
– Now, guide the plastic opening tool along the entire seam, using a smooth prying motion to separate the grip from the controller as you go.
Step 4


Check it out! You’ll find four screws nestled at the bottom tip of each grip and another pair hanging out at the top near the controller’s triggers. They’re just waiting for you to give them some attention.
And don’t forget the last screw! It’s hiding in the center of the battery tray, patiently waiting beneath a sticker. Just peel it back gently, and you’ll be all set!
– Let’s start by grabbing that trusty TR8 Torx Security screwdriver and carefully unscrewing those five pesky 2.3 mm screws. You’ve got this!
– Now, take that same TR8 Torx Security screwdriver to gently poke through the sticker and tackle that last screw. Almost there!
Step 5


– First things first, flip that controller over so the buttons are facing up—this will keep those pesky vibration motors from jumping ship! 🎉
– Next up, gently lift the bottom of the D-pad and pull it off like you’re unwrapping a present. Don’t worry, it’ll come off easily!
– Now, it’s time to say goodbye to the entire plastic faceplate. Just give it a gentle tug upwards; it should pop off in no time!
– Last but not least, grab those thumbsticks and give them a little tug from the top. They’ll come off smoothly, just like magic!
Step 6


Take a moment of caution in the next step when you’re gently separating the main assembly from the backplate. There’s a ribbon cable connecting these two buddies that needs to stay in one piece. Handle with care!
The backplate can get a bit stubborn when it comes to the port at the bottom, so be prepared to use a little gentle prying motion to set it free.
– Let’s kick things off by carefully taking out the tiny black mode switch from the front of your controller. It’s a small move, but it sets us up for success!
– Now, gently pry off the backplate from the main assembly. Just a little pull, and they should come apart like old friends reuniting. Easy peasy!
Step 7

Hey there! That tiny ribbon cable is the lifeline connecting your back cover to the controller’s inner workings. To gently detach it, just flip up the black lever located on the opposite side of the connector from the cable. Easy peasy!
– Grab your trusty tweezers and gently unplug the ribbon cable located on the side that’s nearest to the back cover. Just remember to pull the cable parallel to the circuit board’s surface, and you’ll be golden!
Step 8


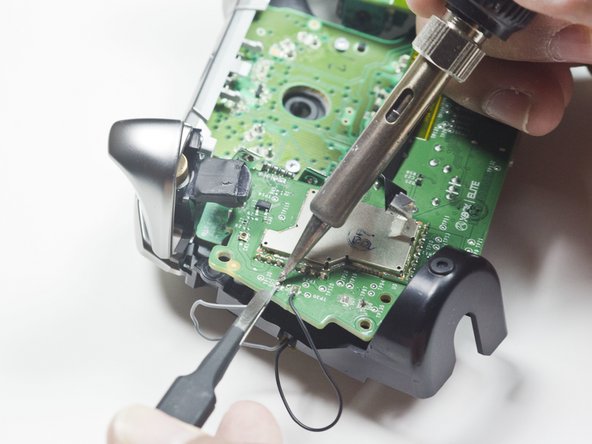
Make sure to note where those red and black motor wires are attached, so you can hook them back up in the same spot later.
This will set the rumble motor free from the controller assembly – nice work!
– Let’s get started by labeling each motor based on where it’s supposed to go – those rumble motors can be a bit finicky, so make sure to keep track of which is which.
– Flip that controller over so the thumbsticks are facing downwards – it’s time to get a little hands-on.
– Now it’s time to get out your trusty tweezers and soldering iron – if you’re not feeling confident, don’t worry, you can always schedule a repair – and carefully remove the black and red wires from the motherboard. Take your time, and remember to check out our Soldering Iron Guide if you need a refresher.
Tools Used

Step 9


Handle those four wires connecting the motherboard to the buttons with care—let’s keep them intact and happy!
– Let’s get started by removing the two T6 7mm screws located just above the rumble motor housing using a T6 Torx screwdriver. Take your time and make sure they’re completely out before moving on to the next step.
Tools Used

Step 10

Grab the Soldering Iron Guide for a handy assist on taking off and putting on those wires. You’ve got this!
Make sure to remember where those grey and black motor wires connect. They’ll need to go back in the same spots, so keep it organized!
– Time to get up close and personal with those wires! Use your trusty soldering iron to carefully desolder the four wires connecting the top and bottom motherboards to the buttons, and then gently remove them.
Tools Used
Step 11

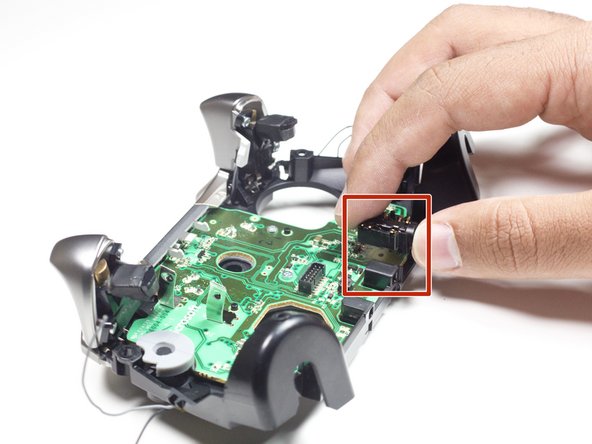
Watch out for that tiny 9mm audio jack housing lurking beneath the main motherboard! It’s a little sneaky and loves to hide, so keep an eye on it to ensure it doesn’t go MIA.
– Time to get started! Carefully pull the top motherboard upwards to remove it.
– Next, gently lift the small 9mm audio jack from the motherboard – it’s easier than you think!
Step 12


– Grab your trusty T6 Torx Screwdriver and let’s get those four T6 7mm Torx screws out of there! You’ll need to remove two screws from each trigger on the trigger assembly. Easy peasy!
– Now, gently lift the plastic trigger piece while simultaneously pulling down the spring mechanism. They’ll separate like old friends parting ways!
Tools Used
Step 13

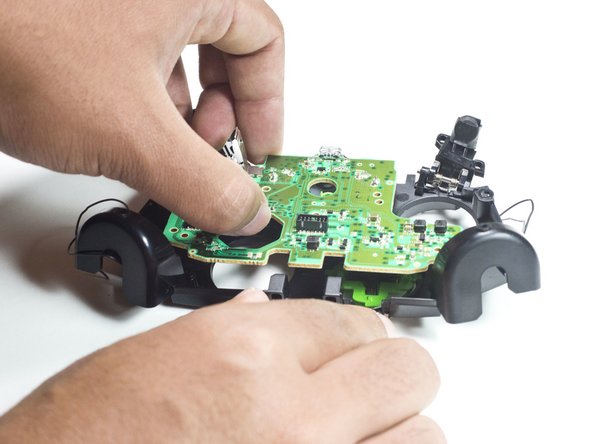
– Grab your T6 Torx Screwdriver and get ready to tackle those six T6 7mm Torx screws that are keeping the bottom motherboard snugly attached to the plastic frame of the controller. Let’s get to unscrewing!
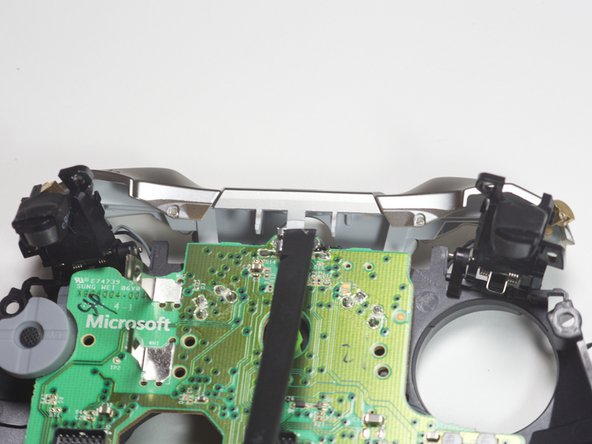
– Next up, take your trusty plastic spudger and gently work on freeing the silver assembly that holds the right and left bumpers. Just lift the plastic tab near the charging port of the Xbox, and you’ll be on your way!
– With a careful touch, slowly lift the bottom motherboard up and towards yourself. You’re doing great, keep it steady!
Tools Used
Step 14


– Gently pry off the little green plastic piece by lifting it away from the silicone that’s keeping it snug.
– Carefully pull upwards to remove the soft grey silicone covering the buttons. It’s easier than it sounds!
Step 15

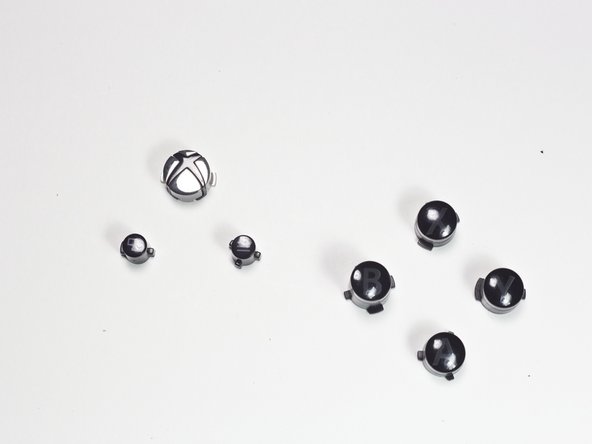
Each button has its own special shape, so it can only fit in one way. You got this!
– Let’s get started by removing each button one by one – you should have a total of seven buttons to take out. Just gently pull each one out to release it.
Step 16


Make sure to take a mental note – or a real note, we won’t judge – of where those grey and black motor wires are attached, because you’ll want to reconnect them the same way later on.
– To put everything back together, just work your way through these steps in reverse – easy peasy!
– If you didn’t quite get it done, no worries! You can always schedule a repair and let the pros handle it.
– You’re all done! Pat yourself on the back, you’ve successfully completed this repair guide from Salvation Repair.
Tools Used
Success!

