Xbox One Heat Sink Replacement Guide: Step-by-Step DIY Tutorial
Duration: 45 minutes
Steps: 37 Steps
Remember, separating the heat sink from the CPU means you’ll need to refresh the thermal compound. Don’t worry, it’s an easy step! You’ll just need to clean off the old paste and apply some new thermal goodness. Check out our guide for a quick walkthrough on how to get it done.
Thinking it’s time to amp up your cooling game or swap out that not-so-great heat sink? Dive into this guide to swap the heat sink in your Xbox One! Just a heads up: disconnecting the heat sink from the CPU will mess with the original thermal compound. So, make sure you clean it off and slap on some fresh thermal paste afterward. Check out the guide for all the details on how to do that!
Step 1

– Alright, time to crack open your Xbox! Go ahead and carefully cut or peel away that pesky tamper-evident tape. No worries about your warranty— Microsoft won’t void it as long as you’re gentle with everything inside. Enjoy the adventure!
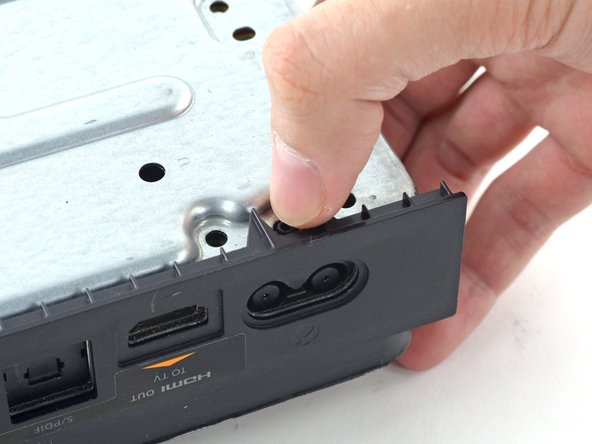
Step 2


– Grab your trusty plastic opening tool and gently wiggle it to lift off the plastic vent around the side USB port.
– This vent is surprisingly flexible and held on by some pretty weak plastic clips—so start from the back and peel it away like a pro.
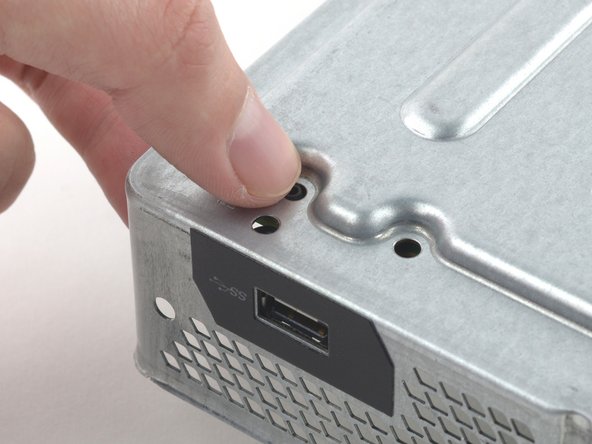
Step 3


There’s a nifty little plastic tab that adds support to that front corner of your Xbox. It may be small, but it’s doing some serious heavy lifting!
– Gently slide that tab straight back and pop it out like a pro!
Step 4


Get ready to wrestle with a stubborn plastic clip that’s holding the two case halves together – it’s the first of many, so be prepared to use some elbow grease!
Keep that spudger in place until you’ve fully opened the case. These clips are super springy, so they might try to snap the case shut on you while you’re working – stay on your toes!
– Slide the flat end of a spudger between the upper and lower case where they meet at the rear of the side vent opening. You’re gonna rock this, champ!
Tools Used

Step 5


The connection between the upper and lower halves is held tight by a bunch of clips running along the back and sides of the Xbox. Just a little finesse and you’ll be on your way! If you need help, you can always schedule a repair.
– Slide a trusty plastic opening tool between the upper and lower case to gently unclip that rear vent. You’ve got this!
Step 6


– Keep cruising along the back of the Xbox, popping those clips up. You got this!
Tools Used
Step 7


Once you’ve made your way to the far end of the rear case, it’s showtime for the top case to make its grand exit! If it’s feeling a little stubborn, grab your trusty plastic opening tool and gently run it around the corner. A little nudge should help pop those clips along the side that isn’t home to the USB port. You’re doing great—keep it up!
– Keep those clips popping! A little slide of the plastic opening tool across them can really do the trick.
Step 8


Hold your horses! The upper case is still hanging on by the front panel button cable, so let’s not try to remove it just yet.
Grab a trusty plastic opening tool and gently nudge those pesky clips that might still be hanging on for dear life.
– Grab that trusty spudger you left in the crack and give the upper case a gentle pry to pop those last few clips free!
– Now, lift the upper case just a tad and slide it over a bit to reveal the front panel board waiting for you.
Tools Used
Step 9


The front button cable features a special ZIF connector—so keep your eyes peeled and follow the next steps closely to disconnect it safely!
– Grab those tweezers and gently pop the blue plastic retaining loop over the white connector on the board. You’ve got this!
– Next, take the spudger and carefully nudge the locking tab of the connector towards the cable to release it. Easy-peasy!
Tools Used
Step 10


– Grab those tweezers and gently coax the cable right out of the connector on the board – it’s just a little shy!
– Now, let’s give that upper case a little lift and carefully remove it.
Step 11


– The next four steps are all about putting things back together. Feel free to skip them if you’re still in disassembly mode!
– Grab your trusty spudger and use its flat end to gently pop free the clips holding the front panel to the upper case.
– Carefully lift the front panel away from the upper case. You’re doing great!
Tools Used
Step 12


– Swap out the top section of the upper case, it’s time for a change!
– Align those clips just right and give them a good press around the edges to secure them snugly in place.
Step 13


– Gently support the front panel at the front of your Xbox, like you’re giving it a little hug.
– Grab those tweezers and carefully replace the front button cable into its ZIF socket. Precision is key!
– Now, take the flat end of your trusty spudger and slide it to the left to lock that ZIF cable in place. You’ve got this!
Tools Used
Step 14


At the bottom edge of the front panel, you’ll find some nifty plastic hooks that snugly connect with their buddies on the lower case’s front edge. Just a little teamwork to get everything in place!
– Hold the front panel at a fun 45-degree angle and connect its plastic hooks with the ones on the lower case. It’s like a little puzzle piece coming together!
– Now, gently push the top of the front panel into the Xbox, just like you’re closing a mailbox. Give it a firm press to make sure those clips are snug and secure, locking everything in place!
Step 15


Hey, when you’re pulling on that cable, make sure you grab the connector end, not the part that’s attached to the board. That connector can be a little delicate, and if you’re not careful, you might accidentally yank it off the board. We wouldn’t want that, right?
– Carefully lift the speaker cable connector to release it from the front panel board – it’s like freeing a tiny cable from its cozy home!
– Use the trusty flat end of a spudger to gently coax the antenna cable away from the front panel board. You’re making great progress!
Tools Used
Step 16


– Unscrew those two 9.5 mm T8 Torx screws from the Wi-Fi board. Easy peasy!
– Now, gently lift the Wi-Fi board straight up from its cozy spot in the upper metal case.
– Keep that Wi-Fi board antenna cable snug in place, and slide the Wi-Fi board to the side. Ta-da! You’ve exposed the screw marked ‘C3’ hiding underneath.
Step 17

– Alright, time to loosen things up! Use your trusty Torx T10 screwdriver to remove those eight 65 mm screws from the top of the upper metal case. You got this!
Step 18


The Wi-Fi board interconnect cable is like the friendly bridge connecting the upper metal case to the motherboard. It’s essential for your device’s connectivity!
– Gently lift the upper metal case, but don’t remove it just yet.
Step 19


Let’s get started by removing the upper metal case.
– Time to say goodbye to the Wi-Fi board interconnect cable! Gently disconnect it from the motherboard and keep moving forward.
Step 20


– Alright, let’s give those SATA cables a little break! Unplug the power and data cables that connect the hard drive to the motherboard. It’s like giving them a little vacation.
Step 21

– Gently lift out that hard drive tray from your Xbox, like you’re unveiling a hidden treasure!
Step 22


– Unplug those cables from the optical drive like a pro! Gently detach the power and SATA data cables from the motherboard. You’re one step closer to a smooth repair.
Step 23

– Gently take out the optical drive assembly from your Xbox. It’s like giving it a little hug and saying, ‘Time for a break!’
Step 24

– Gently lift that motherboard assembly out of the lower case like you’re unveiling a surprise! You’ve got this!
Step 25

– Let’s get started by removing the three 9.5 mm T9 Torx screws that hold the front panel board in place. Grab your trusty screwdriver and carefully take them out.
Step 26

– Gently detach the front panel board from its cozy socket on the motherboard. You’ve got this!


Step 29

Now it’s time to flip that lower metal frame and motherboard assembly over, so it rests nicely on the fan. Let’s get this done!
– Let’s get started by removing the screws from the bottom of the lower frame. This is where the magic happens!
– First, take out the four 11.2 mm T10 Torx screws – they’re holding everything together down there.
– Next, remove the four 9.5 mm T9 Torx screws. You’re making great progress, and your device is one step closer to being good as new.
Step 30

You’ll notice two tiny plastic plugs sticking out from the back metal case—one is hiding under the side USB port, and the other is tucked beneath the AC input port. These little guys can snag on the lower metal case, making it a bit tricky to lift out the motherboard. Just take your time, and if things get too tough, you can always schedule a repair.
– Now it’s time to get those plugs through the lower metal case – gently push them on through!
Step 31

– Time to give that motherboard and heat sink/fan assembly a little lift! Gently lift it out of the lower metal case. You got this!


Step 33


– Slide the tip of a small flathead screwdriver between the post and the outer edge of one arm of the X-clamp. No pressure, just a gentle nudge!
– Carefully twist the screwdriver to lift the arm of the X-clamp off the post. It’s like a little dance—smooth and easy!
Step 34


– Give that X-clamp a little spin to loosen up another arm from its post, and feel the smoothness!
– Now it’s time to say goodbye to the X-clamp—remove it with a smile!
Step 35


– Time to give that motherboard a little lift off the fan/heat sink assembly. Gently does it!
– Now, when you’re putting everything back together, don’t forget to check out our handy-dandy thermal paste guide! It’ll help you give your CPU a nice, cool hug. schedule a repair
Step 36


– Grab your trusty plastic opening tool and gently wiggle it to pop those two clips on one side right out of the channel next to the heat sink. You’ve got this!


Success!

