Xbox One S Optical Drive Replacement Guide – DIY Tutorial
Duration: 45 minutes
Steps: 13 Steps
Alright, let’s get this party started! We’re about to give your Xbox One S a fresh new optical disc drive. This means no more sad, lonely game discs. You’ll be back to playing in no time. To tackle this, we’ll need a screwdriver (think Torx Security) and a slim pry tool. Don’t worry, this isn’t brain surgery, but it’s a good idea to take your time and be gentle. If you’re feeling a bit nervous, don’t forget that you can always schedule a repair. Some light soldering might be in store for the drive’s wires, but we’ll get through this together.
Step 1

– Turn the Xbox One S upside down so that the bottom side is facing up. You’ve got this!
Step 2

Heads up! Those little clips holding the bottom on can be a bit fragile. Be extra careful when you’re taking it off. If you need help, you can always schedule a repair.
As you gently pry the case open, you might hear some clicking sounds—don’t worry, it’s just the case saying hello! Getting that bottom piece off can be a bit of a workout, but you’ve got this!
Start your adventure at the back, right where the warranty sticker likes to hang out. Work your way along the rear edge until all the clips are free. Next, tackle each side like a pro! Once three sides are freed up, begin at the front end opposite the sync button. Take your time and be careful—it’s like a dance, and with a little patience, everything will come apart smoothly, leaving no bumps or scratches in the process!
– Kick things off by focusing on the back of the case where that pesky warranty sticker hangs out. Slip the plastic opening tool into the sweet spot between the bottom of the case and the cool, grated top side. Keep your eyes peeled for the clips that are holding the case snugly in place. Use that trusty opening tool to gently pop those clips out. The smoothest move here is to pry the black case away from the bottom, just like a pro!
– Grab your opening tool and get ready to pop those clips out! Remember, the best approach is to gently pry the black case away from the bottom. You’ve got this!
Step 3

– Now that you’ve popped all the clips open, it’s time to gently lift off the bottom part of the case. You’re doing great!
Step 4


– Let’s get started by removing the six green 50 mm long screws from the metal case labeled F1 through F6 – grab your trusty T10 Torx screwdriver and get to work!
Step 5


– Carefully wiggle the interior case away from the bright white exterior case using the right approach.
– Gently push the white plastic edges outward at the back to detach from the plastic I/O shield.

Step 7

– To get inside, simply pop and lift the top panel of the casing – it should come off easily.
Step 8


Get ready to liberate that plastic casing around the hard drive! It’s time for it to break free from the console’s grasp.
Keep in mind, some models might just need a little extra love with C4 and C5.
– Alright, let’s get that hard drive swapped out! First, gently flip your console over. Now, it’s time to tackle those two 10 mm T-10 Torx screws, C3 and C5, located on the back of your Xbox One S. You’ve got this!
Step 9


– Time to give that hard drive a little break! Carefully unplug it from the motherboard by gently pulling apart the two plastic connectors.
Step 10

– To kick off this repair, let’s start by removing the optical disc drive. Begin by taking out the silver 10 mm T-10 Torx screw labeled ‘C4’ – it’s time to set that drive free!
Step 11

– Gently pull the disc drive away from the motherboard. Then, unplug those plastic connectors from the motherboard. You got this!
Step 12
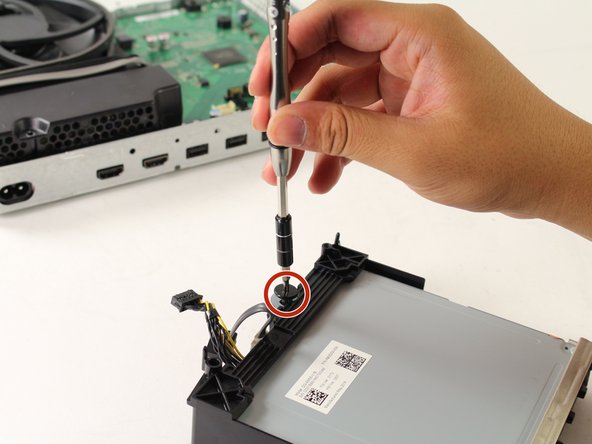
– Alright, let’s get this party started! First, we need to remove that little black Torx screw from the bottom of the optical drive. It’s hiding down there, looking all mysterious and important, but don’t worry, we’ll get it out in no time.
Step 13


If the situation calls for it, feel free to grab some plastic opening tools to gently pop those connectors off the drive.
– Time to put your device back together! Just retrace your steps and follow these instructions in reverse. You’ve got this!
– If you’re feeling a bit stuck along the way, remember, it’s totally okay to ask for help. You can always schedule a repair.
– Your device is just a few steps away from being as good as new!
Success!

