Xbox One X Power Supply Replacement: Step-by-Step DIY Guide
Duration: 45 minutes
Steps: 25 Steps
Hey there, techie! Ready to swap out your Xbox One X model 1787’s power supply? You’re in the right place! This guide will walk you through it step-by-step. This is a super common repair if you’re having issues with your console’s power. Don’t worry, we’ve got your back. Just make sure your console is powered off and all cables are unplugged before we get started. And hey, remember to be careful with static electricity. It’s a real buzzkill for electronics! Let’s get this done. If you need help, you can always schedule a repair.
Step 1


Before you dive in: Make sure to power down your device and unplug any cables from the console to get started on the right foot.
– Grab your trusty tweezers and gently peel back the sticker covering the right-side screw on the back of the console. You’ve got this!
Step 2

– Grab your trusty T10 Torx screwdriver and take on those two 12.6 mm-long screws chilling on the back of the console. You’ve got this!
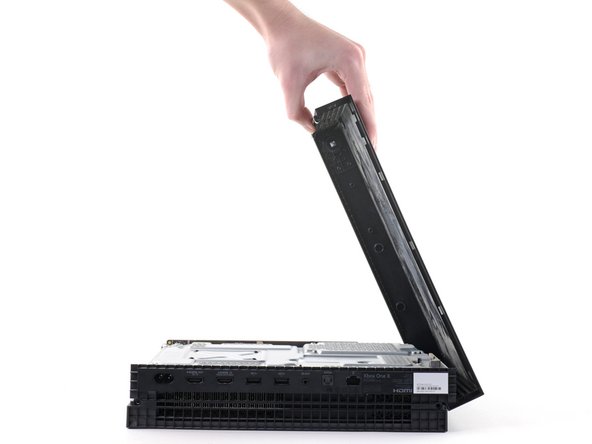
Step 3


– Give that console a nifty 90-degree twist!
– Now, gently tug the front of the upper plastic case towards you until it hits a little stop. This will help slide those pesky clips out of their cozy slots on the upper plastic case.
Step 4


– Give that console a little twist, rotating it 90 degrees until the back is looking right at you.
– Now, gently lift the left side of the upper plastic case (that’s from the back of the console’s point of view) and stop when it feels like it’s reached its limit.
Step 5


If pushing up on the case isn’t doing the trick, give it a whirl by trying different angles until it swings open smoothly.
– Keep that left side of the upper plastic case steady! Now, gently nudge the right side up to clear the screw boss out of your path.
– Now, swing that upper plastic case open to a cool 75 degrees!
Step 6


– Gently push the upper plastic case down and away from the console until it’s free and clear!
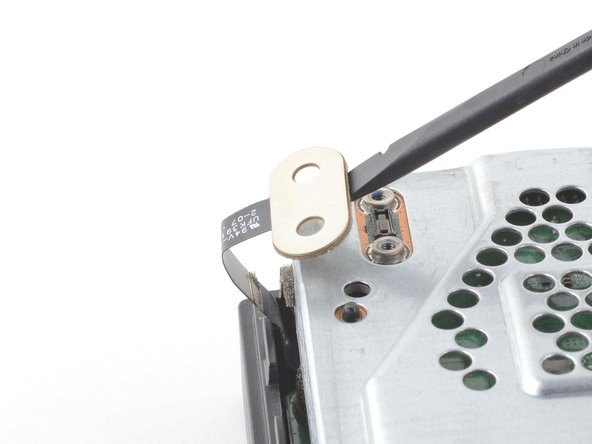
Step 7


– Grab your trusty spudger, or even your fingernail if you’re feelin’ fancy! Gently flip down that little hinged locking flap on the ribbon cable’s ZIF connector found on the front circuit board. Easy peasy!
Tools Used

Step 8

– Gently grab the ribbon cable with some blunt tweezers and carefully pull it downwards, easing it out of the connector.
Step 9

– Let’s get started! Use a T8 Torx screwdriver to carefully remove the three 13.3 mm screws that hold the front circuit board in place inside the upper metal case. Take your time and make sure they’re all out before moving on to the next step.
Step 10


Hold onto the board gently on both sides where it’s plugged in to keep it safe and sound. We wouldn’t want it to get all bendy and sad!
– Gently pull the front circuit board straight out from the upper metal case and place it to the side like a pro.
Step 11

– Grab your T10 Torx screwdriver and let’s take off those six 47.7 mm screws that are holding the upper metal case snug against the lower plastic case. You’re doing great!
– Now, switch to your T8 Torx screwdriver and gently remove the two 7.5 mm screws that are keeping the press connector attached to the upper metal case. Keep it up, you’re almost there!
Step 12

Be careful not to push the spudger too far into the socket – you don’t want to accidentally damage it!
– Slide the flat end of your spudger under the press connector on the side that’s opposite the ribbon cable. Nice and easy!
– Gently lift that press connector up and away from the upper metal case using the spudger. You’re doing great!
– To get those press connectors back in action, carefully align one side and give it a gentle press until it clicks. Then do the same on the other side. Avoid pressing down in the middle—trust me, your pins will thank you! If it goes a bit wonky, they might bend and that’s a no-go for lasting damage.
Tools Used
Step 13


Keep a good grip on that bottom plastic case; it’s decided to part ways with the metal one!
– Alright, let’s flip that console over, shall we?
– Now, gently lift the lower plastic case away from the metal frame and set it aside like the star it is!
Step 14

– Let’s get those two T10 Torx screws out of the way, shall we? Start by unscrewing the ones that are holding down the lower metal case:
– One of them is a snazzy 7.7 mm screw.
– And the other one? It’s an 11.4 mm screw, ready to be freed!
Step 15

As you work on this step, be ready! The disc drive might try to pop up along with the lower metal case. Just give it a gentle nudge to keep it down!
– Gently lift the lower metal case up and away from the upper metal case and its inner workings. You’re doing great!
– Now, go ahead and set the lower metal case aside to give yourself some space to work.
Step 16

When flipping your console over, make sure to hold onto that disc drive! It’s just connected to the motherboard by a couple of cable connectors, so give it a little hug to keep it safe from any accidental bumps.
– Let’s get started by flipping the console over – it’s time to get a little hands-on!
– Now, grab your trusty T10 Torx screwdriver and use it to remove the screws that hold the power supply and fan in place within the upper metal case:
– You’ll need to remove two 11.4 mm screws – they’re the first to go!
– Next, remove two more 11.4 mm screws – we’re making progress!
– Finally, take out one last 11.4 mm screw, and you’ll be one step closer to fixing your device. If you need help, you can always schedule a repair
Step 17


The disc drive is connected to the motherboard! Keep those wires nice and straight—no need to twist and shout them around too much, or they might get a little cranky!
– Let’s turn that console upside down, shall we?
– Gently lift the disc drive so its little metal tab can break free from the power supply’s grip.
– Now, place the disc drive on the shiny upper metal case, right above the hard drive. Make sure there’s enough room to easily unplug the power supply from the motherboard. You’ve got this!
Step 18


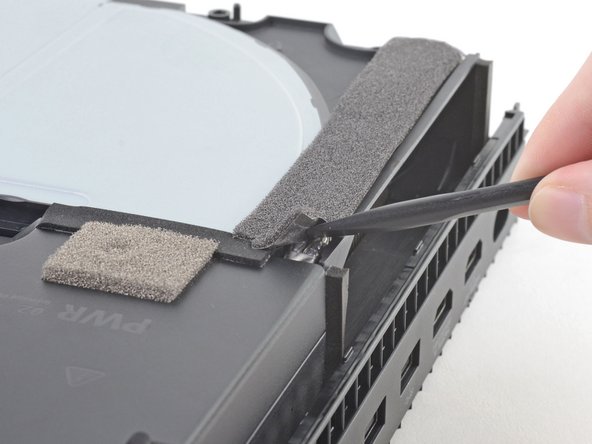
Carefully remove the spudger, being mindful of the two grey cables hiding under the foam tape. Let’s avoid any accidental damage to these cables, okay?
– Start by sliding the flat end of your trusty spudger underneath that dark grey foam tape—beginning from the corner nearest to the power supply and the edge of the console. You’ve got this!
– Now, gently lift that corner up like you’re unveiling a surprise.
– Take your time and carefully push the spudger through to the other side of the tape until you see the flat end pop out. Easy peasy!
Tools Used
Step 19


Need a little extra room to work with that disc drive? No problem! Just give it a nudge away from the power supply. We’ve got this.
– Carefully lift the power supply straight up to disconnect it from the motherboard. If you’re not sure, take a moment to double-check your work – we’ve got you covered!
Step 20


Be gentle with those cables, they’re delicate like a butterfly’s wing. Don’t go pulling or bending them too much, or you might make them sad.
– Gently raise the power supply so those cables can strike a perfect 90-degree pose!
Step 21


– While you hold that power supply high above the console like a champ, gently wiggle those two grey cables out of their cozy plastic hook on the fan case. You’ve got this!
Step 22

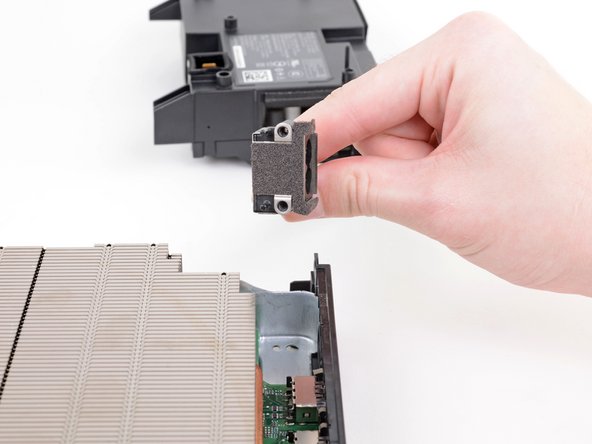
– Alright, let’s get this party started! First things first, set the power supply down on the table. You’re doing great!
Step 23


– Gently wiggle and pull the cable connector that links the fan to the motherboard straight up. You’ve got this!


Step 25

– Ready to put your device back together? Just do it in reverse, and you’re all set!
– Got some e-waste? Be a hero and take it to an R2 or e-Stewards certified recycler.
– Things not going as smoothly as you hoped? No worries! Check out some basic troubleshooting tips or connect with our awesome community for support.
– Oops! if you didn’t complete this guide, feel free to cancel and try again later.
– Remember, you’ve got this!
Success!
