ASUS ZenWatch Battery Replacement

Duration: 45 minutes
Steps: 4 Steps

Ready to give your ASUS ZenWatch a fresh start? This straightforward guide will help you swap out that tired or dead battery and get your watch ticking again!

Step 1

– On the strap, you’ll find a handy little knob. Give that knob a gentle slide towards the other side of the strap to loosen up the spring bar tension, and voilà—you can easily pull the strap out!

Step 2

– Grab your trusty T5 Torx driver and wiggle it to remove those four screws holding the case in place.

– With a little gentle pressure from your hands, the case should pop right off, like opening a well-loved book.
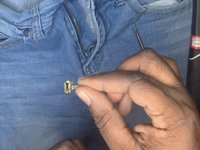
Step 3

– With your trusty tweezers in hand, carefully peel away the fabric that’s cozily shielding the battery connection.

– Grab that heavy-duty spudger and with gentle finesse, nudge the contact upwards towards the top of the case.

Tools Used
  1. TweezersASUS ZenWatch Battery Replacement

Step 4

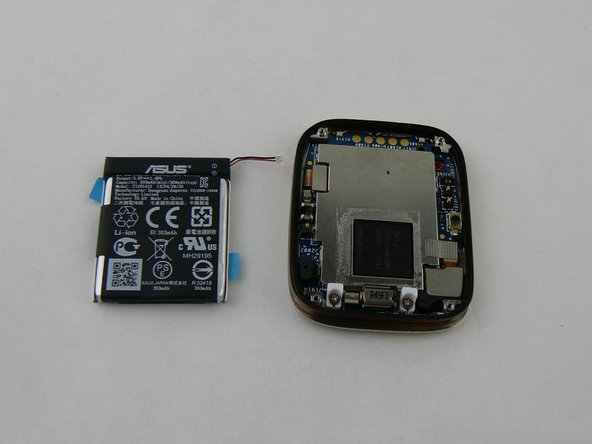
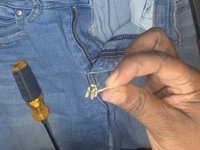
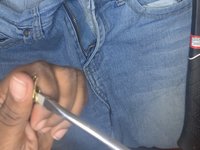
– Carefully nudge the battery upwards using those nifty plastic pry tools.

Success!
Now that you’ve put everything back together, just reverse those steps like a boss! If you hit any snags along the way, don’t hesitate to schedule a repair. You’ve got this!

Completely Revamped Macintosh Color Classic For Its 25Th Anniversary (Mac Mini Inside)

Macintosh Color Classic Repair

The Macintosh Color Classic was a groundbreaking all-in-one Macintosh computer released in the early 1990s, boasting a color display. This tutorial will guide you through the process of repairing your Macintosh Color Classic.

Macintosh Color Classic

Before starting the repair, make sure you have the necessary tools and replacement parts. It’s also essential to ground yourself to prevent static electricity damage to the computer’s internal components.

Macintosh Color Classic Internal Components

Step 1: Remove the Back Panel

To access the internal components, you need to remove the back panel. Use a screwdriver to remove the screws holding the panel in place. Gently pry the panel open, taking care not to damage any of the cables or components.

Macintosh Color Classic Back Panel Removal

Step 2: Disconnect the Cables

Once the back panel is removed, you’ll need to disconnect the cables connecting the internal components. Use a cable tie to keep the cables organized and out of the way.

Macintosh Color Classic Cable Management

Step 3: Remove the Logic Board

The logic board is the main circuit board of the computer. To remove it, you’ll need to disconnect the cables and screws holding it in place. Use a screwdriver to remove the screws, and gently lift the logic board out of the computer.

Macintosh Color Classic Logic Board Removal

Step 4: Replace the Faulty Component

Once the logic board is removed, you can replace the faulty component. Make sure to handle the components with care, as they can be easily damaged.

Macintosh Color Classic Component Replacement

Step 5: Reassemble the Computer

After replacing the faulty component, reassemble the computer in the reverse order that you disassembled it. Make sure all cables are securely connected, and the back panel is properly screwed in place.

Macintosh Color Classic Reassembly

Conclusion

Repairing your Macintosh Color Classic requires patience and attention to detail. By following these steps, you should be able to replace the faulty component and get your computer up and running again.

How To Fix Samsung Galaxy Phone Black Screen

Samsung Galaxy Phone Black ScreenHow to Fix a Samsung Phone with a Black Screen

If your Samsung phone’s screen is black, don’t panic! There are a few things you can do to try and fix the problem yourself. Here’s a step-by-step guide:

Block ImageStep 1: Check the battery

Make sure that your phone’s battery is charged. If the battery is completely drained, your phone may not be able to turn on. Try charging your phone for a few minutes and see if that solves the problem.

Samsung Phone Parts

Step 2: Check the display

If your phone’s battery is charged, the next step is to check the display. Look for any cracks or damage on the screen. If there is any damage, your display may need to be replaced.

Samsung Phone Screens

Step 3: Check the motherboard

If your phone’s display is not damaged, the next step is to check the motherboard. The motherboard is the central component of your phone and it can be damaged by water, heat, or physical impact.

iPhone Liquid Damage Repair

Samsung Phone Motherboards

Step 4: Contact Samsung

If you have tried all of these steps and your phone’s screen is still black, the next step is to contact Samsung. They may be able to help you diagnose and fix the problem.

Disassembling Hp Photosmart D110A Printer Hood

HP Photosmart D110a: Disassembling the Printer Hood

Here’s a step-by-step guide to help you disassemble the hood of your HP Photosmart D110a printer:

HP Photosmart D110a printer with mouth openStep 1: Open the Printer’s Mouth

Pull down on both sides of the printer’s mouth to open it.

HP Photosmart D110a printer with scanner flap removed Step 2: Remove the Scanner Flap

Lift the scanner flap up and pull it towards you to remove it.

HP Photosmart D110a printer with top screws removedStep 3: Remove the Top Screws

Use a T-9 screwdriver to remove the three screws on top of the printer.

HP Photosmart D110a printer with power button panel removedStep 4: Remove the Power Button Panel

Reach into the printer’s mouth and press the small clip behind the power button. Pull the power button panel out from right to left.

HP Photosmart D110a printer with fourth screw removedStep 5: Remove the Fourth Screw

Remove the screw that was covered by the power button panel.

HP Photosmart D110a printer with ribbon cables and wires removedStep 6: Remove the Ribbon Cables and Wires

Gently pull upwards on the ribbon cables and wires connecting the motherboard to the hood to remove them.

HP Photosmart D110a printer with hood liftedStep 7: Lift the Hood

Carefully lift the hood away from the printer and set it aside.

HP Photosmart D110a printer hood with screw removedStep 8: Remove the Screw from the Hood

Use a T-9 screwdriver to remove the screw on the underside of the printer hood.

HP Photosmart D110a printer hood separatedStep 9: Separate the Hood

Lift the top piece of the hood vertically to separate the two pieces.

HP Photosmart D110a printer hood with ribbon cables separatedStep 10: Separate the Ribbon Cables

Carefully pull down the white ribbon cable through the top piece of the hood and separate the two hood pieces connected by the black ribbon.

HP Photosmart D110a printer hood disassembledStep 11: Disassembled Hood

Congratulations! The printer hood is now disassembled into two pieces.

Need Help?

If you encounter any problems while disassembling the printer hood, don’t hesitate to schedule a repair with Salvation Repair. We offer a limited lifetime guarantee on all parts and labor, and we’re always happy to help you keep your printer running smoothly.

Samsung Galaxy A03S Screen Replacement Tutorial

Duration: 45 minutes
Steps: 14 Steps

Use this guide to swap out a cracked or broken screen on a US version Samsung A03s. We’ll be using a refurbished screen with the frame already installed. Before you dive in, inspect your new screen to see which tiny components are pre-installed. You can skip some steps if you’re using a screen with components already in place. Note: We’ll be transferring parts to a new screen and frame assembly. If your screen doesn’t come with the frame pre-installed, this procedure won’t work. Note: The US version of this phone is a bit different from the international version. You can still follow this guide, but some components might look slightly different. Note: For this repair, we’ll remove the battery and transfer it to the new screen assembly. If your battery is swollen, take the necessary precautions. Before opening your phone, discharge your battery to 25% or lower to avoid any potential hazards. If you need help, you can always schedule a repair.

Step 1

– Pop out the sim card like a pro! Just grab a sim card tool and gently poke it into the sim card tray hole. You’ve got this!

Step 2

– This back cover is held by plastic clips. Grab your opening tool and gently pop off the plastic cover.

– Be cautious when working near the power button. This button houses a fingerprint sensor connected with a ribbon cable to the back cover. Avoid cutting this cable while removing the back cover. If you need help, you can always schedule a repair.

Step 3

– There are 2 little plastic notches on the back cover that keep the power button snug and secure. Go ahead and disconnect the power button from the back cover, and you’ll be one step closer to your repair goal!

Step 4

– There are 18 screws holding the camera lens bracket and loudspeaker in place, and guess what? They’re all the same size! Grab your trusty Phillips screwdriver and get ready to remove those 18 screws. Let’s get that camera lens and speaker out!

Step 5

– Grab your trusty spudger and gently pry up the camera lens bracket and loudspeaker. You’ve got this!

Tools Used
  1. Spudger

Step 6

– Gently pry away the battery cable using a spudger, and let those connections breathe!

Tools Used
  1. Spudger

Step 7

– Grab your trusty spudger and gently disconnect that power button ribbon cable. Once that’s done, go ahead and take out the power button.

Tools Used
  1. Spudger

Step 8

– Grab your trusty spudger and gently disconnect that mainboard flex cable. You’ve got this!

Tools Used
  1. Spudger

Step 9

– Grab your trusty tweezers and gently disconnect the black antenna cable from both the mainboard and the charging board. You’ve got this!

Tools Used
  1. Tweezers

Step 10

– Grab your trusty spudger and gently lift out both the mainboard and charging board. You’re on the right track!

Tools Used
  1. Spudger

Step 11

– Grab a heat gun or some isopropyl alcohol and gently pop out that vibrate motor. If you need help, you can always schedule a repair

Step 12

– Give your volume button flex a little TLC with some heat or a splash of isopropyl alcohol to help it say goodbye!

Step 13

– Grab your trusty spudger and gently pry out that earpiece speaker like a pro!

Tools Used
  1. Spudger

Step 14

– Grab a hairdryer or heat gun and some isopropyl alcohol to loosen the battery.

– Take it slow and steady while removing the battery, avoid any battery poking.

– There’s quite a bit of adhesive under this battery, making it a challenge to remove. Slide a thin plastic card underneath to help lift that sticky mess.

Repairing A Mid 2009 Macbook Pro 13 Trackpad That Clicks But Won’T Register

Repairing a Trackpad that Clicks but Won’t Register on a Mid 2009 MacBook Pro 13″ Unibody

Is your MacBook Pro’s trackpad driving you crazy? It clicks, but nothing happens. Don’t worry, we’ve got you covered. In this tutorial, we’ll walk you through the steps to repair your trackpad and get it working like new again.

MacBook Pro 13

Step 1: Remove the Lower Case

To access the trackpad, you’ll need to remove the lower case of your MacBook Pro. Start by removing the 10 screws that secure the lower case to the MacBook Pro. Seven of these screws are 3 mm Phillips screws, and three are 13.5 mm Phillips screws.

Removing the lower case screws

Step 2: Remove the Battery

Next, you’ll need to remove the battery. Start by removing the two tri-point screws that secure the battery to the upper case. One of these screws is 5.5 mm, and the other is 13.5 mm.

Removing the battery screws

Step 3: Disconnect the Trackpad Connector

Use the flat end of a spudger to carefully pry the trackpad connector up from its socket on the logic board.

Disconnecting the trackpad connector

Step 4: Remove the Trackpad

Open your MacBook Pro and set it on a table. While holding the edge of the trackpad closest to the logic board with one hand, remove the four 1.2 mm Phillips screws highlighted in red.

Removing the trackpad screws

Step 5: Clean the Contact Switch

Using a small X-Acto knife or pin, carefully lift the tape. Peel it back to lift the top of the contact switch. Use a Q-tip with a small amount of Isopropyl Alcohol (91%) to wipe both the top and bottom of the contact.

Cleaning the contact switch

Step 6: Reassemble the Trackpad

Once you’ve cleaned the contact switch, reassemble the trackpad by reversing the steps above. Make sure to tighten the screws securely, but do not overtighten.

Reassembling the trackpad

Conclusion

And that’s it! With these steps, you should be able to repair your MacBook Pro’s trackpad and get it working like new again. If you’re not comfortable with this repair, or if you’re not sure what’s causing the problem, we recommend consulting a professional. At Salvation Repair, we offer a limited lifetime guarantee on all parts and labor, and we’d be happy to help you with your repair. Schedule a repair today!

Salvation Repair logo

Denim Jeans Inner Thigh Replacement Tutorial

Denim Jeans Inner Thigh Replacement: A DIY Repair Guide

Are you tired of throwing away your favorite pair of jeans because of a torn inner thigh? Look no further! This DIY repair guide will show you how to replace the inner thigh of your denim jeans, giving them a new lease on life.

Denim Jeans Inner Thigh Replacement

Step 1: Prepare Your Tools and Materials

To start this repair, you will need a few basic tools and materials. These include:

  • Fabric scissors
  • Embroidery hoop
  • Embroidery needle and floss
  • Denim swatch
  • New patch of denim

Tools and Materials

Step 2: Cut Out the Damaged Area

Use the embroidery hoop as a stencil to trace out the damaged area. Then, use fabric scissors to cut along the back panel of the jeans, following the line. Make sure to only cut the back panel, as cutting the front panel will create an unnecessary hole.

Cutting Out the Damaged Area

Step 3: Create the Patch

Place the cutouts in the denim swatch and trace a larger shape of the cutout. Use fabric scissors to cut out the patches. Then, center the old denim onto the new patch and trace vertical and horizontal lines on denim using a straight edge and some chalk.

Creating the Patch

Step 4: Attach the Patch

Pin the old denim in place and use an embroidery needle and embroidery floss to add stitches into the patch. Use a Straight Stitch (just up and down sewing) following the vertical and then horizontal lines. Then, use a Whip Stitch to attach the patch, repeating the process a second time.

Attaching the Patch

Step 5: Finish the Repair

Turn the jeans inside out and trim down the patch. Use a straight stitch to tighten up any loose spots. The style is meant to look rustic and DIY, so don’t worry if it’s not perfect.

Finishing the Repair

And that’s it! With these simple steps, you can replace the inner thigh of your denim jeans and give them a new lease on life. Remember to schedule a repair with Salvation Repair if you need any further assistance.

Schedule a repair

We offer a limited lifetime guarantee of all parts and labor, so you can trust that your repair will be done right. Contact us today to learn more!

How To Patch Holes In Bottoms With Wool

How to Patch a Hole in Jeans with Wool

Got a hole in your favorite jeans? Don’t worry, we’ve got you covered At Salvation Repair, we’re all about fixing things and making them good as new. In this tutorial, we’ll show you how to patch a hole in your jeans using wool. It’s a simple and effective way to extend the life of your jeans.

jeans with a hole

Before we start, make sure you have the following materials:

  • A piece of felt large enough to cover the hole
  • Thread
  • A needle
  • Wool
  • Soap
  • A laundry machine

Step 1: Cut a Piece of Felt

Cut a piece of felt large enough to cover the hole. Make sure it’s a bit bigger than the hole itself.

cutting felt

Step 2: Thread Your Needle

Insert thread through the needle hole. Make a loop at the end of the thread and pull the end of the thread through the loop to create a knot.

threading needle

Step 3: Pinch the Jean and Felt Together

Grab the end of the jean with your hand and pull it towards you, making it inside out. Place the felt on the hole and pinch the jean and felt together.

pinching jean and felt

Step 4: Stitch the Felt to the Jean

Insert the needle horizontally into the jean and edge of the felt. Pull the needle through until the knot touches the felt. Repeat this step until the border of the felt is stitched.

stitching felt to jean

Step 5: Add Wool to the Hole

Grab more than enough wool to cover the size of your hole, ensuring it is at least an inch thick. Rub the wool between your hands to make a ball.

adding wool to hole

Step 6: Stab the Wool onto the Foam Board

Place the wool on top of the hole and stab it through the jean and onto the foam board. Repeat this step until the wool is hardened.

stabbing wool onto foam board

Step 7: Wash and Dry Your Jeans

Rub some soap onto the wool to tangle the fibers. Place the jeans into the laundry machine and wash on cold. Air dry your jeans.

washing and drying jeans

Step 8: Enjoy Your Mended Jeans!

And that’s it You’ve successfully patched a hole in your jeans using wool. Wear your cute mended pants with pride!

mended jeans

At Salvation Repair, we’re committed to helping you fix your stuff and make it good as new. If you’re not comfortable with DIY repairs or need help with a more complex fix, schedule a repair with us today!

How To Fix Snagged Bottoms

How to Fix Snagged Jeans: A Step-by-Step Guide

Snagged jeans can be frustrating, but they don’t have to be the end of your favorite pair. With a few simple steps and some basic tools, you can fix those pesky snags and make your jeans look like new again. At Salvation Repair, we’re dedicated to helping you fix your stuff, and we’re excited to share this tutorial with you.

Snagged jeans

Step 1: Identify the Snag

Take a closer look at your jeans and identify the snag that you want to fix. Make sure you can see the loose threads and the area where the snag is located.

Identifying the snag

Step 2: Insert the Ballpoint Needle

Insert the sharp end of your ballpoint needle through the center of the snag. This will help you to carefully turn the jeans inside out without losing the placement of the needle.

Inserting the ballpoint needle

Step 3: Turn the Jeans Inside Out

Carefully turn the jeans inside out, making sure to keep the ballpoint needle in place. This will give you access to the loose threads and allow you to start repairing the snag.

Turning the jeans inside out

Step 4: Use the Tapestry Needle

Take your No. 18 tapestry needle and gently maneuver all of the loose strings from the snagged denim to the inside of the jeans. You will position your needle to pull the loose strings upward.

Using the tapestry needle

Step 5: Tie the Thread

String the No. 18 tapestry needle with your thread. Tie both ends of the thread to form a small, tight knot. Make another knot, this time pulling the thread slowly and tightly around the snag.

Tying the thread

Step 6: Secure the Knot

Get the knot as close as possible to the surface of the denim jean. Pull the knot as tight as possible. Use the scissors to trim the excess thread on both sides.

Securing the knot

Step 7: Apply Fabric Adhesive

Take a small amount of fabric adhesive, and rub it against the knot you made to secure the snagged denim. The adhesive will secure the loose strings inside the denim.

Applying fabric adhesive

Step 8: Allow the Adhesive to Dry

Allow the adhesive at least 20 minutes to dry. This will ensure that the knot is securely in place and the snag is fixed.

Allowing the adhesive to dry

Step 9: Turn the Jeans Right Side Out

Turn the jeans right side out, and your snag is fixed You should now have a pair of jeans that looks like new again.

Fixed snag

At Salvation Repair, we’re committed to helping you fix your stuff. If you’re not comfortable with this repair or if you have any other questions, feel free to schedule a repair with us. We offer a limited lifetime guarantee on all parts and labor, and we’re always here to help.

Jean Zipper Repair Tutorial

Jean Zipper Repair Tutorial: A Step-by-Step Guide

Is your favorite pair of jeans in need of a zipper repair? Don’t worry, we’ve got you covered At Salvation Repair, we offer a limited lifetime guarantee on all parts and labor, and our expert technicians are here to guide you through the process. In this tutorial, we’ll show you how to fix a broken zipper on your jeans.

Jean Zipper Repair Tutorial

Step 1: Prepare Your Zipper

Before you start the repair, make sure your zipper is in the upright position. If one of the zipper sides can be attached back on the tracks without any help, you can skip to Step 3. If not, don’t worry, we’ve got a solution for that too!

Zipper in Upright Position

Step 2: Use a Flathead Screwdriver to Open the Zipper

Take a flathead screwdriver and place it in between the zipper sides. Twist the screwdriver back and forth while holding the zipper steady. This will allow the zipper side to open wider, making it easier to attach to the zipper tracks.

Using a Flathead Screwdriver to Open the Zipper

Step 3: Attach the Zipper to the Tracks

Now that the zipper side is open, attach it to the zipper tracks. Use a hammer to help close the zipper side onto the track. Make sure the zipper is secure on the track by moving it up and down and tugging on it.

Attaching the Zipper to the Tracks

Step 4: Repeat the Process for the Other Side

Repeat Step 2 and Step 3 for the other side of the zipper. Make sure the tracks are even before hammering down the second side.

Repeating the Process for the Other Side

Step 5: Check the Zipper

After hammering the zipper, everything should be secure. Move the zipper up and down a few more times to ensure the tracks are even, connecting, and staying connected.

Checking the Zipper

And that’s it Your jean zipper should now be fixed. If you’re not comfortable with this repair or if you’re not sure about any of the steps, don’t hesitate to contact us at Salvation Repair. We offer free postage for mail-in repairs and on-site mobile repairs for local customers in Mississippi. Schedule a repair today and let our expert technicians take care of your broken zipper!

Salvation Repair Logo

🍪
Have a cookie! This site uses cookies to enhance your experience. Opt-Out Options.