Samsung Galaxy S10e Screen Replacement
Duration: 45 minutes
Steps: 34 Steps
This guide takes a bold step by removing the screen panel, all while keeping your original frame intact. Let's get started!
Ready to swap out that cracked screen on your Samsung Galaxy S10e? Here’s your game plan: you’ll pop off the back cover so you can unplug the screen from the motherboard. The process will break the screen panel, but your phone’s frame stays intact. The screen is made up of the top glass and the display underneath—while you’ll separate the glass from the panel during the repair, the old screen’s headed for retirement and won’t be making a comeback. If things get a bit wild, you can always schedule a repair.
Step 1

You can use a hair dryer, heat gun, or hot plate for some extra warmth, but remember to keep it cool—those OLED displays and internal batteries can be a bit sensitive to heat, and we definitely don't want to fry them!
Cracking open your phone means saying goodbye to those waterproof seals. If you want your phone to keep dodging water like a pro, grab some fresh adhesive before putting things back together. Otherwise, keep it high and dry if you’re skipping the adhesive swap.
Getting the phone warm enough can take a few rounds with the iOpener—don’t rush it! Stick to the iOpener instructions so you don’t accidentally turn your phone into a hot potato.
- Make sure your phone is powered all the way down before getting started—trust me, it’s less dramatic that way.
- Warm up your iOpener and give the right edge of the back cover a good two-minute spa treatment. This helps loosen up the sticky stuff holding everything together.
Tools Used

Step 2


The sticky stuff is spread out just like in the first picture, where you can see the inside of the cover after it's been taken off. Keep it smooth and steady!
- Next up, you'll be working your magic to slice through the sticky stuff holding the back cover in place.
- From the outside, aim for the highlighted zones—those are your adhesive targets.
- Pro tip: The right side, just below the Bixby button, has the skinniest layer of adhesive.
Step 3


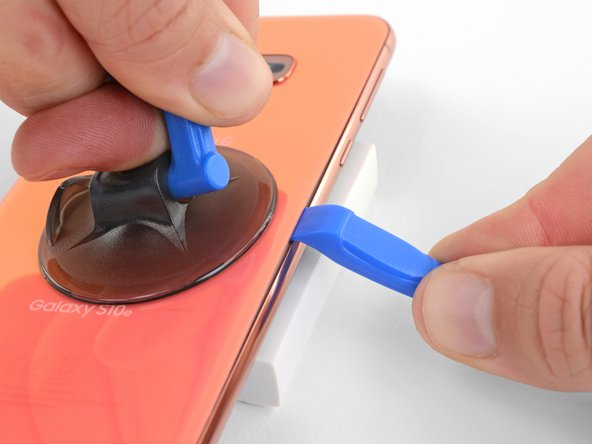
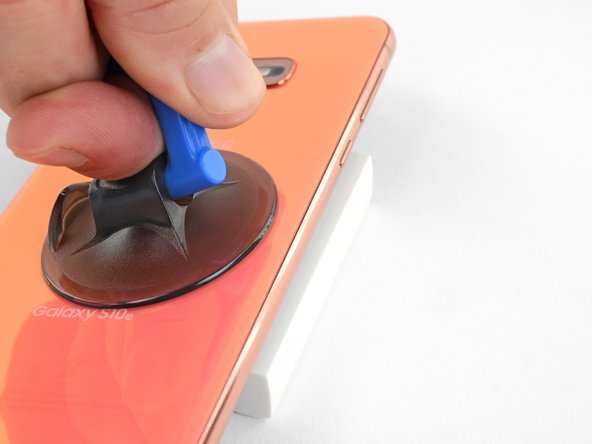
The suction cup isn’t a fan of curves, so stick it to a flatter spot on the glass—right near the edge just won’t cut it.
If your phone’s back cover is cracked, the suction cup might bail on you. Grab some strong tape to lift it up, or if you’re feeling crafty, superglue the suction cup to the glass and let it set before moving on.
- Stick that suction cup onto the back cover, right up near the heated edge—aim for just below the Bixby button, where the glue is at its weakest. You’ve got this!
Step 4

Prying too hard or using metal tools can crack the rear glass — gentle hands and plastic tools are the way to go. If you need help, you can always schedule a repair.
Using an iOpener? Heat it up just right—too much and you’ll have a gel pack explosion on your hands!
- Prop up the heated edge of your phone on something about half an inch (13 mm) thick. This gives you a nice angle to sneak in your opening tool.
- Use your suction cup to lift up the right edge of the back cover, just enough to create a little gap between the cover and the frame.
- Slide the edge of your opening tool into that gap like you’re slicing into a stubborn avocado.
- It might take some muscle! If it’s being difficult, reheat the area to loosen up the adhesive—don’t be shy, it cools off quickly and might need a second (or third) round.
Tools Used
Step 5


- Glide your opening tool along the right side of the phone to gently cut through the adhesive holding the back cover in place.
Step 6


- Gently insert an opening pick into the edge next to the opening tool. Keep the pick in place to stop the glue from sticking back together as you work.
Step 7

- Warm up the top edge of your phone with a heated iOpener for about two minutes. Let the heat work its magic before moving on.
Tools Used
Step 8


Since there's more glue hanging out in this area, you'll want to slide your pick a bit deeper into the phone to loosen things up.
- Slide an opening pick into the top right corner of your phone, then gently glide it around the corner and along the top edge. You're doing great!
- Keep that opening pick snugly in place to stop the adhesive from getting all clingy again. You're almost there!
Step 9

- Warm up the left edge of your phone for about two minutes using a heated iOpener—think of it as giving your device a quick spa treatment before you get hands-on.
Tools Used
Step 10


- Pop a new opening pick into the top left corner and slide it smoothly down the left side of your phone—like you’re buttering toast, but with more tech.
- Let that pick chill on the left edge so the sticky stuff doesn’t try to make a comeback.
Step 11

- Warm up that iOpener and give it a cozy two-minute hug on the bottom edge of your phone.
Tools Used
Step 12


The glue is working overtime in this spot, so slide your pick in a bit deeper to break it all loose.
- Grab an opening pick and slide it along the bottom edge of your phone, starting at one of the corners. This will loosen up that stubborn adhesive and get things moving.
Step 13

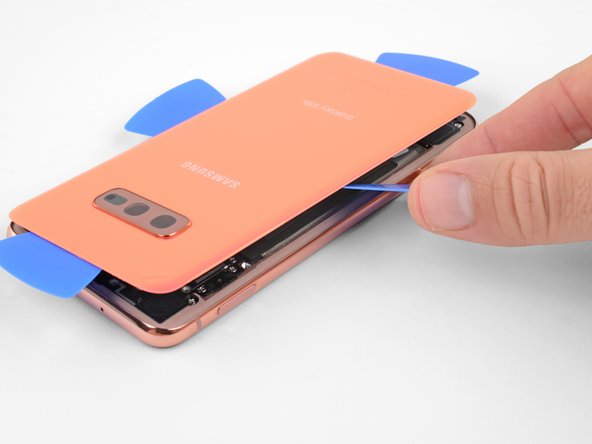

- Grab your trusty opening picks and gently get under the back cover – treat it like a secret treasure waiting to be uncovered!
- Carefully lift off the back cover once you're in – it's like peeling off a surprise layer of a gift!
- If you feel any stubborn resistance, pause for a moment and use an opening pick to slice through any leftover adhesive that's playing hard to get.
Step 14

- Get ready to rock this repair! Just follow along as you reinstall the back cover and swap out that adhesive like a pro.
If you're not keen on replacing the adhesive, you can pop the back cover back on without it—just make sure to scrape away any big blobs of old glue so it sits flush. Once it's in place, give it a good heat and press down firmly to help it stay put. Keep in mind, it won’t be waterproof anymore, but the leftover adhesive usually does a solid job of holding everything together. Before sealing up completely, turn on your device and test that everything works smoothly. If you need a hand or want peace of mind, you can always schedule a repair.
Step 15

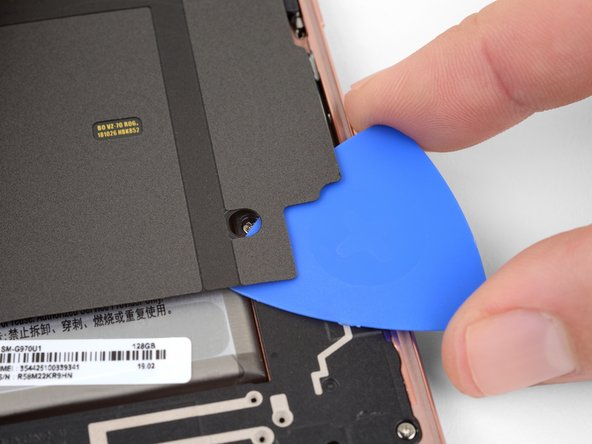
- Take out the eight 3.9 mm Phillips screws holding the upper midframe to your phone. Keep those screws somewhere safe—they love to wander off!
Step 16

- Gently slide an opening pick under the bottom right corner of the upper midframe and loosen up that sticky adhesive bonding it to the lower midframe. Take it slow—no need to rush this part!
Step 17


- Begin by slipping the tip of a spudger into the small notch on the right edge of the upper midframe’s plastic section, just near the Bixby button. Gently leverage the spudger to lift the midframe away from the phone chassis. If you need a hand, you can always schedule a repair.
Tools Used

Step 18

- Gently lift the midframe using the plastic section and carefully take it out of the phone. You've got this!
- When it's time to put it back together, start by inserting the top edge of the assembly into the phone's frame. Then, with a little love, press down on the rest of the assembly until it clicks into place. Easy peasy!
Step 19


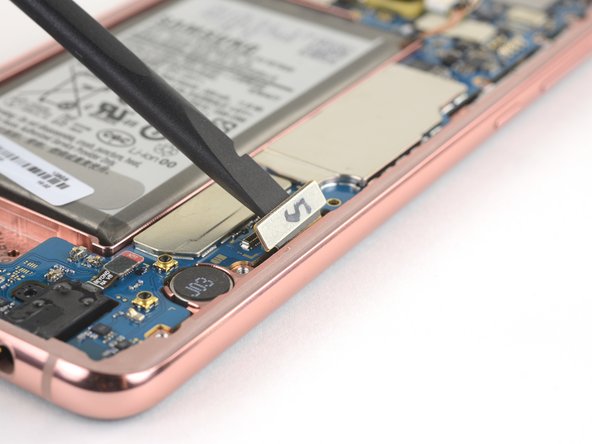
- Gently slide the flat end of a spudger under the battery connector and lift it straight up to disconnect it. Nice and easy—no rush!
Tools Used
Step 20

- Grab your Phillips driver and get ready to unscrew those seven 3.9mm screws holding the loudspeaker in place. You've got this!
Step 21


- Gently insert the tip of a spudger into the notch on the right side of the loudspeaker. Carefully pry upward with the spudger to lift and loosen the speaker.
Tools Used
Step 22


- Gently lift the loudspeaker out and set it aside.
- When putting things back together, press around the edges of the loudspeaker until it clicks into place.
Step 23

When reconnecting press connectors like this, line it up carefully and press down one side until it clicks, then do the same for the other. Skip pressing in the middle—those delicate pins don’t appreciate surprises. If it’s off-center, pins may bend and that’s a one-way ticket to permanent damage.
- Grab your trusty spudger and gently pop the screen connector free from its spot on the motherboard. Easy does it—no need to rush!
Tools Used
Step 24


While you're waiting, keep an eye on these seams:
You can use a hair dryer, heat gun, or hot plate, but remember to keep it cool! Overheating can be a bummer for your phone's internal battery, which doesn't like the heat.
- Flip your phone over so the screen is staring right back at you.
- Warm up the right edge of the display with a heated iOpener for about two minutes—think of it as a spa day for your phone.
- Look for the display seam—it's the one above that slim plastic bezel. That's your VIP entrance for prying the screen loose.
- Avoid the frame seam! It's hanging out below the bezel, and poking at it will only annoy the plastic. Stick to the display seam for smooth sailing.
Tools Used
Step 25


Slide the open pick into the seam just above the plastic bezel, and gently work it around. Keep it steady and confident—you're opening like a pro! If you hit a stubborn spot, take a breath, and try a different angle. Need a hand? You can always schedule a repair.
If your device is on the older side, this step might be a bit stubborn. Hit it with some extra heat and give it another go.
- Stick a suction cup onto the heated edge of the display—think of it as a little grabber for your screen.
- Gently pull up on that suction cup with steady, confident force to create a small gap.
- Slide the tip of an opening pick into the seam between the display and the frame—think of it as gently prying it open like a book.
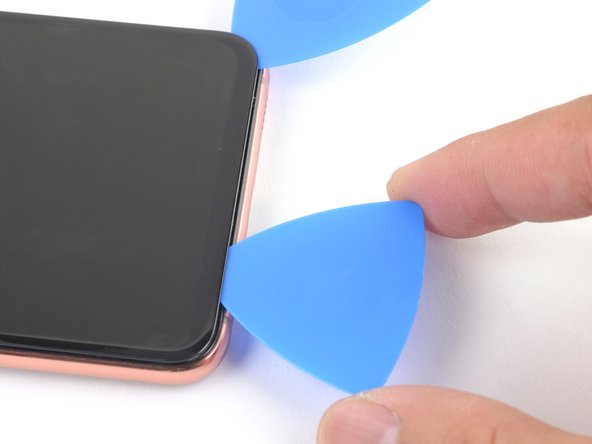
Step 26


- Gently glide that opening pick along the right edge to cut through the sticky stuff holding your device together.
- Once you're in there, keep the opening pick in the corner to make sure the adhesive doesn't seal up on you again.
Step 27

- Warm up the bottom edge of the display by applying a heated iOpener for about a minute. This helps loosen things up and makes the next steps smoother. If you need a hand, remember you can always schedule a repair.
Tools Used
Step 28

- Gently slide an opening pick along the bottom edge to cut through the adhesive, like you're opening a treasure chest. Keep the pick in the corner to prevent the adhesive from sealing back up, so your next move stays smooth. If you need a hand, you can always schedule a repair.
Step 29


- Work your magic again: heat and slice along each of the other display edges. Take it one side at a time, and keep that patience strong!
Step 30


The OLED panel and the glass panel are pretty much BFFs—they're sealed together tight. Once you let some air sneak in, the OLED won't be lighting up your day anymore.
- Gently lift the display glass and set it aside like royalty—your screen's grand exit is complete.
Step 31

- Warm up your iOpener and place it on the OLED panel for about a minute. This will help loosen the adhesive and make the next steps way smoother.
Tools Used
Step 32


- Gently lift the display panel from the right side and ease it away from the frame. Take your time and let it peel off like a sticker—nice and smooth!
Step 33

If you're running into issues, feel free to snip the display panel cable to help you get the display off. It's all about making the process smoother!
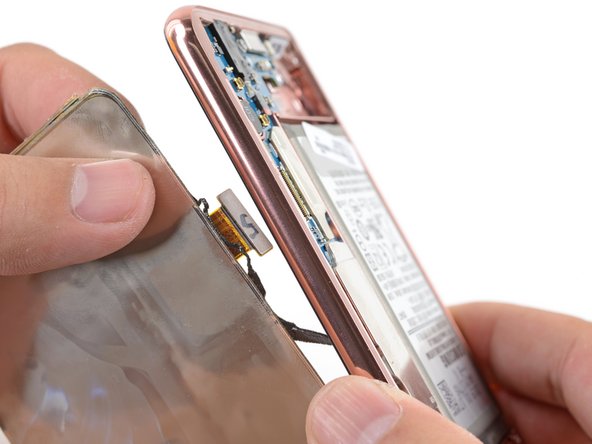
- Carefully guide the display panel connector through the frame like you’re threading a needle—steady hands win the day!
Step 34


- Ready to put everything back together? Just retrace your steps in reverse order.
- Got old parts or gadgets? Drop them off at an R2 or e-Stewards certified recycler and give them a second life.
- Once you’re done, check out our guide to make sure your repair is working smoothly.
- If your device is still being stubborn, try some basic troubleshooting, or chat with our Answers community for advice. If you need backup, you can always schedule a repair with us!