How to Replace iPhone 8 Battery Guide – Step-by-Step
Duration: 45 minutes
Steps: 38 Steps
Get ready to dive in and completely detach that display assembly!
While you could peel off those adhesive strips holding the battery right after you pop open the phone, we highly suggest tackling the Taptic Engine first. Trust us, it makes things smoother!
Ready to make your iPhone 8 feel like new? Dive into this guide to swap out your old battery and boost your phone’s energy! Got a puffy battery? Please handle with care. This guide will have you remove the entire display assembly to avoid any oops moments with those delicate display cables. But hey, if you’re feeling bold and confident in your skills, feel free to bypass the display removal steps—just be gentle with those cables. Before yanking out the battery, it’s smart to remove the Taptic Engine to avoid any adhesive mishaps. Remember, when pulling out the adhesive strips, keep it low and slow to avoid breakage. Once you’re done, don’t forget to give your new battery the VIP treatment: charge it up to 100%, let it chill for a couple more hours, then run it down completely before giving it another full charge to 100%. Enjoy your supercharged iPhone!
Step 1
– Unscrew the two 3.5 mm pentalobe screws chilling at the bottom edge of your iPhone.
Before you jump in, let’s make sure your iPhone’s battery is chilled out below 25%. Wouldn’t want to start a miniature fireworks show if it gets poked! Also, remember to switch off your iPhone before you dive into the disassembly adventure.
Heads up! Cracking open your iPhone’s display will throw its waterproof seals out of whack. Either have some new seals on standby before diving deeper, or keep your iPhone clear of splashes if you choose to rock it without a seal refresh.
Step 2
Be careful not to shove that opening pick too far! To keep your gadget safe and sound, just follow this step to mark your pick. It’s a simple trick to avoid any oops moments.
– Grab your marker and jazz up your opening pick by marking it 3 mm from the tip. It’s like giving your tool a mini makeover!
Step 3
The upcoming trio of steps will show off the Anti-Clamp, our nifty tool designed to simplify the opening process. If you’re not rocking the Anti-Clamp, just hop down three steps for another cool way to get the job done!
– Yank the blue handle back like you’re starting a lawn mower to free up those Anti-Clamp arms.
– Scooch those arms over to hug the left or right side of your iPhone—dealer’s choice!
– Park those suction cups down near the bottom of your iPhone, right above the home button. One on the front and one on the back, like a little sandwich.
– Give those cups a good squeeze to stick ’em right where you want them.
Step 4
– Yank the blue handle forward to snap the arms into place.
– Give that handle a good twist clockwise for a full spin or keep going till you feel the cups getting a good stretch.
– Keep those suction cups nice and lined up! If they start dancing out of place, just loosen them a tad and straighten them back up.
Step 5
– Warm up an iOpener and slide it through the arms of the Anti-Clamp.
– Fold the iOpener so it rests on the bottom edge of the iPhone.
– Allow a minute for the adhesive to loosen, creating a gap for entry.
– Insert an opening pick into the gap.
– Omit the following three steps.
Tools Used
Step 6
The upcoming trio of steps will guide you on how to unleash the screen with the help of a suction cup. Let’s get the screen popping off in style!
– Warming up the lower edge of your iPhone will make the adhesive less sticky and easier to handle. It’s like prepping it for a smoother makeover!
– Grab your hairdryer or heat up an iOpener and park it on the lower edge of your phone for about 90 seconds. This little spa treatment helps loosen up the glue so your opening move is a breeze.
Tools Used
Step 7
– Pop a suction cup onto the lower half of the front panel, just above the home button. It’s like giving your device a little window cleaning!
Step 8
The adhesive sealing the screen is extremely strong, so it might take considerable effort to initially pry it open. If you find it challenging to create an opening, reapply heat and gently rock the screen back and forth. This motion can help soften the adhesive, allowing you to insert your tool and start the separation.
– Give that suction cup a hearty tug to start a small party between the screen and the frame.
– Wedge an opening pick into that newfound party groove.
Step 9
Hold up, partner! Don’t get too zealous prying off the top edge of that display. It’s snugly secured by some sneaky plastic clips that might just snap if you give them a hard time.
– Glide the opening pick up the left side of your phone starting from the bottom and cruise towards those volume buttons and the silent switch, zapping through that sticky adhesive that’s keeping the display snug.
– Pause your pick when you hit the top left corner of the display. It’s a good spot to take a breather!
Step 10
Watch out! There are some sneaky cables hiding along the right edge of your iPhone. Let’s not poke around there with your pick—those cables are sensitive!
Step 11
– Pop your tool back in at the lower right corner of your iPhone. Glide it around the corner and shimmy up the right side to loosen that sticky adhesive.
Step 12
– Carefully tug upwards on the suction cup to nudge the display’s bottom edge upwards.
– Give the tiny knob on the suction cup a little pull to detach it from the front panel.
Step 13
– Wiggle an opening pick under the display at the top left corner and slide it across the top edge to free that stubborn adhesive.
Step 14
– Gently nudge the display assembly a tad downward (heading away from the top edge of the phone) to free those sneaky clips that are holding it to the rear case.
Step 16
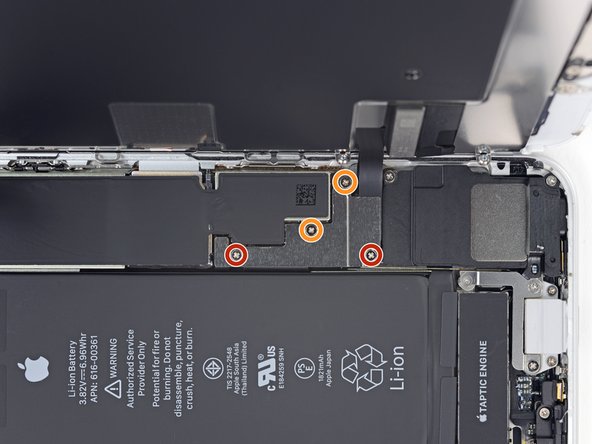
– Unscrew the four Phillips screws that are keeping the lower display cable bracket snug against the logic board. Remember, these screws are like snowflakes, each one is unique in length!
– Keep a sharp eye on those screws! Make sure each one goes back into its original home during reassembly. Mixing them up could spell disaster for your device.
– Lift off the bracket and set it aside. You’re doing great!
Step 17
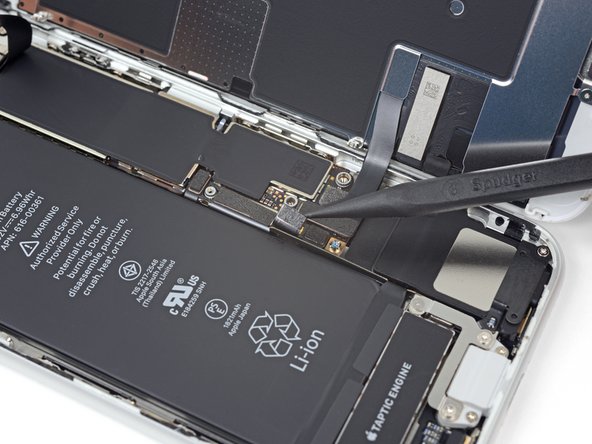
– Grab your spudger and gently pop the battery connector out of its home on the logic board.
– Give that battery connector cable a little bend away from the logic board to keep it from sneaking back and powering up the phone while you work.
Tools Used
Step 18
– Grab your spudger and gently nudge the lower display connector out of its cozy socket.
– When snapping the connectors back into place, start on one side with a satisfying click, then give the other side some love too. Remember, the middle is a no-push zone! Keep things aligned to avoid any connector catastrophes.
Tools Used
Step 20
– Unscrew the trio of 1.3 mm Phillips screws that are keeping the bracket snug over the front panel sensor assembly connector.
– Pop off the bracket and set it aside.
Step 23
– Alright, let’s dive into some screw action next to the Taptic Engine! You’re going to remove three screws:
– A tiny 1.3 mm Y000 screw, just a little guy
– A 2.7 mm Phillips screw, keepin’ it tight
– And a 2.9 mm Phillips screw, the big brother
Step 24
– Time to liberate that bracket! Go ahead and remove it.
Step 25
– Carefully wiggle an opening pick between the antenna flex cable and the speaker’s top edge.
Step 26
– Grab your spudger and gently lift the diversity antenna flex cable off the logic board with its point. It’s like coaxing a sleepy cat off your laptop—easy does it!
Tools Used
Step 27
– Tuck an opening pick under the antenna flex cable to keep the socket steady.
– Gently use the point of your spudger to lift and unplug the antenna flex cable from its home, while using the opening pick to keep the socket snug in place.
Tools Used
Step 28
– Time to part ways with the Wi-Fi diversity antenna. Just pop it out!
Step 29
– Unscrew the dynamic duo securing the Taptic Engine:
Step 31
– Grab your spudger and use its pointy end to lift and disconnect the Taptic Engine flex cable. You’re doing great!
Tools Used
Step 32
Hey there! Be cautious when you’re detaching the Taptic Engine flex cable—it might be sticking like best buddies with the antenna flex cable!
– Time to say goodbye to the Taptic Engine. Let’s get it out of there!
Step 33
Your iPhone’s battery is snugly held in place with four stretchy adhesive strips—two chillin’ at the top and two kickin’ it at the bottom.
– Each strip of sticky magic comes with a nifty black pull-tab. Just give it a light tug, and it’s like peeling a banana—easy and satisfying!
Step 35
Keep those adhesive strips smooth and flat while you work—it’s like handling a delicate pasta noodle that hates to be crinkled! Avoid any twists or kinks that might cause them to stick to themselves and snap.
Also, let’s not get pushy with the battery. Pressing down on it while pulling the strips creates drama points that could cause the adhesive to tear.
If a strip decides to break off and play hide and seek under the battery, and you can’t coax it out, just remove any remaining strips and move forward with the next steps as cheerily outlined below.
– Gently tug at one of the battery adhesive strips, pulling it towards the bottom of the iPhone. Keep it slow and steady, like you’re walking your pet snail!
– Keep a firm, continuous pull on the strip until it gracefully exits from between the battery and the rear case. Aim for the lowest angle possible to avoid hooking it on anything else inside your iPhone—think limbo dancer!
– Oops, did the adhesive strip snap? No panic! Just grab the remaining piece with your fingers or some blunt tweezers and keep on pulling. You’ve got this!
Tools Used
Step 36
If a sneaky adhesive strip decided to break off under the battery and stay behind, just roll with it and hit up the next step!
– Do the same dance and remove the last three sticky strips. Got ‘em all? Awesome, move past the next step like a boss!
Step 37
If any of those pesky adhesive strips snapped and left the battery glued to the rear case, just dribble a few drops of isopropyl alcohol (90% or higher) right under the battery near the stubborn strip(s). Give it a minute, then nudge that battery up gently.
Still stuck? No sweat! Warm up the rear case right behind the battery with an iOpener or give it a blast with a hair dryer to loosen that clingy adhesive.
Or, you can get crafty with a piece of strong string (like dental floss or a slice of thin guitar string) and sneak it under the battery to wiggle it free.
Tools Used
Step 38
– Pop out the battery from your iPhone with a touch of flair.
– Got a plastic sleeve on your new battery? Slide that off before you pop the battery in.
– If you spot any rogue alcohol solution hanging about, give it a wipe or let it air out before the new battery goes in.
– No sticky stuff on your new battery? Check out our guide on how to get those adhesive strips in place.
– After you’ve got everything back together, give your device a quick force restart to smooth out any potential hiccups.
– Connect the battery connector back to its socket on the logic board just temporarily to make sure everything lines up perfectly in its new home.


