iPod shuffle 3rd Generation Teardown
Duration: 45 minutes
Steps: 14 Steps
Got our hands on a shiny new 3rd Generation Shuffle and were curious about its insides. Let’s dive in and see what makes this little gadget tick!
Step 1


– Here’s the scoop: we’re celebrating the new Shuffle with a quick peek at what makes it special. We’ll keep you updated on Twitter as we discover neat things along the way. The box is small and lightweight—almost like a tiny treasure chest. Apple reports that the Shuffle has a true volume of 4,326 cubic millimeters and tips the scales at just 10.7 grams—about the weight of 286 MacBook Pros 17″. And hey, if you’re into fixing and upgrading, remember we also sell Mac and iPod parts. Need a hand? You can always schedule a repair if things get tricky.
Step 2

Compatibility can be a bit tricky with this iPod. We gave it a shot with a Shuffle 2nd Generation dock, but it wasn’t a perfect fit. Then, we tried the cable with the Shuffle 2nd Generation, and that didn’t quite work out either.
– What’s in the box:
– We gave it a quick test spin before cracking it open…
– The controls are less weird than we expected, but honestly, pressing real buttons is still more our vibe.
– iPod Shuffle
– Apple Earphones (with in-line remote)
– USB Cable
– Quick Start guide
Step 3

The Shuffle is pretty low-key – you won’t find any iPod or Shuffle labels on it. In fact, it’s the first iPod model that doesn’t have any branding on it.
– The usual suspects are here.
– Can you spot the Shuffle in this lineup?
Step 4


– When you hook up the shuffle to your computer, you’ll need to grab the voice-over feature through iTunes first. It’s a quick download, so no sweat.
– Good news: any regular headphones will let you jam out. The catch? Without Apple’s special headphone playback controls, you won’t be skipping tracks or cranking the volume up and down from your headphones.
– Apple’s headphone playback control gives you two buttons for volume and a center button for playback. Tap the center once to play or pause, twice to jump to the next track, or three times to go back.
Step 5


– Time to get things open… Apple has made their iPods a little tricky to crack open lately, and this iPod is no exception.
– First, we gently wedge a metal spudger into the gap between the rear cover and the rest of the shuffle.
– Once the spudger is in, it creates just enough space to slip in an iPod opening tool. Slide the tool along the gap to gently pop the left side of the rear cover loose.
– With one side of the cover off, it’s pretty easy to use the opening tool to release the right side as well.
Tools Used


Step 6

– We’ve got access. That wasn’t too complicated, though the shuffle might not be the fastest route for easy repairs.
While aluminum can sometimes be a bit bendable, the rear cover isn’t too tough to flex open. Just keep in mind, there’s a retaining tab at the top that keeps the cover in place. To get it off, start by gently prying the bottom edge of the rear cover away from the device first, then work your way up, being careful around that top tab. If you run into any snags, you can always schedule a repair for expert help.
Step 7

– Picture this: one chip, a battery, and just a few buttons and screens. Wild, right? The future is looking pretty sleek.
– Even cooler, both halves come in at just 5 grams each. That means the working half of the iPod only tips the scales about 10% more than a single sheet of printer paper. Light as a feather, but way more useful!
Step 8

Don’t let these pictures fool you, this iPod is very small.
– Grab your small Phillips screwdriver and remove the single screw here. No need to worry about identifying it – there’s just one. Easy peasy.
– We’ve had a lot of requests for more screw guides, but lucky for us, this iPod doesn’t need one. Just make sure you don’t drop that tiny screw, and everything will be smooth sailing.
Step 9


This iPod’s shape is a lot closer to the classic iPod Shuffle than the one that came right before it. It’s a familiar form that makes it easier to handle and identify.
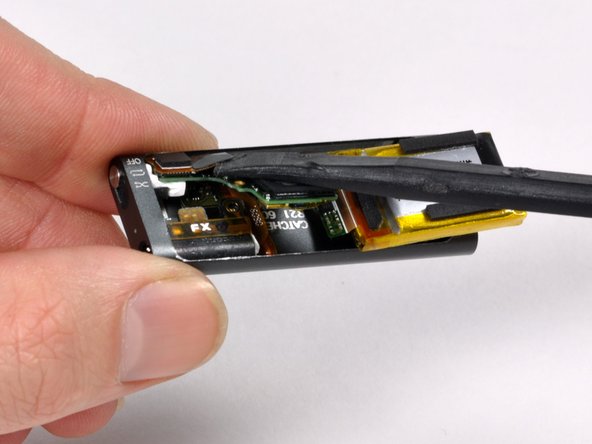
– Carefully disconnect the single connector that links the logic board and battery to the rest of the iPod’s internal components. This step is essential for safely removing the internals and getting ready for the next stage of your repair.
Step 10

– Now you’ve got three separate pieces. There aren’t a ton of parts packed into this iPod.
– No shocker here: the battery is soldered right onto the logic board, just like every other Shuffle. Apple does offer battery replacement, but $49 for a new battery when the whole iPod cost $79? Ouch.
Step 11


– The headphone jack and shuffle switch come out as one unit.
– The back of the casing is stamped 09/03/03. If that means March 3rd of 2009, then this Shuffle has been assembled for no more than nine days.
– In the third picture, you can see the white translucent piece of plastic to the left of the headphone jack. This serves to transmit the the LED status light to the outside of the iPod.
Step 12

– Apple claims this iPod’s battery lasts about 10 hours, which is a couple of hours shy of the previous Shuffle models. The 3.7-volt lithium-polymer battery packs a modest 0.27 watt-hours of energy. To figure out the capacity in amp-hours, remember: P (power) equals I (current in amps) times V (voltage). So, I equals P divided by V. Doing the math, you’ll find the capacity is roughly 0.073 amp-hours, or 73 mAh, which is pretty tiny for an iPod battery. If you need help, you can always schedule a repair.
Step 13


– Here’s the main event: the one-and-only chip! This little powerhouse is a multi-layer sandwich with the CPU, RAM, and 4GB of flash memory all bundled together. The markings say it was made in week 7 of 2009—that’s late February for anyone keeping score.
– Take a peek inside the earbud controls—yep, that’s what you’d expect. No wild surprises here, just the usual tech doing its thing.
Step 14

– Let’s take a look inside the shuffle.
– We came across a dime while exploring our shuffle.
– Just a heads-up: please don’t go opening your shuffle to hunt for a hidden dime. We promise, there was no treasure inside ours.