iPod Shuffle 1st Generation Teardown
Duration: 45 minutes
Steps: 18 Steps
Step 1

Before opening your iPod, ensure that the hold switch is in the locked position.


Step 3
– If you see a cap covering your USB port, now’s the time to take it off – carefully!
Step 4

– Heads up—this part can take a bit of time and a steady hand. Go slow and stay chill to avoid any surprise scratches to your iPod.
– Grab an Exacto knife and carefully work it between the two sections, tracing the seam where the USB port sits. You’ll need to glide the blade back and forth along this edge—think 20 to 30 passes—until the glue finally gives up. Patience wins the day here!
Step 5

– Carefully glide your knife around all four sides of the USB port, working your way through the glue. If things feel a bit stubborn, try gently rocking the knife side to side to help loosen things up.
Step 6

If the USB port doesn’t budge, double-check that all the glue around it is loosened up. Avoid yanking on the port itself—there’s a delicate ribbon cable hiding behind it that doesn’t appreciate surprises!
– Grab a spudger and gently pry on the headphone jack to loosen it up, then slide the USB port right out of its housing. Easy does it!
Tools Used
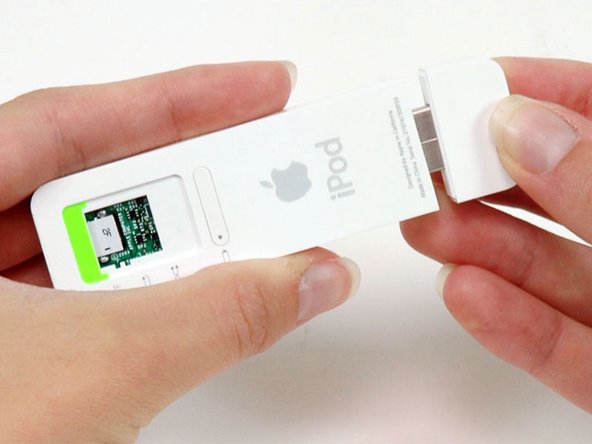
Step 7

– Once the USB port is free, gently slide it out of its housing. Be careful not to pull too hard—there’s still a ribbon cable attached to the logic board, and we don’t want to yank that!
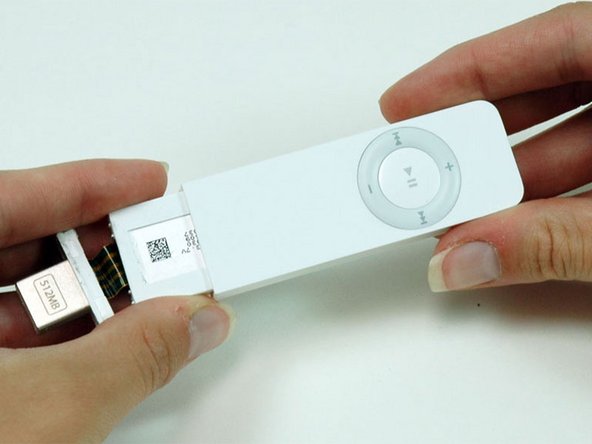
Step 8

– Gently slide the iPod out of its casing using a spudger, carefully pushing near the headphone jack on the logic board. If you need help at any point, you can always schedule a repair.
Tools Used
Step 9
If the battery indicator happens to fall out, don’t stress—just make sure to pop it back in before putting everything back together. Getting it back into place can be a little tricky, but with a bit of patience, you’ll slide it in from the end of the casing and get it settled right into its slot. It’s a bit like a puzzle piece, but with a little finesse, it’ll fit perfectly.
– Flip the iPod so that the click wheel is facing up. This way, the battery indicator won’t fall out on you!
– Gently slide the iPod out of its casing. You got this!
Step 10

– Grab a spudger and gently lift the black plastic latch holding the USB port ribbon. The latch will swing up 90 degrees, freeing the ribbon cable for the next step. If you need help, you can always schedule a repair.
Tools Used
Step 11

– Gently lift the yellow USB ribbon from the battery, peeling it away carefully. Take your time to avoid any damage and keep the process smooth sailing. If you need a hand along the way, you can always schedule a repair.
Step 12

– Gently slide the USB ribbon out of its connector—think of it as peeling away a sticker, but way more delicate.
– Lift the USB port along with the detached ribbon cable to free it from the iPod. Easy does it!
Step 13

– Gently tease the white plastic frame away to loosen the left side of the logic board. Give the board a little lift to keep it from slipping back into place. If you need help, you can always schedule a repair.
Step 14

– Now, do the same thing on the other side to release the logic board from the white plastic casing.
Step 15

– Gently lift the logic board to detach it from the memory board below. Don’t rush to take it out just yet – it’s still connected to the battery, so leave it in place for now.
Step 16

– Flip your iPod over and gently press the battery out through the opening in the case—it’s just held in place with some mild adhesive, nothing wild.
– Now, carefully lift both the battery and the logic board out of the iPod. Nice and steady wins the repair race!
Step 17

– Gently peel back the translucent tape holding the memory board to the edge of the white plastic frame. You only need to lift the tape on one side—the other side will come free as you lift the memory board out. If you need help, you can always schedule a repair.
Step 18

The white plastic frame isn’t the toughest thing out there, so take it easy. Don’t put too much pressure on the thin plastic arm when you’re peeling off the tape. A gentle touch will do the trick!
– Carefully lift the memory board out of its slot and peel away the tape on the other side of the frame to free it up. If you need help along the way, you can always schedule a repair.
Success!