DIY iPhone XS Battery Replacement Guide: Step-by-Step Tutorial
Duration: 45 minutes
Steps: 48 Steps
Hey there! Just a friendly reminder: if you run into any hiccups along the way, don’t hesitate to reach out for help. You can always schedule a repair!
Hey there! Did you know that your iPhone’s battery is designed to keep 80% of its capacity for about 500 charge cycles? That usually translates to around 18-24 months of dependable service for most folks. After that, you might find yourself charging your iPhone more often, and you might even get a little heads-up from iOS saying that your performance might take a hit (yep, slower phone vibes). But no worries! With this guide, you can swap out that tired battery and bring your iPhone back to its energetic self. If you notice your battery is swollen, take the right precautions before diving in. Just a heads-up: after your repair, your iPhone might throw a little tantrum with a warning about battery ‘genuineness,’ even if you used original Apple parts. If your iPhone’s working like a champ, you can totally ignore that message. For the best performance, once you’ve followed this guide, give your new battery a little love: charge it up to 100%, then keep it plugged in for at least two more hours. After that, use your iPhone until it decides to go to sleep due to low battery. Finally, charge it up uninterrupted to 100%. Happy repairing!
Step 1

Time to give your device a little breather before the repair party begins! Make sure that battery is feeling carefree below 25% juice. We wouldn’t want any accidental sparks flying around. Let’s keep things cool and safe on the repair dance floor!
Before you crack open that iPhone’s display, just a heads up – its waterproof seals are about to take a dive! Remember to have those replacement seals on standby before you dive into this step. Or if you prefer to live life on the edge, make sure to steer clear of any liquid adventures once your iPhone is back in action without new seals.
– First things first, let’s give your iPhone a little nap—power it off before we dive into the disassembly fun!
– Next up, grab your trusty pentalobe screwdriver and remove those two 6.9 mm-long screws chilling at the bottom edge of your iPhone.
Step 2


Be careful not to push your opening pick in too deep; it could cause some unwanted damage to your device. Take a moment to mark your pick—it’s a smart way to keep your gadget safe and sound!
– Grab your trusty opening pick and measure 3 mm from the tip. Give it a little mark with a permanent marker to guide your way!
Step 3


Remember to sport those stylish safety glasses to shield your peepers from any rogue glass bits during this nifty repair process.
If your iPhone’s screen has taken a hit, let’s keep things in check! Covering the glass with some tape will help minimize any further damage and keep you safe while you tackle the repair. You got this!
– Cover the iPhone’s screen with overlapping strips of clear packing tape, making sure the whole face is protected.
– If the suction cup isn’t sticking in the upcoming steps, try folding a sturdy piece of tape like duct tape into a handle and use it to lift the screen instead.
Step 4


In the next three steps, we’ll be showcasing the Anti-Clamp, our nifty little gadget that makes opening your device a breeze! If you’re not rocking the Anti-Clamp, no worries—just skip ahead three steps for another way to tackle this.
– Give that blue handle a little nudge backward to free the Anti-Clamp’s arms.
– Glide those arms gently over the left or right edge of your iPhone.
– Place those suction cups near the bottom edge of the iPhone–one in the front, one in the back.
– Gently squeeze the cups together to give that desired area some good ol’ suction.
Step 5


– Give that blue handle a little push forward to secure those arms like a pro!
– Now, twist that handle clockwise a full 360 degrees, or until the suction cups start to stretch out a bit.
– Keep an eye on those suction cups to make sure they’re staying in sync. If they start to drift apart, just loosen them up a tad and get those arms back in line.
Step 6


– Heat up the cool iOpener and slide it through the arms of the Anti-Clamp.
– Fold that snazzy iOpener so it rests on the bottom edge of your iPhone.
– Chill for a minute to let the adhesive do its thing and create an opening gap like magic.
– Gently slide an opening pick into the gap under the screen and the plastic bezel—avoid the screen itself, of course.
– Just breeze past the next three steps.
Tools Used

Step 7

Step 8


– To get started, gently position a single suction handle on the bottom edge of your phone, making sure to avoid the curved part of the glass. Need assistance? Don’t hesitate to schedule a repair.
Tools Used

Step 9


– Let’s get this party started! Pull up on the suction cup like a champ, applying steady pressure to create a tiny gap between the front panel and rear case.
– Time to slide in an opening pick into the gap beneath the screen and the plastic bezel. Remember, we’re aiming for the bezel, not the screen itself. You got this!
The adhesive keeping your display snug is super strong, so getting that first gap open requires some serious effort. If you’re struggling to create a gap, try applying a bit more heat and gently rocking the screen up and down. This will help loosen the adhesive until you can slide your tool in. Remember, if you need help, you can always schedule a repair!
Step 10


– Glide the opening pick around the lower left corner and up the left edge of the device, smoothly cutting through the adhesive that’s keeping the display in place.
Step 11

Careful! There are some delicate cables running along the right edge of your iPhone. Avoid inserting your pick in this area as it could cause damage to the cables.
Step 12


– Slide your pick back into the bottom edge of your iPhone and gently glide it up the right side to keep peeling away that adhesive like a pro!
Step 13


The upper part of the display is held in place by a combination of glue and clips. Keep that in mind as you tackle this repair!
– Gently slide the opening pick around the top corner of the display, while giving it a little tug or wiggle down towards the Lightning port. It’s like a gentle dance with your device!
– Once you’ve made it to the opposite corner, keep sliding that pick and slice through any remaining adhesive that’s holding the display in place. You’re doing great!
Step 14

– Give that little nub on the suction cup a gentle tug and watch it pop off the front panel like a champ!
Step 15


Hold your horses! Don’t go fully separating the display just yet—there are some delicate ribbon cables still hanging on to the iPhone’s logic board. Take it easy and be gentle!
– Gently lift the iPhone’s display up from the left side, just like flipping open a book—easy peasy!
– Prop the display up against something sturdy so it stays put while you work your magic on the phone.
– When it’s time to put things back together, set the display in place, align the clips along the top edge, and give that top edge a gentle press until it clicks into position. If it’s being a bit stubborn, take a moment to check those clips around the edge—make sure they’re not bent out of shape.
Step 16


– Unscrew five screws that are holding the logic board connector bracket in place. Here are the lengths you’ll need to keep in mind:
– As you tackle this repair, remember to keep an eye on each screw and return it to its original spot. This will help you avoid any mishaps with your iPhone!
Step 17

– Time to say goodbye to the bracket!
– Before you seal everything up, why not power on your iPhone and give it a quick test run? Check all the functions to make sure they’re working like a charm. Just remember to turn your iPhone off completely before diving back into the repair!
Step 18


– Grab a spudger or your trusty clean fingernail and gently lift the battery connector from its cozy spot on the logic board.
– Give the connector a little bend away from the logic board to keep it from accidentally reconnecting and powering up your phone while you work your magic.
Tools Used


Step 22


The front panel sensor assembly flex cable is gently stuck in place, so give it a little love as you work on it!
– Gently elevate the cable until the sticky bond loosens.

Step 24


– Time to show those screws who’s boss! Get ready to remove the five screws holding down the two brackets under the Taptic Engine and main speaker:
Step 25


The brackets are just hanging out, barely stuck in place!
– Carefully lift each bracket to free it, making sure to keep it straight and avoid any bends. You’ve got this!
Step 26


– Unscrew the 1.9 mm Phillips screw that’s holding the speaker connector cover in place. Let’s get that cover off and see what’s inside!
Step 27

– Pop off the speaker connector cover.


Step 29


When lifting the speaker, be gentle with that flex cable you just disconnected. If needed, give the cable a little bend toward the battery to make sure the speaker has all the wiggle room it needs to pop out smoothly.
– Slide a spudger under the cool top edge of the speaker, near the edge of the device’s hideout.
– Kindly lift and coax the top edge of the speaker up just a tad, you’re doing great!
– When it’s time to bring the speaker back home, keep an eye on the flex cable’s whereabouts, and ensure it doesn’t get stuck beneath the speaker.
Tools Used


Step 31


Step 32


– Time to part ways with the speaker. Do it gently, like saying goodbye to a friend you’ll see again soon.
– Peeling off the adhesive gasket? Easy! Use tweezers and a gentle touch to clear the way for a fresh start.
– Ready to seal the deal against water and dust? Meet your new best friend – the adhesive gasket. Clean the stage with isopropyl alcohol and a lint-free cloth or a coffee filter. So fresh, so clean.
– Now, the star of the show – your new adhesive gasket! Pop it on the speaker, place the speaker right back where it belongs, and voilà, you’re back in business!
Tools Used
Step 33


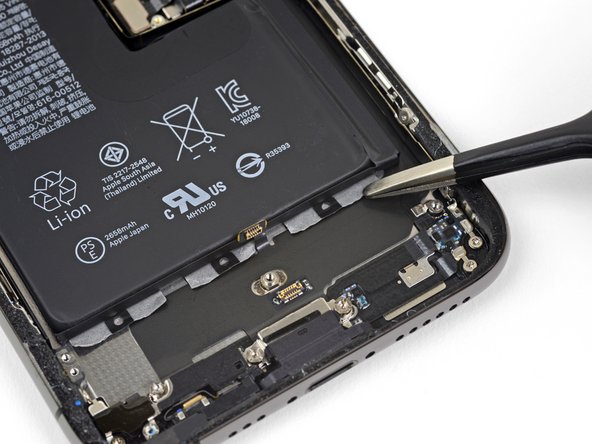
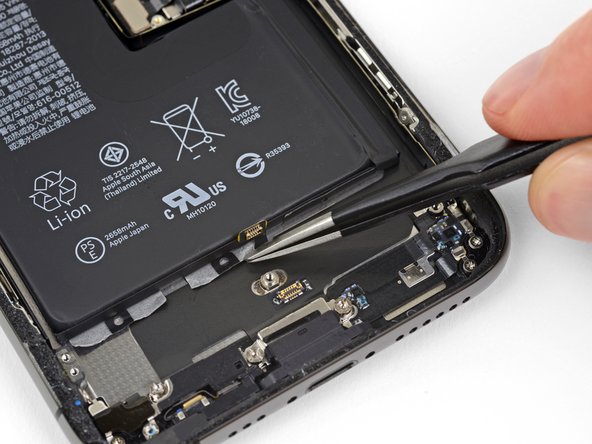
– Grab your trusty spudger and gently pry up the Taptic Engine flex cable from its socket. It’s like giving it a little lift to help it disconnect. You’re doing great!
Tools Used
Step 34


– Take out those two 1.9 mm Phillips screws that are holding the Taptic Engine in place. You’ve got this!
Step 35


– Grab hold of the plastic bumper strip and give it a gentle lift over the speaker connector.
Step 36

– Get ready to party by removing the lively Taptic Engine assembly.
Step 37

The battery is held in place on the back cover with four pieces of stretch-release adhesive—one cozying up under the top part of the battery, and three hanging out under the bottom part. If you need help, you can always schedule a repair!
Step 38


Avoid poking the battery with sharp objects. A battery that gets punctured might leak harmful substances or even ignite. Stay safe and keep it cool!
Every tab features a handy little loop right in the middle; if you’re struggling to get a grip on that tab, just slide a tool through the loop for some extra help.

Step 40


If the strips happen to break, no need to stress! They don’t always perform perfectly. Just keep on reading for some extra tips on how to tackle those pesky broken strips.
Get ready to become a battery wizard! In the upcoming steps, you’ll gently tug on each tab to stretch that sneaky adhesive hiding beneath the battery. This special stretch-release adhesive is pretty clever – it loses its stickiness when you pull it, making it super easy to lift the battery right out. You’re almost there, and if you need a hand, you can always schedule a repair.
– Want to boost your chances of nailing this? Here’s how to do it:
– In case a strip decides to play hide and seek under the battery and is being particularly stubborn, don’t sweat it! Just move on to the other strips and keep following the steps below.