How to Replace iPhone 11 Pro Max Earpiece Speaker & Sensor Assembly Tutorial
Duration: 45 minutes
Steps: 32 Steps
Hey there! Just a heads-up, this assembly is uniquely matched to your iPhone straight from the factory.
Dive into this guide to swap out the earpiece speaker and front sensor assembly on your iPhone 11 Pro Max. This nifty module, stuck to the display’s back, features a mic, ambient light sensor, flood illuminator, and proximity sensor. Remember, this little guy is matched to your iPhone straight from the factory, so when you’re swapping displays, be sure to move it over to your new screen. The flood illuminator is part of the Face ID security squad, and if it’s not sitting pretty or if you swap it out, Face ID will throw a fit. Handle with care to keep your phone’s face-recognition smile wide! If things get tricky, you can always schedule a repair.
Step 1


– Switch off your iPhone to get this party started safely!
– Unscrew the two 6.7 mm-long pentalobe screws chilling at the bottom edge of the iPhone.
Before diving in, let’s take it easy on the excitement and power down your iPhone battery to under 25%. A juiced-up lithium-ion battery could turn into a fireworks show if it gets punctured by mistake!
Cracking open your iPhone’s display will toss its waterproof seals out the window. Make sure you’ve got some fresh seals on hand before you dive deeper, or keep it dry if you plan on snapping it back together seal-free!
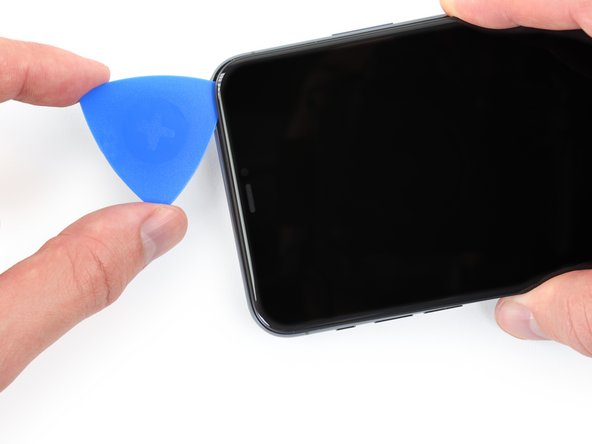
Step 2


Be careful not to shove your opening pick too deep or you might accidentally give your device a boo-boo. Mark your pick with this step to stay in the safe zone and keep your tech happy!
– Grab your measuring tape and pop a snazzy little mark at 3 mm from the tip of the opening pick with your trusty permanent marker.
Step 3


Pop on some safety shades to keep those peepers safe from any rogue glass during your repair adventure.
Got a spider-webbed screen? No worries! Slap some tape on that bad boy to keep the cracks from spreading and protect your digits while you work your repair magic.
– Stick some clear packing tape over your iPhone’s screen, covering it completely with overlapping strips. This makes it easier to work on.
– Having trouble getting the suction cup to stick? No sweat! Just grab some duct tape, make a loop with a handle, and use that to lift the screen.
Step 4


The next three steps showcase the Anti-Clamp, a nifty tool that we made to simplify the opening process. If the Anti-Clamp isn’t in your repair toolkit, skip ahead three steps for an alternative opening method. Need help? No worries! You can always schedule a repair.
– Give the blue handle a gentle tug back to release the Anti-Clamp’s arms.
– Slide those arms along the left or right edge of your iPhone with ease.
– Get those suction cups cozy near the bottom edge of your iPhone—one on the front and one on the back.
– Squeeze those cups together and let them do their magic by creating a nice suction on the spot.
Step 5


– Yank the blue handle towards you to secure those arms in place.
– Give the handle a hearty twist clockwise—keep going for a full 360 spin or until you feel the cups getting a good stretch.
– Keep those suction cups eyeing each other like best buds! If they start acting up and slipping, just ease up on the suction and line them up again.
Step 6


– Warm up an iOpener and sneak it through the arms of the Anti-Clamp like a ninja.
– Cozy the iOpener up on the bottom edge of your iPhone, like it’s tucking in for a nap.
– Chill for a minute to let the adhesive loosen up and start to let go.
– Wedge an opening pick into the gap beneath the screen and the plastic bezel. Remember, pick on the bezel, not the screen!
– Hop over the next three steps.
Tools Used

Step 7

Warming up the lower edge of your iPhone makes the adhesive less sticky and easier to manage, so opening up your device will be a breeze!
– Grab your hairdryer or heat gun, or get that iOpener ready, and give the lower edge of your iPhone a warm-up session for about a minute. This little heat wave helps loosen up the sticky adhesive underneath, making your next moves a bit smoother.
Tools Used
Step 8


– Pop a suction handle onto the lower end of your phone, steer clear of that tricky curved glass area!
Tools Used

Step 9


The adhesive that seals the display is quite strong, and it can be tough to create an initial opening due to its strength. If you find it difficult to start a gap, reapply heat and gently rock the screen up and down to soften the adhesive, which should help in creating a sufficient gap to insert your tool.
– Give that suction cup a hearty tug upwards to make a teeny-weeny gap between the front panel and the rear case. It’s like opening a portal!
– Now, sneak an opening pick into that gap you just created. It’s like inserting a sword into a stone!
Step 10


– Wiggle that opening pick around the bottom left curve and slide it up the left side of your iPhone, like you’re spreading butter on toast, cutting through that sticky adhesive that’s keeping the display snug.
Step 11

Watch out! There’s a sneaky cable hiding along the right edge of your iPhone. Let’s not poke our pick there, to keep that cable happy and intact!
Step 12


– Pop your pick back into action at the bottom edge of your iPhone, and shimmy it up the right side to keep on loosening that sticky adhesive.
Step 13


The top edge of the display is held in place with a combination of glue and clips, so get ready to tackle this with a bit of finesse!
– Time to give your phone a little wiggle! Gently tug the right side of the screen downwards towards the Lightning port. Easy does it!
– Get your pick ready for some action by sliding it into the top-right corner of your device. Let’s do this!


Step 16


Hold your horses! Don’t go fully separating the display just yet—there are some delicate ribbon cables still linking it to the iPhone’s logic board. Let’s take it slow and steady!
– Let’s kick things off by popping open the iPhone, just like opening a cool book from the left side.
– Now, give the display a little lean against something to keep it nicely propped up while you do your magic.
– When putting things back together, gently lay our display in its sweet spot, line up those clips along the top edge, and give that top edge a satisfying press before locking in the rest of the display. If it’s being a bit stubborn, check on those clips around the screen and make sure they’re not feeling bent out of shape.
Step 17


– Unscrew those two 1.3 mm long Y000 screws holding the battery cover bracket in place. You’ve got this!
– Now’s a perfect time to power up your iPhone and check that everything’s working like a charm before sealing the display back on. Just remember to turn your iPhone off completely before diving back into the repair!
Step 18

– Go ahead and give that bracket a little break and remove it.
Step 19


– Gently use a spudger or your clean fingernail to lift the battery connector up from its cozy spot on the logic board.
– Give the connector a little bend away from the logic board—this will help keep it from accidentally reconnecting and powering up your device while you’re working your magic.
Tools Used

Step 20


– Grab your trusty Y000 driver and get ready to tackle those six 1.3 mm screws holding the logic board cover bracket in place. You’ve got this!
Step 21

– Time to say goodbye to that bracket! Go ahead and remove it.


Step 24

– Alrighty, let’s tackle the display assembly. Feel free to take a break here if you’re feeling adventurous and want to swap out that watertight adhesive around the edges. Remember, if you need help, you can always schedule a repair!
Step 25


– Let’s get started by removing the three screws that hold the speaker/sensor assembly in place on the back of the display. Take your time and make sure they’re all out before moving on to the next step. If you need help, you can always schedule a repair
Step 26


The speaker is still connected by a super slim ribbon cable. Just a friendly reminder to handle it with care and avoid any unnecessary tugging or pulling. You’ve got this!
The earpiece speaker is gently stuck in place.
– Hey there, let’s give that speaker a little nudge using the point of a spudger.
– Now, let’s show that speaker some love by flipping it over – gently down and away from the top edge of the display.
Tools Used


Step 29


The sensor is still connected to the sensor assembly by a super slim flex cable. Just a friendly reminder to handle it with care and avoid putting any unnecessary strain on that little guy!
– Get those tweezers ready and give that ambient light sensor a little wiggle. Gently lift it from its snug notch in the display.
Tools Used

Step 30


– Great job on removing the entire ambient light sensor, just like in the first photo! Now, let’s keep the momentum going and move on to the next step below.
– If the white diffuser strip decided to stick around and is still lodged in the display, as shown in the second photo, gently coax it out from the top edge using a thin blade or pry tool. A little heat beforehand can make this task a breeze!
Step 31


Lift the speaker gently to give yourself some room to work, but remember to treat that slim flex cable with care—it’s delicate!
– Start from the left and glide an opening pick under the flex cable and beneath the proximity sensor + flood illuminator module. You’re doing great!
– Gently wiggle and lift that module to free it from its cozy spot in the front panel. Keep it up!
Step 32


– Let’s get started by removing the earpiece speaker and front sensor assembly – it’s the first step towards a good-as-new device.
– When you’re putting everything back together, take a moment to double-check the position of the black plastic module that holds these components in place:
– Make sure it’s positioned so that these parts aren’t blocked by any adhesive, and you’ll be golden. If you need help, you can always schedule a repair